31.8.10

Cheddar Crackers

I have always avoided baking crackers until a good friend told me how delicious they are to make. I always thought they would be far too much work to be worth the effort, but these beauties certainly are worth the (minimal) effort required! They are deliciously flavourful and highly addictive. When I make them now, I have to make a double batch and we still never have leftovers. They're great served with cream cheese and hot pepper jelly or even great to just eat on their own.

I seem to be posting a lot of Anna Olson recipes - guess it just goes to show that she writes great cookbooke with down to earth recipes! This recipe is from Anna Olson's cookbook Fresh. If you're looking for a great cookbook that uses local and fresh ingredients - this is the perfect cookbook for you. The book is broken down into seasonal sections based on what is in season locally. Deliciousness!

Enough about my hero Anna Olson's cookbooks - on to the recipe! :D

Cheddar Crackers
Recipe from Anna Olson - Fresh, p. 186
Ingredients:
  • 3/4 cup all-purpose flour
  • 1/4 cup cornmeal
  • 1 tbsp sesame seeds (more for sprinkling)
  • 1/4 tsp salt
  • 1/4 tsp baking powder
  • 1/4 cup unsalted butter, frozen
  • 1 cup coarsely grated old or extra-old cheddar
  • 1 egg whisked with 2 tbsp water, for brushing
  • coarse salt and sesame seeds for sprinkling

Method:

  1. In a food processor, pulse together the flour, cornmeal, sesame seeds, salt and baking powder. Use a box grater to grate in the butter and pulse until mixture is rough and crumbly. Add the cheddar cheese and 1/4 cup cold water and pulse until the water is incorporated, adding another 1 tbsp water if necessary to form a soft dough.
  2. On a lightly floured work surface, knead the dough 3 or 4 times to develop the gluten in the flour slightly and make the dough easier to work with. Form the dough into 2 balls and flatten them into disks and chill for at least an hour.
  3. Preheat the oven to 400F. Line baking tray with parchment paper.
  4. On a lightly floured surface, roll out the first piece of dough into a 12-inch square (about 2mm thick) and cut it into 2-inch squares. Place the squares on the prepared baking tray. Repeat with the 2nd piece of dough.
  5. Brush squares lightly with egg wash and prick them all over with a fork. Sprinkle them with salt and sesame seeds and bake until lightly browned, about 13 minutes. Cool before transferring them to a plate.
  6. Crackers can be stored for up to 5 days in an airtight container.


I'm not really very precise about size and shape of my crackers - however they turn out is just fine and they taste wonderful! If you want to be more precise, go right ahead - one of those culinary ruler/ straight edges works great and using a pizza cutter would be very quick and efficient for cutting the dough. The one important thing is to try to make sure they're approximately the same size so they cook evenly. Enjoy this recipe!


Happy Baking my Friends!

30.8.10

Pork Tenderloin with Maple Onion Cream

Looking for an easy yet impressive recipe for your next dinner party? Look no further! This recipe is always a hit. Its very rich, so definitely not something to eat all the time - break it out for special occasions! This pork tenderloin recipe is from one of my cookbooks by Anna Olson - In the Kitchen with Anna. Anna has a note regarding the technique for this recipe which I thought I would share with you:


"Dry rubs are a great way to add flavor to many cuts of meat at the last
minute. The spices toast and cook right into the meat, regardless of whether it
is prepared in a pan, on the grill or in the oven."


This recipe definitely imparts a lot of flavour with simple ingredients. Another key to successfully executing this recipe is making sure you are patient enough to carmelize your onions. Don't underestimate the time required for carmelizing onions because this develops the flavour base for your sauce and you don't want a harsh onion taste in the sauce - it needs to be the delicate, slightly sweet flavour of lightly carmelized onions. Do cook the onions for the full 20 minutes as stated in the recipe - its just the right amount of sweet.

Pork Tenderloin with Maple Onion Cream

Recipe from In the Kitchen with Anna by Anna Olson, p. 113

Ingredients:

  • 1 tbsp chopped fresh thyme
  • 1 tsp whole caraway seeds
  • 1/2 tsp fine salt, plus extra for seasoning
  • 1/4 tsp pepper, plus extra for seasoning
  • 3 tbsp olive oil, divided
  • 2 pork tenderloins, about 1 lb each
  • 1 tbsp butter
  • 2 cups sliced onion
  • 1/4 cup white wine
  • 3 tbsp maple syrup
  • 1 cup whipping cream

Method:

  1. Preheat the oven to 375F. In a small bowl stir the thyme, caraway seeds, salt, pepper and 1 tbsp olive oil to combine. Rub the spice mix all over the pork tenderloins. Place pork in an ungreased shallow baking dish and roast uncovered until it reaches an internal temperature of 165F (medium well). Remove pork from baking dish to rest for 10 minutes before slicing.
  2. While pork is roasting, prepare the sauce. Heat butter and remaining 2 tbsp of olive oil in a large saute pan over medium heat. Add the onions and cook, stirring often, until lightly carmelized, about 20 minutes. Add the wine and maple syrup and simmer until reduced by half - it will turn into a glaze. Add the cream and return to a simmer and season to taste.
  3. To serve, slice the pork tenderloin into 1/2 inch slices and spoon sauce over top. Enjoy!

29.8.10

Best Banana Bread Ever... Seriously!


It happens to everyone - you don't eat your bananas fast enough and suddenly you have a bunch of brown, soft bananas on your hands. You don't want to waste them, but they're not exactly fit to just eat on their own. Make banana bread with them! Its quick, easy, delicious and can be healthy too (depends on the recipe you use!). You can be in and out of your kitchen in one and a half hours - 15 minutes of prep time and about 1 hour and 5 minutes in the oven. Not a bad deal for such a delicious tasting treat!

My favorite banana bread recipe is from a cookbook I received as a wedding present called The Best Bake Sale Ever written by Barbara Grunes. Its such a great cookbook - every recipe I've baked out of it has been a success. Any way, on to the recipe!

Just-The-Best Banana Raisin Brean
Minimally Adapted from The Best Bake Sale Ever

Ingredients:

  • 1 3/4 cups flour
  • 1 tsp each baking powder and baking soda
  • 1/4 tsp salt
  • 1 tsp cinnamon
  • 6 tbsp unsalted butter, at room temperature (for a lower fat alternative, substitute 1/2 or all of the butter with unsweetened applesauce)
  • 1/2 cup granulated sugar
  • 1/2 cup brown sugar (to cut down on sugar, you can use splenda brown sugar in place of real brown sugar)
  • 1 egg
  • 1 cup mashed ripe bananas (3-4 very ripe bananas)
  • 1 cup chocolate chips (or omit this all together for plain banana bread)

Method:

  1. Preheat the oven to 350F. Spray or grease a non-stick loaf pan (9x5 inch).
  2. Mix flour, baking powder, baking soda, salt and cinnamon in a medium bowl. Set aside.
  3. In a large bowl, using an electric mixer, cream butter for a few minutes until it changes colour (should be almost white). Add sugars and continue beating until fluffy and light (about 2 minutes). Add the egg, beat well. Mix in the bananas. Beat in flour mixture. Add chocolate chips, raisins or whatever you're adding to the batter.
  4. Spoon the batter into the prepared pan. Bake in center of preheated oven for 1 hour and 5 minutes or until toothpick inserted into the center comes out clean.
  5. Cool bread in pan for 5 minutes, then invert onto wire rack and turn right side up to cool completely.

This banana bread recipe is great! Be sure to use really ripe bananas - they blend into the batter nicer and also impart more flavour into the bread. While you're at it - double the recipe and make two loafs - you'll eat it all, don't worry! Enjoy!

Happy Baking my Friends!

28.8.10

Dunham & Froese Estate Winery

Well, its the weekend again! What better topic to blog about on the weekend than visiting vineyards! I had the opportunity to visit Dunham & Froese Estate Winery in Oliver, BC on my vacation this year. The wine maker, Kirby Froese is distantly related to my dad, so it was really cool to check it out and sample some of the wines (never mind the fact that we came home with 1/2 a case of wine!!).

The wine we sampled was delicious, though the white wines were my favorite. The tasting room was attached to the Covert Farms restaurant and was very cute and cozy. The wine can be ordered online through their website or it can be found at a number of restaurants and boutique wine stores throughout the lower mainland and the Okanagan. They list all locations on their website. Here are a few photos from our visit. As I drink the bottles we purchased, I'll blog about them and share tasting notes with you (be forewarned - it could take a while - not because I'm a slow drinker, more due to the fact that we purchased a lot of wine on our last vacation!!!).

Check back tomorrow! I'll be posting a great recipe for banana bread. Until then, enjoy your weekend my friends. Cheers!

27.8.10

The Daring Bakers August 2010 Challenge - Baked Alaska

The August 2010 Daring Bakers’ challenge was hosted by Elissa of 17 and Baking. For the first time, The Daring Bakers partnered with Sugar High Fridays for a co-event and Elissa was the gracious hostess of both. Using the theme of beurre noisette, or browned butter, Elissa chose to challenge Daring Bakers to make a pound cake to be used in either a Baked Alaska or in Ice Cream Petit Fours. The sources for Elissa’s challenge were Gourmet magazine and David Lebovitz’s “The Perfect Scoop”.

I chose to make the Baked Alaska. I made vanilla bean ice cream, brown butter pound cake and a lovely meringue topping. As this was my first challenge I didn't deviate from the recipe, but it was delicious and challenging with many firsts for me! I've never browned butter before, but it was incredible and I will be doing so many time in the future I'm sure. The flavour is amazing! I've also never made ice cream before, particularly because I don't own an ice cream maker. But making mine without the ice cream maker turned out to be just fine - still delightfully creamy.

The first step is to make the ice cream. I used David Lebovitz's recipe from "The Perfect Scoop". Simple, but time consuming, because regular stirring is necessary for a creamy ice cream.

Vanilla Ice Cream
Makes about 1 quart (1l)

1 cup (250ml) whole milk
A pinch of salt
3/4 cup (150g) sugar
1 vanilla bean, split lengthwise
2 cups (500ml) heavy cream
5 large egg yolks
1 teaspoon pure vanilla extract

1. Heat the milk, salt, and sugar in a saucepan. Scrape the seeds from the vanilla bean into the milk with a paring knife, then add the bean pod to the milk. Cover, remove from heat, and infuse for one hour.
2. To make the ice cream, set up an ice bath by placing a 2-quart (2l) bowl in a larger bowl partially filled with ice and water. Set a strainer over the top of the smaller bowl and pour the cream into the bowl.
3. In a separate bowl, stir together the egg yolks. Rewarm the milk then gradually pour some of the milk into the yolks, whisking constantly as you pour. Scrape the warmed yolks and milk back into the saucepan.
4. Cook over low heat, stirring constantly and scraping the bottom with a heat-resistant spatula, until the custard thickens enough to coat the spatula.
5. Strain the custard into the heavy cream. Stir over the ice until cool, add the vanilla extract, then refrigerate to chill thoroughly. Preferably overnight.
6. Remove the vanilla bean and freeze the custard in your ice cream maker according to the manufacturer’s instructions. If you don't have an ice cream maker, follow instructions for freezing here.

Next up - brown the butter and make the brown butter pound cake. I know this cake sounds boring - just plain pound cake made with browned butter? Those were my initial thoughts, however, this cake is DIVINE!!! You must try it out. The nutty rich flavour of the browned butter makes the whole cake. It is moist and decadent and will go well with just about any flavours.

Brown Butter Pound Cake
  • 19 tablespoons (9.5 oz) (275g) unsalted (sweet) butter
  • 2 cups (200g) sifted cake flour (not self-rising; sift before measuring)
  • 1 teaspoon (5g) baking powder
  • 1/2 teaspoon (3g) salt
  • 1/2 cup (110g) packed light brown sugar
  • 1/3 (75g) cup granulated sugar
  • 4 large eggs
  • 1/2 teaspoon pure vanilla extract

1. Preheat the oven to 325°F/160°C and put a rack in the center. Butter and flour a 9”x9” (23cmx23cm) square pan.
2. Place the butter in a 10” (25cm) skillet over medium heat. Brown the butter until the milk solids are a dark chocolate brown and the butter smells nutty. (Don’t take your eyes off the butter in case it burns.) Pour into a shallow bowl and chill in the freezer until just congealed, 15-30 minutes.
3. Whisk together cake flour, baking powder, and salt.
4. Beat the brown butter, light brown sugar, and granulated sugar in an electric mixer until light and fluffy, about 2 minutes. Beat in the eggs one at a time, mixing well, and then the vanilla extract.
5. Stir in the flour mixture at low speed until just combined.
6. Scrape the batter into the greased and floured 9”x9” (23cmx23cm) square pan. Smooth the top with a rubber spatula and rap the pan on the counter. Bake until golden brown on top and when a toothpick inserted into the center comes out clean, about 25 minutes.
7. Cool in the pan 10 minutes. Run a knife along the edge and invert right-side-up onto a cooling rack to cool completely.

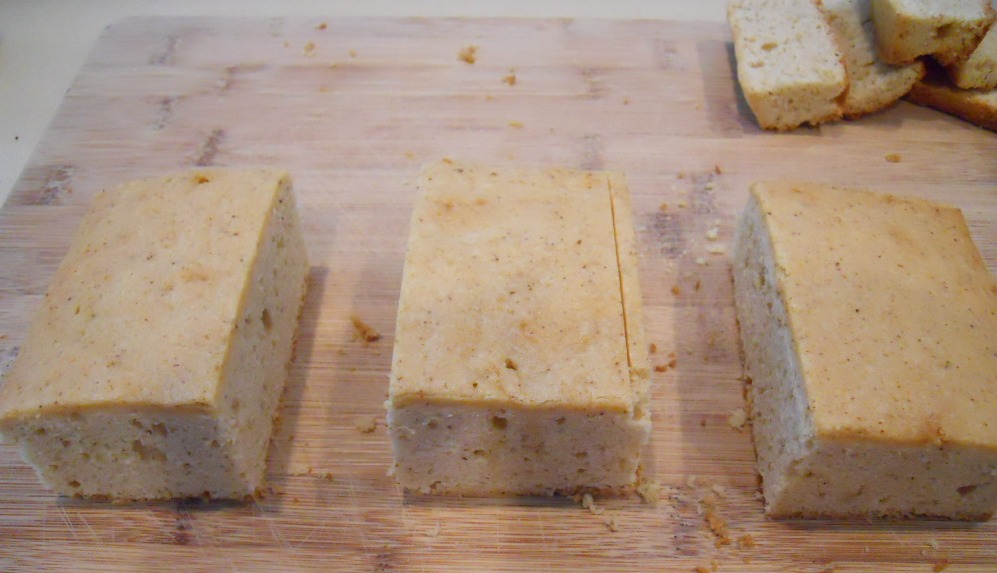
Cut your cake into the desired shapes for your baked alaska. I cut mine into simple rectangles, but you can do any shape. Or you can leave the cake whole or cut it into one big shape and make a family sized baked alaska! There are so many options. In hindsight, I would have cut my cake in half as the amount of cake in each baked alaska was a bit much, but they still tasted delicious.


Next step is to make the meringue. This was the easiest part of the entire challenge!
Meringue
  • 8 large egg whites
  • ½ teaspoon (3g) cream of tartar
  • ½ teaspoon (3g) salt
  • 1 cup (220g) sugar

Beat the egg whites, cream of tartar, and salt on high speed in an electric mixer until soft peaks form. Beat in the sugar gradually in a slow stream until stiff peaks form.


Now to assemble the baked alaska! I simply scooped out ice cream and formed it into a mound on top of each cake piece. But you can freeze the ice cream in any type of form (ie use tea cups) to top your shape of cake. Freeze for a while until this is solid enough to work with. Remember, you don't want it melting too much when you start putting the meringue on.
Pipe the meringue onto the ice cream and cake shapes (I just smoothed it on with a spatula). Either way looks beautiful! Freeze for one hour or up to one day.
Remove from the freezer and let soften on the counter for about 10 minutes so it's not rock hard when you serve it. Then burn the tips of the meringue with a blow torch (alternatively, just broil in the oven until golden brown). Serve to your impressed guests and be sure to enjoy one yourself!


This was definitely challenging for me, but such a great learning experience. And so rewarding to taste the end result! Happy Baking my Friends!

26.8.10

Summer Salad

I've been absent from the blogging world for a few days because I've been away with my hubby! We went on a little trip for our 3rd anniversary to the Oregon Coast. It was beautiful! Now back to reality.


I thought I would share with you a summery salad today. If you're dreading falls approach, make this salad - you'll definitely feel summery when you eat it! The salad is also very simple and great to make on a work night. You could even add some grilled chicken or fish and you would have a complete meal!


Ingredients:

  • Mixed greens
  • goat cheese, crumbled
  • toasted pecans (I tossed mine with some cayenne pepper, brown sugar and olive oil after I toasted them)
  • croutons
  • blueberries
  • balsamic vinaigrette

For the vinaigrette:

Mix together 1/2 cup olive oil, 2 tbsp balsamic vinegar or lemon juice, 1 small clove garlic, minced, 1 tbsp dijon mustard, 1/8 tsp salt, 1/8 tsp black pepper in a glass jar, blender or food processor. Shake, blend or whirl until smooth. Drizzle over your salad and enjoy!

Try this vinaigrette tonight on your salad! Its delicious and only takes a couple minutes to make. Enjoy!


Blueberry on FoodistaBlueberry

21.8.10

Lunch at Covert Farms - Oliver, BC

On my most recent visit to Oliver, BC, I had the privilege of visiting Covert Farms for lunch. Covert Farms is one of the leading producers of fruit and vegetables in the Okanagan and the best part - they're all organic. You can honestly taste a difference when you eat their produce and compare it to what you're used to purchasing in the grocery store. It is such a quaint little country market with a nice organic cafe where we had our lunch.

The market sells most any produce that is in season as well as local organic cheeses, and other delectable tidbits. The cafe is lovely! I took some photos of the menu - not sure how well you'll be able to read them, but I thought everything sounded delicious and was very reasonably priced. Even if you can't read the writing on the menu - the photos of the various menu items look delicious.

Each table on the outdoor patio had a lovely little flower arrangement on it. The flowers were freshly cut from the various flower gardens around the farms. While we were sitting on the patio enjoying our lunch, staff members from the cafe would come out and pick fresh herbs from the gardens surrounding the patio to be used on the lunch plates as garnishes or to include in the various dishes they served. Thats how fresh everything is!

Any way - on to the food! A couple of us ordered the pulled pork sandwich. It was delightful! The usual way to serve a pulled pork sandwich is with coleslaw on the side, but Covert Farms added their own twist and served the coleslaw on the sandwich. Absolutely a great twist on the original. The plates were very simply presented - big sandwich, fresh veggies and fruits from the farm and a lovely curried dip for the veggies. Perfect summer lunch!

The other dish we ordered was a roasted vegetable quiche. It was also lovely and presented the same way as the pulled pork sandwich. It was flavorful and didn't have the thick pastry crust that can make most quiche so high in fat and unhealthy.

A simple, healthy and tasty meal was had at Covert Farms. If you're ever in the Oliver area, I would encourage you to check out the farm market and perhaps dine in their cafe. You won't be disappointed!

20.8.10

Weekend Wines II

Well, it's Friday today! Happy Friday to all you working folk out there - your weekend officially starts soon. In light of the fact that it's Friday today, I thought I would share three wines with you that I've tasted over the past few weeks. If you're trying to decide upon a bottle of wine to buy for the weekend - check out the rest of my post!

While camping in Jasper my mom and I tried a lovely 2009 Rose wine from Oregon called Jose's Rose. I actually chose this wine because it was one of the only bottles of wine in the Jasper liquor store that wasn't $40-50 per bottle! This one was around $18 per bottle in Jasper and probably about 3-5 dollars cheaper in any other liquor store! It was deliciously refreshing with a nice balance flavours.

The wine maker's tasting notes include the following:

Jose’s Rose. exhibits hues of a late summer sunset. This wine tickles the
nose with aromas of strawberries, cream and fresh cut watermelon. The
light-bodied mouth feel is fresh and fruity with flavors of citrus fruit
balanced by refreshingly crisp mouthwatering acidity. The clean finish
lingers while putting a blissful smile on your face.

This was one of my favorites - I would encourage you to try it if you can find it in your liquor store!

Next up was a wine brought over by a friend of my husband (this guy always brings great wine!) - it was a 2009 Kerner from Oliver Twist Estate Winery. I had never heard of a Kerner wine before and upon looking it up found that it was a blend of riesling and trollinger. I found this wine to be a little on the off-dry side - almost too sweet for me, but the flavours were lovely as was the aroma. This would be an excellent wine for beginner wine drinkers who like the sweeter taste and aren't yet accustomed to a drier wine.

The wine maker's tasting notes on this one include the following:

"Appealing to both white and red wine drinkers. This Kerner has a delicate
aroma, offering notes of exotic fruits, white peach and a hint of spice, with a
fruity finish. Pairs brilliantly with turkey or ham or simply chilled and sipped
on its own."

Next up was a small bottle of 2008 Optima from Quails Gate in the Okanagan Valley. Be advised - this is a sweet syrupy dessert wine. I actually had to mix mine because it was far too sweet for me to drink even a small glass on its own (but keep in mind that I prefer a much drier wine than this!). What I found interesting about this wine were the wine makers notes. I'll quote them below so I don't get any of it wrong, but this wine was actually the result of a fungus finding its way onto the grapes before they were harvested, which caused the grapes to become raisin-like and produce a very sweet juice for fermentation. Interesting that something this sweet could be the result of a fungus that would normally be perceived as a very negative thing!

Here are the wine maker's notes:

"Picked late in October, the Totally Botrytis Affected (TBA) Optima grapes
were foot-stomped in the picking bins to get the juice in contact with the skins
prior to pressing. The soft skinned grapes were thoroughly dehydrated from the
‘Botrytis Cinerea’ mold. This harmless fungus pierces the grape skins causing
the fruit to shrink and raisin, leaving the remaining juice naturally sweet.
After gentle pressing and cold settling in the tank, the juice was racked then
fermented cold over a 10 day period. The 2008 season provided good natural
acidity to balance the residual sweetness in this unique dessert wine."

And the wine maker's tasting notes:

"This succulent dessert wine exhibits a very aromatic profile of baked pear,
fig, orange and ripe citrus with a classic honey bees wax note derived from the
Botrytis mold. The palate is full of candied sweetness balanced by firm natural
acidity. Enjoy with créme brulee or soft, flavoured cow’s milk cheese."

If you enjoy a sweet wine and are looking for something to accompany your dessert course, this would be an excellent wine to try out!

I hope this post helps you in your choices for wine this weekend! I absolutely loved how different tasting each of these bottles of wine were. There is something here for any wine drinker! Happy Friday - enjoy your weekend! Cheers!

19.8.10

The Waterfront Restaurant - Prince Rupert

For my parents' anniversary we took a little day trip to Prince Rupert. They needed to be out of the house so that they could be surprised later when they got home and what better way than a fun little day trip with some yummy food! We ate lunch at the Waterfront Restaurant on the Harbour at the Crest Hotel. The ambiance of the restaurant left something to be desired, but the stunning view definitely made up for the lack of ambiance! For a window seat though, reservations are pretty well mandatory - even if you're just going for a quick lunch!
The one thing that was unique and so cute was the fact that soft drinks were served out of the old fashioned glass bottles! I just had to take a picture because it's so rare to see them these days!

For a starter, my dad and I both ordered the clam chowder. It was deliciously creamy and very flavourful. Definitely a nice way to start the meal off.

When we go to Prince Rupert, the tradition is to order Fish and Chips. Why not when you're right on the ocean and can get some of the freshest and delicious fish around! So we all ordered the Fish and Chips. Below is a photo of my plate - it was beautifully presented and served with a lovely salad - topped with toasted pecans, fresh blueberries, dried cranberries and a mild vinnaigrette. Unfortunately though, the fish was overcooked and as a result was a little dry. The salad was delicious as was the tartar sauce served with the fish though.

Overall though it was a nice lunch and a great opportunity to visit with my parents and enjoy the view. Apparently brunch is absolutely delicious at the Waterfront Restaurant! Their specialty is a smoked salmon eggs benedict! I will definitely be returning to give that a try next time I'm up north visiting. Thanks Dad for a great lunch and an enjoyable trip to Prince Rupert! When we returned home, I officially shocked them with a surprise bbq party in their back yard with 50 of their closest friends and family members! A good time was had by all. Be sure to check back to my blog tomorrow - I'll have a couple of wine suggestions for your weekend (which is just around the corner)!! Happy Thursday!

18.8.10

White Chocolate Cheesecake

I made a white chocolate cheesecake for my parents' 30th anniversary party a few weeks ago. This is one of the best cheesecake recipes I've ever made and I get rave reviews from everyone who tries it - so if you're looking for a cheesecake recipe to impress - try this one out! You won't be disappointed and neither will the lucky people you share it with. :) The recipe is from my cookbook Everyday Favorites put out by Canadian Living. I served the white chocolate cheesecake with a kahlua chocolate drizzle and fresh raspberries. It was delicious!
White Chocolate Cheesecake
Recipe minimally adapted from Everyday Favorites - p. 330
Ingredients:
  • 60 vanilla wafers (Nilla Wafers)
  • 1/2 cup butter, melted
  • 8 oz white chocolate, coarsely chopped
  • 1 cup 10% cream
  • 3 pkg (250g each) cream cheese, softened
  • 1/4 cup granulated sugar
  • 4 eggs
  • 2 tsp vanilla
  • 2 tbsp kahlua
  • 1/3 cup chocolate syrup
  • fresh raspberries

Method:

  1. Grease bottom and side of 9-inch springform pan; line side with parchment paper. Set pan on large wide piece of heavy-duty foil; press foil against side of pan.
  2. In food processor, grind vanilla vafers to fine crumbs; add melted butter and blend until evenly moistened. Press onto bottom and 1/2 inch up side of prepared pan. Bake in centre of 350F oven until golden brown at edge, about 15 minutes. Let cool on rack.
  3. Meanwhile, in bowl over saucepan of hot (not boiling) water, melt white chocolate with cream; gently stir until smooth. Let cool to room temperature.
  4. In separate bowl, beat cream cheese with sugar until fluffy; beat in eggs, 1 at a time, beating well after each addition. Stir in white chocolate mixture and vanilla. Pour into cooled crust.
  5. Set pan in larger pan; pour in enough hot water to come 1 inch up sides. Bake in centre of 325F oven until centre is just set and edge is slightly puffed, about 1 hour and 15 minutes. Most cheesecakes are still slightly jiggly when done, but because of the white chocolate, this one is quite firm and is set. If jiggly, it is underdone. Remove from water bath and place on rack. Remove foil and let cool completely. Make-ahead: cover and refridgerate up to 2 days.
  6. Combine chocolate syrup and kahlua. Drizzle chocolate kahlua topping over cheesecake and garnish with fresh raspberries.


This cheesecake makes enough to feed 16 people, so don't make this if you're not feeding a few guests or you'll never be able to eat it all! Trust me! :D Hope you enjoy this recipe and have a chance to give it a try. Happy baking my friends!

17.8.10

Wine & Cheese Tasting Party

While I was up North visiting my family, a few of us decided to have a Wine & Cheese tasting party. Each couple brought two bottles of wine - one bottle they have tried and enjoyed and another bottle that they have never tried. Each couple also brought two types of cheeses to sample with the wine. What a fun party! Such an enjoyable and affordable way to taste multiple wines and cheeses and fit in some much needed socializing. I put out a fruit tray, cracker/ baguette tray, home made bruschetta, and a few yummy preserves including jalepeno & fig. The food complemented the wine really nicely.

Unfortunately I didn't have a lot of time to be taking photos, but I'll tell you about the ones I did take photos of! The first one was a Pinot Noir from Quail's Gate. None of us were overly impressed with the wine - it just seemed to taste a little flat. Here are the tasting notes though - I'll let you decide for yourself!

"This wine exhibits super bright fruit aromas of pure cherry with a gravelly
mineral complexity, savoury spice and lingering fragrance. The supple and
steadily balanced cherry flavour runs on layers of fine tannins, finishing long
and fresh. Tempt your taste buds and pair this wine with grilled salmon with
roasted beet salad or quail over pancetta and baby arugula.2005 Limited Release
Pinot Noir"

The one wine that we tried and LOVED was a 2009 Malbec from Argentina (Funky Llama). It was deliciously smooth and flavorful! There wasn't a lot of information online about this wine, but I found these notes on Examiner.com:

"The juice itself is in fact fit for a party – surely nothing too serious.
It'll go down easy with a burger or pizza on a Sunday night. You'll taste notes
of cherry, blackberry and pepper. While it's not overly complex, it's a decent
choice if you're going low-budget."

Overall the tasting party was a great success! It was an awesome chance to socialize with family and great friends. I would love to have another tasting party, but would likely make a few changes - first thing - I would coordinate on types of cheese that each couple brings - we ended up with a couple of duplicates on the more popular cheeses like the Applewood Smoked Cheddar. :) Yummy though! Do you ever host wine tasting parties? If so, do you have any rules or guidelines for making sure they're a success? Would love to hear what you think!

Thanks for stopping by!