27.11.11

Blog Love - Liebster Award!

Well I'm pretty excited! Teri from The Freshman Cook just awarded me the Liebster Blog award. It totally made my day to be recognized by a fellow food blogger - so thanks Teri. :)

A liebster blog award is given to an awesome blog that has under 200 followers, but is on their way to many more! Part of this award is to pass it on to five other up-and-coming bloggers that meet the above criteria. I'm passing it on to the following awesome bloggers:

  1. Lisa of Cook Lisa Cook
  2. Merut of Eating with my Mouth Open
  3. Shelley of C Mom Cook
  4. Marcellina of Marcellina in Cucina
  5. Ellie of The Bitchin' Kitchin'


I will contact each of you to let you know about your award! The rules are that you pass it along to your five favoriet , under 200 members blogs and mention and link back to the person who awarded the Liebster to you.

Congrats to all of you! Keep up the awesome blogging. :)

November 2011 Daring Bakers' Challenge - Filipino Desserts!

I'm on a roll! I've completed two Daring Bakers' Challenges in a row!! October's challenge was to make Povitica and it was a great success.  This month was equally successful! Catherine of Munchie Musings was our November Daring Bakers' host and she challenged us to make a traditional Filipino dessert - the delicious Sans Rival cake! And for those of us who wanted to try an additional Filipino dessert (not me unfortunately - ran out of time!!), Catherine also gave us a bonus recipe for Bibingka which comes from her friend Jun of Jun-Blog.

 This was probably the quickest and easiest DB challenge I've participated in since I started the club back in August of 2010. While being quite easy and not really containing any new techniques, the end result was absolutely delicious and I got to experience a desert from a different culture that I've never had the privilege of tasting. This is something that is easily achievable in an evening (I started at 8pm and finished by 10:30) and uses pretty basic ingredients.

The recipe has two main components: baked meringue layers (four of them), and french buttercream. Both recipes can be found on the Daring Kitchen website.  I'm not going to reproduce it here. I omitted the cocoa powder in the meringue and flavoured the buttercream with vanilla extract. If I was going to make this recipe again (which I think I will!!), I would bake the meringue layers longer to crisp them up a little bit more, but either way, this dessert was delish. Even hubby enjoyed it thoroughly!

 Hope you enjoy the pics!! I certainly had a great evening making this last night and I wasn't exhausted by the time I was finished, so that is always a nice thing. :)


 Thanks Catherine for a wonderful challenge! I love the creativity of this challenge and the lovely flavours. I have just one regret: that I didn't have time to try both dessert recipes!! Eventually I will get around to it. :)

Happy Baking my Friends!

24.11.11

Brown Butter Pumpkin Layer Cake

 I have a whole load of pumpkins in my house leftover from pumpkin carving. I was sitting there the other day trying to figure out what to do with them so they don't go to waste when I realized I had scanned a number of recipes from my friend D's scads of Fine Cooking magazines and surely one of them used pumpkin! Sure enough, I found this recipe for pumpkin brown butter cake. The recipe was a bit of work, but if you make it over a couple of days, it is definitely do-able without exhuasting yourself.

 I was so pleasantly surprised by the amazing flavour and texture of this cake. My friend D and her hubby dubbed this to be one of the best cakes they've ever eaten and I would have to agree!! Its awesome! Try it out this weekend - it is worth the effort. Make sure you have someone to share it with though - it makes a lot of cake!!
 Brown Butter Pumpkin Layer Cake
Recipe adapted from Fine Cooking Magazine (Finecooking.com)

Ingredients:
  •  1 1/2 cups pumpkin puree (buy it canned, or make your own)
  • 6 oz unsalted butter
  • 9 oz all purpose flour
  • 1 1/2 tsp baking soda
  • 1 1/2 tsp cinnamon
  • 1 tsp ground ginger
  • 3/4 tsp fine salt
  • 1/4 tsp ground cloves
  • 1 1/2 cups sugar
  • 2/3 cup firmly packed brown sugar
  • 2 large eggs
  • 1/3 cup buttermilk
  • 1 recipe of topping (see recipe below)
  • 1 recipe of frosting (see recipe below)
Method
  1. Preheat oven to 350F. Butter and flour two nine inch cake pans, line the bottoms with parchment paper and butter the parchment.
  2. Melt the butter in a medium saucepan over medium heat. Cook, swirling the pan occasionally until he butter turns a nutty golden-brown - watch it carefully to ensure it doesn't burn. Pour into a small bowl and let stand until cool but not set, about 15 minutes.
  3. In a medium bowl, whick the flour, baking soda, cinnamon, ginger, salt, and cloves. In a large bowl whisk 1 1/2 cups of pumpkin puree with the sugar and brown sugar, eggs, and buttermilk until very well blended. With a rubber spatula, stir in flour mixture until just combined. Gently whisk in the brown butter until completely incorporated. Divide mixture evenly among the pans.
  4. Bake the cakes until a tester inserted into the cakes comes out clean - about 28 minutes. Let the cakes cool in the pans for 10 minutes. Turn the cakes out onto cooling racks and peel parchment from the top. Allow to cool completely.
  5. To assemble the cake, put one cake layer on a cake plate. Spread 1/2 cup of the frosting onto the top of the cake layer and sprinkle with 1/2 cup of the topping. Top with the second cake layer. Frost the top and sides with the remaining frosting. Arrange the remaining topping in a ring 1 1/2 inches from the edge of the cake. Serve immediately, or cover and refrigerate for up to two days. Serve at room temperature.

 Nut Topping
Recipe adapted from Fine Cooking Magazine

Ingredients:
  • 1 1/2 tbsp unsalted butter
  • 1/3 cup sliced almonds
  • 1/3 cup walnuts
  • 1/2 cup roasted pepitas
  • 2 tbsp firmly packed brown sugar
  • 1/4 tsp fine salt
  • 1 1/2 tbsp crystallized ginger
Method:
  1. Melt the butter in a heavy 12 inch non-stick skillet over medium heat. Add nuts and pepitas and cook until nuts begin to brown and pepitas begin to pop. Sprinkle in brown sugar and salt and stir until the sugar melts and the nuts are glazed. Stir in the ginger. Remove from the heat and let the mixture cool in the skillet.

Frosting
Recipe adapted from Fine Cooking Magazine

Ingredients:
  • 4 oz unsalted butter
  • 8 oz cream cheese, room temperature
  • 1/4 cup firmly packed brown sugar
  • 5 oz icing sugar
Method:
  1. Melt butter in a small saucepan over medium heat. Cook, swirling the pan occasionally until the butter turns a nutty golden, brown. Pour into small bowl and let stand until the solids settle at the bottom of the bowl, about 5 minutes. Carefully transfer the bowl to the freezer and chill until firm, about 18 minutes. Using a spoon, carefully scrape butter from the bowl, leaving the browned solids at the bottom, discard the solids.
  2. Using an electric mixer, beat the butter and the cream cheese and brown sugar on medium high speed until light in colour and brown sugar has dissolved. Gradually beat in the icing sugar and continue beating until fluffy, 1-2 minutes. 
I've linked this post up with Whatcha Baking Wednesdays over at Cajun Sugar Pie. Head over there to check out some of the other yummy desserts fellow food bloggers baked up this week. :)

I hope you enjoy this cake like we did!

Happy Thanksgiving weekend to my American readers!! Hope you have a wonderful holiday weekend.

Happy Baking my Friends!

22.11.11

Mississippi Mud Pie

 Hi Friends! I am trying to be a better person and blog more frequently so you have some delicious recipes to check out on this site. While I'm not necessarily doing that much better, you have to admit, I've improved slightly! Last month I even participated in the Daring Bakers Challenge for the first time in a while annnddd I have plans to participate in this month's challenge too! Go me. Ohhhh and one more thing to brag about: I am trying to be more technologically savvy - I got Twitter! Can you believe it?? If you want to follow, click on the follow me button on the right hand side of my blog. :) Woot!

Its not that I haven't been cooking and baking - oh, that doesn't cease around here... I just haven't been photographing things and when I do get inspired to take photos, I take photos of the beginning stages and then get too lazy to take photos of the finished food. :( I'm not really quite sure why this lack of motivation is going on, but I am trying to improve!! So you can imagine my joy when I finally managed to photograph some finished baked goods: I made this Mississippi Mud Pie on Rememberance day weekend.  And I'm blogging about it already because I'm excited to share such a yummy recipe with you!

 Mississippi Mud Pie
Recipe adapted from Gordon Ramsay's World Kitchen

Ingredients:
  • 7 oz (200g) graham crackers
  • generous 1/4 cup lightly salted butter, diced
  • 2 oz (60g) good-quality semisweet chocolate, chopped (I just used chocolate chips)
  • 6.5 oz good-quality semisweet chocolate, chopped (I just used chocolate chips)
  • generous 3/4 cup butter, diced
  • 4 large eggs, lightly beaten
  • scant 1/2 cup dark brown sugar
  • scant 1/2 cup light brown sugar
  • generous 3/4 cup heavy cream
  • another generous 1/2 cup heavy cream, well chilled
  • 2-3 tbsp confectioners sugar, to taste
  • chocolate shavings, to finish
Method:
  1. To make the base, whirl the graham crackers in your food processor until they form fine crumbs. Tip into a large bowl. Melt the butter and chocolate together in a heatproof bowl in the microwave (my microwave has a melt chocolate and melt butter function that gently melts delicate things like chocolate and butter than burn easily, if your microwave doesn't have this function, do this in a double boiler on your stove). Mix until smooth, pour onto the graham crumbs and mix until evenly combined.
  2. Tip the crumb mixture into a 9" tart pan with a removable base. Using the back of a spoon, press the mixture into the base and up the sides of the pan to cover evenly. Chill to allow the base to firm up. Preheat oven to 350F.
  3. To make the filling, melt chocolate together in a heatproof bowl in your microwave (same story as in step 1). In the bowl of a stand mixer, beat the eggs and brown sugars together until thick and doubled in volume. Whisk in the cream, then fold through the melted chocolate and butter.
  4. Pour the mixture over the cookie base and bake in the oven for about 45 (mine too just over 50 minutes) minutes until just firm. Allow to cool completely before removing from the pan (if making in advance, remove from the fridge at least 30 minutes before serving as chocolate filling will set and harden when cold).
  5. For the topping, whip the cream with confectioners sugar and a splash of vanilla until it holds soft peaks. Spread over top of the cooled pie and finish with a scattering of chocolate shavings. Cut into slices and serve.
This is a fairly easy dessert to make and is great to serve to company because it tastes great and your guests will think you put in a load of effort. Maybe some of my American friends will incorporate this into their Thanksgiving menus this weekend??!!! :D

Happy Baking my Friends!

21.11.11

Jane's Yummy Bread for SRC!

 Secret Recipe Club... what a great thing! I look forward to it every month and agonize over what I'm going to make. This month I was assigned Jane - Adventures in Dinner. Jane is a teacher and a mother, so you know what that means! She is busy. I am always so amazed at women who have a family and a career and a blog... I mean, its enough work to have a family or a career, but do it all at once, then add a blog to that? Wow! I'm impressed!

And I was even more impressed as I started browsing through recipes on her blog. I settled on this amazing looking bread that Jane actually made because the rosemary potato loaf at the store cost almost $7 per loaf. I can't blame her for wanting to make her own - especially because this recipe was so delicious. Oh, and did I mention how easy it is? You can make this delicious bread in under two hours. Woot!

Rosemary Potato Bread
Recipe adapted from Jane - Adventures in Dinner

Ingredients:
  • 2 tbsp honey
  • 1 tbsp quick rise yeast
  • 2 cups warm water, divided
  • 3 tbsp olive oil
  • 4 1/2 cups flour
  • 3 tbsp chopped fresh rosemary
  • 1 small white potato, sliced paper thin
  • coarse salt
  • fresh ground black pepper
Method:
  1. Combine the honey, yeast and one cup of the warm water in a bowl. Mix together gently and let stand 5 minutes until the mixture is frothy. Add the olive oil and the remaining cup of warm water. Add the flour and mix together until dough comes together. Turn out onto a lightly floured surface and knead the dough together lightly until it comes together into a smooth ball. Cover with the mixing bowl and let rise for 30 minutes.
  2. Preheat the oven to 350F. Pat the dough out into a rectangle or whatever shape you like. Drizzle generously with additional olive oil and poke holes with your fingers at regular intervals in the dough - this will give the oil somewhere to settle while the dough proofs. Let the loaf proof for 15 minutes.
  3. Arrange the potato slices and then sprinkle with rosemary, salt and pepper (use lots of pepper). Bake in preheated oven for 30-35 minutes. Enjoy!
 Thanks Jane for such a delicious and easy recipe. It looks really impressive and would be great to serve to friends and family when they come to visit. It is a light, chewy bread with nice crispy edges. :) Do head over to Jane's blog and check it out when you have a minute - you're sure to find lots of inspiration on what to make for dinner and lots of interesting posts to read.

 If you're interested in joining the Secret Recipe Club, or just want more information, head on over to the great new SRC website and check it out. SRC is a great group of people who are passionate about cooking and baking and connecting with other bloggers. Thanks to Angie - Group C's fearless leader and organizer - I know its lots of work to get everything together and remind all of us delinquents who like to prepare and schedule their posts the night before they're due... Thanks for putting up with people like me Angie!!

Happy Baking my Friends! Hope to see you back soon. :)

15.11.11

How to... Make your own Pumpkin Puree!

 There are so many delicious recipes out there right now that call for pumpkin puree - not canned pumpkin pie filling, plain old pureed pumpkin. But given that I have four pumpkins sitting around my house from our pumpkin carving party that didn't get carved and I don't want them to go to waste... I didn't think it would be appropriate to head to the store and pick up cans of the processed stuff while I have the real thing at home! Surely there must be some way to turn those pumpkins into pumpkin puree that orignarily just comes out of a can? Google gave me a resounding YES, there is a way to make your own pumpkin puree and its *gasp* easy!! Do you have a sharp knife? An oven? A food processor? Then, you can make your own pumpkin puree - it will taste better than canned because it is fresh! Go ahead, give it a try!

(Note - using a jackolantern pumpkin that has been previously carved is dangerous - it has been exposed to all kinds of things, not to mention growth of bacteria from exposure to air, that can make you sick - use a whole pumpkin that has not been mutilated in any way!!).

 First off, use a sharp knife and chop that pumpkin in half - starting at the stem (see top picture). Then use a metal spoon and scrape out all the seeds and stringy insides until you're left with a nice, clean pumpkin. While you're cleaning out the pumpkin, preheat your oven to 350F.

Oil a shallow baking dish and then place the pumpkin halves, cut side down onto the well-oiled dish. Roast in your pre-heated oven for 45-60 minutes, or until tender when pierced with a knife. Note, that the baking time is for a pumpkin that weighs approximately 4lbs - if your pumpkin is larger, adjust the cooking time accordingly.

 One other thing to note - the larger the pumpkin, the more bitter the flesh - try to stick with smaller pumpkins for roasting - especially if you're going to use them in baked goods where their flavour will really shine!

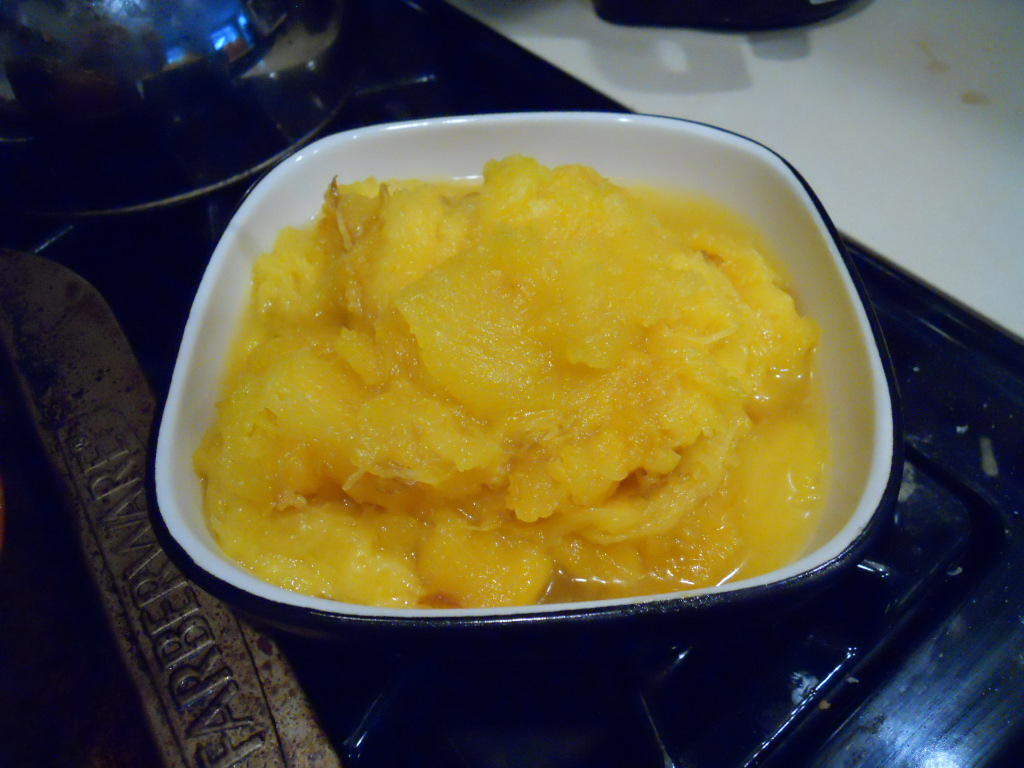
Let your roasted pumpkins cool until they are cool enough to handle. Then scrape out the soft flesh into a bowl and cool completely. Whirl in your food processor for a couple of minutes until it is smooth and silky. Refrigerate until ready to use (you can make this up to two days in advance if keeping in the fridge, or you can freeze it for longer periods).

 Use your delicious pumpkin puree in any baked goods that call for canned pumpkin puree - here are a few ideas from my blog archives:

Pumpkin Pie with Streusel Topping
Four Layer Pumpkin Cake
Pumpkin Doughnuts

You could also substitute this pumpkin puree for any roasted squash in soup recipes! It would sub in great for butternut or acorn squash.

Happy Cooking my Friends!

14.11.11

Lovely's Asian Style Risotto

 I LOVE risotto, but I've never really been brave enough to make it at home. Until now! My friend D shared this recipe with me and raved about it so much that I just had to give it a try. Now, I have a bit of an unhealthy obsession with this recipe (and any risotto for that matter), so I'm going to share this recipe with you and hope you get hooked too.

I've forgotten what cookbook this recipe is from, so if you are able to let me know and I will be sure to update the source to give credit where credit is due. In the mean time, I am going to share this recipe with you so you can get started on your own risotto craze.

Lovely's Asian Style Risotto with Chili Garlic Drizzle
Recipe adapted from unknown source

Chili-Garlic Drizzle Ingredients:
  • 2 tbsp sesame oil
  • 1 jalepeno, finely chopped and seeded
  • 1 garlic clove, minced
  • 4 tbsp soy sauce
  • 2 tbsp rice wine vinegar
  • 1 tbsp sugar
Method:
  1. Heat the sesame oil in a small pan and saute chili pepper and garlic until fragrant. Remove from heat and add the soy, vinegar and sugar. Set aside.

Risotto Ingredients:
  • 2 tbsp olive oil
  • 1 cup onions, chopped
  • 100 grams pancetta, diced
  • 1 cup white mushrooms, sliced
  • 1 cup arborio rice
  • 1 cup white wine
  • 3 cups hot chicken stock (more or less)
  • 3 tbsp butter
  • 1/2 cup fresh cilantro
  • 1 cup fresh spinach, loosly chopped
  • 1 cup freshly grated parmesan cheese
Method:
  1. In a large pot, saute onions in olive oil until softened. Add the pancetta and mushrooms and saute until lightly browned. Add the rice and keep stirring until golden.
  2. Add wine and keep simmering and stirring adding the hot stock 1/2 cup at a time until risotto is creamy and cooked al dente. Stir in butter.
  3. When you are ready to serve, add fresh cilantro, spinach, parmesan and mix together lightly. The spinach should be just wilted. Spoon your reserved chili-garlic drizzle over the plated risotto and serve sprinkled with more parmesan and cilantro.
Enjoy! This one is soooooo delicious. Plus, the chili garlic drizzle is good on pretty much anything, so give it a try. :)

Happy Cooking my Friends!

6.11.11

Bacon Wrapped Sirloin with Stuffed Twice Baked Potatoes!!

A few weeks ago a childhood friend who is also coincidentally also friends with my husband now was in town visiting. I promised to have him over for dinner, but couldn't decide what to make for him and my husband. What do you do when you are cooking for two men who just like meat? You omit the frilly greens and you get straight to the meat and potatoes! Of course, I couldn't make just plain old meat and potatoes, so I made Bacon-wrapped sirloin with super-stuffed potatoes with smoked gouda and caramelized mushrooms and onions? Sounds like a mouthful and it lived up to that expectation. I think both men were so excited by how delicious and "manly" this meal was that they were nearly at a loss for words other than the "mmmmm" sounds coming from their mouths.

I also loved this meal, though it is one to eat only occasionally because it is very high in fat and super rich tasting! I am very proud of myself  (excuse me while I pat myself on the back) because normally I make hubby cook the steak, but he deserved a night off to visit with his friend, so I emarked on pan searing the perfect steak and I nailed it! Hubby was also proud and there was a lot of compliments coming in my direction, which as those of you who also live with males will understand, this doesn't happen that often!! Needless to say, this was a winner! Try it out on your husband when you have a bit to-do list waiting for him and he will be more than happy to work on that list in exchange for this meal. :)
Bacon-Wrappe Sirloin with Stuffed Twice Baked Potatoes
Recipe adapted from Rachael Ray's 365: No Repeats

Ingredients:
  • 2 large russet potatoes, cleaned and pricked with a fork several times each
  • 4 tbsp extra-virgin olive oil
  • 1 lb button mushrooms, brushed clean and then thinly sliced
  • 1 small yellow onion, minced
  • 2 large garlic cloves, minced
  • 1 tbsp fresh thyme leaves, chopped
  • 4 slices thick, centre cut bacon
  • 4 steaks (aproximately 1 - 1 1/2 inches thick)
  • 1/4 cup sour cream
  • 1/3 lb smoked gouda cheese, shredded
Method:
  1. Preheat the broiler to high.
  2. Place potatoes on microwave safe plate and microwave on high for 15 minutes, or until tender. While potatoes are cooking, make the stuffing for the potatoes.
  3. Preheat a skillet over medium-high heat with about 2 tbsp of the olive oil. Add the mushrooms and cook until they start to brown (about 4-5 minutes). Add the onions, garlic, thyme, salt & pepper. Continue to cook, stirring frequently, for 4-5 minutes.
  4. While all that is working, line the bacon slices up on a meat-safe cutting board a few inches apart. Preheat a second skillet over high heat with the remaining 2 tbsp olive oil. Season the steaks with salt and pepper and center each steak on top of a bacon slices. Wrap the bacon over the steaks and place seam side down in the skillet. Cook for 2 minutes on each side. Reduce the heat to medium and cook, turning occasionally for another 6-10 minutes for medium rare to medium well.
  5. Once the potatoes are cooked, cut them in half lenth-wise and scoop out the flesh into a medium bowl, taking care not to rip the potato skins. Using a potato masher, smash the potato flesh together with the sour cream until combined. Stir in te sauteed mushrooms and onions, shredded gouda, salt and pepper. Mound the filling back into the skins and top with a little more gouda cheese. Place on a cookie sheet and transfer to the broiler, 6 inches from te heat, until lightly brown, 3-4 minutes.
  6. Serve bacon wrapped sirloin alongside the stuffed potatoes.

Sounds like a lot of work, but this recipe is out of one of Rachael Ray's 30 minute meals cookbooks, so it actually doesn't take that long! I think from start to finish I had this on the table within 40 minutes. :)

Happy Cooking my Friends! Hope you are managing to stay dry in this miserable weather. :) Time to break out the comfort food!

5.11.11

The Ultimate Spaghetti & Meatballs

 I've got to confess something to you - I'm not a big Spaghetti & Meatballs fan. I would much rather have a meat sauce than have a meatless sauce over meatballs and pasta... weird, I know! I think this recipe has changed my mind though! I would willingly choose this spaghetti & meatballs over spaghetti with meat sauce any day. Tyler Florence is good like that - his recipes are always so delicious that he will have you hooked on something you didn't even think you liked!

 If you want your socks knocked off, make the homemade pomodoro sauce too! Its worth the extra effort. But even if you don't have time and end up using a storebought sauce, this recipe is still going to leave you wanting more!


Pomodoro Sauce
Recipe adapted from Tyler's Ultimate cookbook

Ingredients:
  • 1/4 cup extra-virgin olive oil
  • 1 medium onion, chopped
  • 3 garlic cloves, minced
  • 2 - 28 oz cans whole, peeled tomatoes, with juices, crushed by hand
  • kosher salt & freshly grated black pepper
  • 1/4 cup fresh basil leaves, torn into pieces
Method:
  1. Heat the oil in a large saucepan over medium-low heat. Add the onion and garlic and cook until the vegetables are soft, 4-5 minutes. Carefully add the crushed tomatoes and their juices and season with salt and pepper.
  2. Cook until the sauce is thick, about 15 minutes. Taste and adjust the seasonings. Bring to a boil, stirring for a few minutes with a wooden spoon to further break up the tomatoes. Reduce the heat and let simmer for 20-30 minutes. Stir in the fresh basil and season again to taste.
 The Ultimate Spaghetti & Meatballs
Recipe adapted from Tyler's Ultimate cookbook

Ingredients:
  • kosher salt
  • extra-virgin olive oil
  • 1 onion, chopped
  • 2 garlic cloves, minced
  • 2 tablespoons finely chopped fresh flat-leaf parsley
  • 1 cup milk
  • 4 thick slices firm white bread, crusts removed and cut into cubes (about 2 cups)
  • 1 1/2 lbs ground beef
  • 1 1/2 lbs ground pork
  • 1 large egg
  • 1/2 cup freshly grated parmigiano-reggiano cheese, plus more for serving
  • freshly ground black pepper
  • 4 cups heated pomodoro sauce, or good quality jarred tomato sauce
  • 1/2 lb mozzarella cheese, grated
  • leaves from 3 fresh basil sprigs
  • 1 lb spaghetti
Method:
  1. Bring a big pot of salted water to a boil for the spaghetti.
  2. Heat 3 tbsp of oil in an ovenproof skillet over medium heat. Add the onion, garlic & parsley and cook until the vegetables are soft but not coloured, about 10 minutes. Take the pan off the heat and let cool.
  3. Pour the milk over the bread in a bowl and let it soak while the vegetables are cooling. Combine the meats in a large bowl. Add the egg and parmigiano and season generously with salt and pepper. Use your hands to squeeze the excess milk out of the bread then add the bread to the bowl along with the cooled onion mixture. Gently combine all the ingredients with your hands until just mixed together; don't overwork. Using 1/4 cup portions, shape into meatballs.
  4. Preheat the oven to 350F. Heat a 3-count of oil in the sillet over medium heat and brown the meatballs on all sides, about 10 minutes. Transfer them to a baking dish and spoon about half the tomato sauce over. Shower with the mozzarella and scatter half of the basil leaves on top; drizzle with olive oil. Put the meatballs in the oven and bake until they are cooked through - about 35-40 minutes.
  5. Meanwhile, cook the spaghetti in the boiling water until al dente, 8-9 minutes. Drain the pasta and put it onto a large serving platter. Ladle the rest of the sauce and toss. Spoon the meatballs onto the spaghetti and garnish with the rest of the basil leaves. Serve immediately along with extra cheese.
Tyler says the secret to these meatballs is soaking the bread in milk - I think he's right - it made for a really moist and tender meatball and tasted much more flavourful than other meatballs I've tasted. This meatball definitely didn't need sauce to taste delicious.

Happy Cooking my Friends!