27.4.11

The Daring Bakers Challenge - April 2011 - Maple Mousse in Bacon & Chocolate Bowls

Well, another month has passed by and its already time for another Daring Bakers' post. This month we weren't up to anything technically difficult, but it was definitely a crazy combination that not many of us had ever attempted (in a dessert any way). Funny how maple syrup with pancakes and bacon is a perfectly acceptable breakfast food (at least in Canada) yet the thought of pairing bacon with maple flavoured mousse seems weird! I will admit that the bacon bowls weren't my favorite and given the chance to make this dessert again I would likely opt for a different edible vessle, but I would definitely incorporate the bacon somehow. The rich saltiness of the bacon really offset the sweetness of the maple mousse.


The April 2011 challenge was hosted by Evelyne of the blog Cheap Ethnic Eatz. Evelyne chose to challenge everyone to make a maple mousse in an edible container. Prizes are being awarded for the most creative edible container and filling, so vote on your favorite from April 27th to May 27th at the Daring Kitchen.

This month's challenge was really interesting and really showed how creative the Daring Bakers' can be!


I'm not going to share the bacon bowl technique with you because I wasn't overly impressed with the results, but the maple mousse was so decadent that I must share that recipe. It is super easy so I hope if you're a maple lover that you will give it a try. Be sure to use a high quality maple syrup in this recipe (not maple-flavoured syrup) or you won't have the same results. One other tip I have for you: the maple mousse is very sweet so serve it in small portions (think shot glass size) with something a little salty on top. The salty will counter the sweet to balance out the flavours so perfectly.


Maple Mousse

Recipe provided by Evelyne of Cheap Ethnic Eatz


Ingredients:


  • 1 cup pure maple syrup

  • 4 large egg yolks

  • 1 pkg unflavoured gelatin

  • 1 1/2 cups whipping cream

Method:


  1. Bring maple syrup to a boil then remove from heat.

  2. In a large bowl whisk the egg yolks and pour a little of the maple syrup in while whisking to temper your egg yolks.

  3. Add warmed egg yolks to the maple syrup and mix well.

  4. Measure 1/4 cup of the whipping cream into a bowl and sprinkle with the gelatin. Let stand for 5 minutes to soften the gelatin. Place bowl in the microwave and microwave for 45 seconds (taking out and stirring every 10 seconds). Whisk the gelatin mixture into the maple syrup mixture and set aside.

  5. Whisk occasionally for approximately an hour until the mixture has the consistency of an unbeaten raw egg white.

  6. Whip the remaining cream. Stir 1/4 of the whipped cream into the maple syrup mixture. Fold in the remaining whipped cream and refrigerate for at least one hour.

  7. Remove from fridge and divide equally among any edible (or non edible) containers of your choice.


I can't believe thats another Daring Bakers challenge all finished! Thank you Evelyne for the very interesting and inspiring challenge! I can't wait to see what next month has in store. :)


25.4.11

Chocolate Almond Toffee Bars

What a great long weekend! So relaxing and enjoyable... almost a shame to have to head back to work tomorrow! Oh well, I must have this income to support my cooking and baking addiction... so its a vicious cycle! :)

I made these squares (along with the cupcakes in my last post) for my "treat day" at work. Treat day happens every Thursday in my office and staff members below manager level are required to bring in goodies for everyone. As this day is much anticipated each week, its important to have super yummy goodies for everyone to choose from. I added these Chocolate Almond Toffee Bars to the mix on my last treat day and my co-workers were really excited. I was repeatedly asked for the recipe and there were none left by lunch time.

To top off the great taste of these bars, they're so easy. You can literally whip them up in under 10 minutes (put them together while your oven preheats) and then throw them in the oven for half an hour. Check out the recipe below to see how easy these bars really are! The biggest challenge in making this dish is waiting for the bars to chill enough to slice them into nice squares!! :)

Chocolate Almond Toffee Bars
Recipe from In the Kitchen with Anna by Anna Olson

Ingredients:


  • 1 1/2 cups rolled oats

  • 1/2 cup graham cracker crumbs

  • 1/4 tsp fine salt

  • 1/2 cup unsalted butter, melted

  • 1 cup skor toffee bits

  • 1 cup chocolate chips

  • 1 cup sliced almonds

  • 1 can (300 ml) sweetened condensed milk

Method:


  1. Preheat the oven to 350F. Grease and line an 8-inch square pan with parchment paper so that the paper hangs over the sides of the pan.

  2. Stir the oats, graham cracker crumbs and salt in a bowl to combine, then stir in the melted butter. Pres the crumbly oat mixture into the bottom of the prepared pan. Sprinkle skor bits evenly on top, followed by chocolate chips and sliced almonds. Pour the sweetened condensed milk evenly over pan (it will sink in as it bakes) and bake for 30-40 minutes, or until the top is golden brown and the edges are bubbling. Cool to room temperature in the pan, then chill for at least 4 hours before slicing into bars.

  3. Store toffee bars in the refrigerator for up to one week. Makes about 25 squares.

Happy Easter to all of you & Happy Baking my Friends!

22.4.11

Amazing Cupcake Icing!

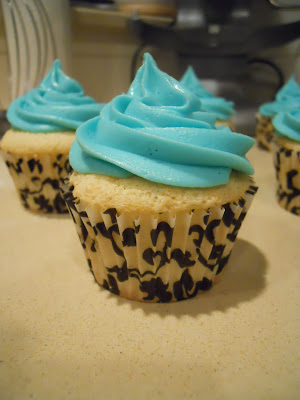
Woooohoooo for a long weekend! Happy Easter to all of you. I was looking back over my blog posts the last couple of weeks and realized I haven't posted many sweets lately... I've just been posting a lot about my cooking escapades. So here is a little something to satisfy your sweet tooth! I made these cute cupcakes a few weeks ago for treat day at our office. The cupcakes, particularly the icing on the cupcakes received rave reviews! I wasn't entirely impressed with the cupcakes themselves; I found them to be a little too eggy. But the icing, well that was another story! This is by far the most delicious and perfect tasting icing I've ever made. If you have a better recipe, please send it my way, but until then, I dub this the best icing recipe ever!


Very Vanilla Icing
Recipe adapted from Anna Olson's cookbook Fresh

Ingredients:


  • 4 oz cream cheese, at room temperature

  • 1/2 cup unsalted butter, at room temperature

  • 3 cups icing sugar, sifted

  • seeds from one vanilla bean

  • 1-2 tbsp milk

  • 2 tsp vanilla extract

Method:


  1. Using a stand mixer, beat the cream cheese and butter until fluffy and smooth. On low speed, add the icing sugar, 1 cup at a time until blended. Beat in the vanilla bean seeds and the vanilla extract. Add the milk one 1 tbsp at a time until the desired consistency is achieved. Colour the icing as desired. Ice cupcakes liberally wth icing.


I hope you enjoy this icing a lot! Tint it with an Easter hue and serve it to your guests this weekend (not by its self, though you will be tempted... please put it on some cupcakes!!).


Happy Baking my Friends!


21.4.11

Spinach & Date Filo Triangles

Whew! This week has just flown by! I just realized that its Thursday already and I haven't posted a single thing all week. Sorry about that! I've been meaning to share these with you for a while... they were so delicious that my sister and I ate the whole batch in one sitting. Add a little tzatziki for dipping and you're set with a lovely little appy that your guests will gobble up in no time! Be sure to double or triple the batch so you don't run out too fast.


Don't shy away from filo pastry either! Honestly, its easy to make these little packages (even if they don't turn out like perfect triangles). Follow the instructions and be sure to keep the filo you're not using under a damp tea towel to keep it moist and pliable. Filo has a bad reputation of being too finicky to work with, but I don't find it difficult at all! Brushing with butter can fix a multitude of sins! Plus, they look super ugly til you start baking them... once they start baking they take on a beautiful golden brown colour and puff up nicely. You won't regret making this appetizer!


Spinach & Date Filo Triangles

Recipe from Meals in Heels

Ingredients:


  • 100g english spinach leaves, rinsed

  • 2 tbsp olive oil

  • 1/2 onion, thinly sliced

  • 2 small garlic cloves, finely chopped

  • 1/2 tsp smoked sweet paprika

  • 1/4 tsp cumin seeds, toasted

  • 1 1/2 tbsp pine nuts, toasted (I omitted these because I didn't have them on hand, but I'm sure they add a delicious texture element to this recipe)

  • 3 medjool dates, pitted and chopped

  • 4 sheets filo pastry, each sheet halved widthways

  • 1 oz melted butter for brushing

Method:


  1. Preheat oven to 400F and place baking tray inside.

  2. Place the spinach and a pinch of salt in a large frying pan over high heat and cook, tossing frequently, for 1-2 minutes or until wilted. Drain, refresh in cold water and use your hands to squeeze out all the liquid. Chop and set aside.

  3. Heat the oil in frying pan over low heat. Add the onion, season with salt and pepper and cook for 10 minutes or until softened. Add the garlic and cook another 2-3 minutes. Add the spinach, paprika, cumin and cook for 5 minutes. Stir in the pine nuts and dates, then transfer to a bowl to cool.

  4. Take a sheet of filo pastry and brush with melted butter. Keep the remaining pastry covered with a slightly damp tea towel to prevent it from drying out. Slice the pastry into 3 long strips. Place a heaped teaspoon of the filling in the lower corner. Fold over and up and keep repeating until you have a tight little triangle. Brush again with butter and place, seam side down, on a baking tray. Repeat with the remaining pastry, butter and filling. Place on the preheated aking tray and bake for 15 minutes or until golden. There is no need to flip them. Serve warm.


I hope you enjoy these yummy little bites! They are so delicious I can't even begin to describe the amazing flavour to you. Do try out the recipe!!


Have a wonderful Easter weekend! I hope you get to enjoy some well deserved time off to hang out with friends and family. I'm sure if your family is anything like mine, that Easter weekend is always an excuse to get together and have a great time with each other eating great food and playing fun games.


Happy Cooking my Friends!

16.4.11

Chiang Mai Chicken Jungle Curry

Wow! It is such a beautiful day here! Definitely a nice break from the dreary overcast days that we have seen so much of here in the Southern part of British Columbia. If you saw my post from a couple days ago about the Green Beans with Sticky Soy Cashews, then you'll be excited for this post. This curry goes so great with those green beans, so be sure to make them together and you'll have a divine meal for you and your friends and family. Tomorrow is going to be a busy day for me! I've got to be up bright and early so that I can make the trek to downtown Vancouver to participate in the Vancouver Sun Run. The Sun Run is a 10km run that brings out over 50,000 participants! It is quite the event and the downtown area of Vancouver is just packed full of people of all kinds. Since tomorrow is going to be so busy, I got some cookies baked today and have planned out my dinner menu for tomorrow so that I don't have much left to do tomorrow other than enjoy the run. Hopefully this beautiful weather carries over to tomorrow so that the run will be enjoyable too. :) Do you have anything exciting planned for the remainder of this weekend? Chiang Mai Chicken Jungle Curry Adapted from Meals in Heels by Jennifer Joyce Ingredients:

  • 2 tsp vegetable oil

  • 2 tbsp soft brown sugar

  • 100g tamarind puree (or you can mix equal parts of lime juice, soy sauce and brown sugar and add that instead)

  • 2 tbsp fish sauce

  • zest and juice of two limes

  • 800 ml coconut milk

  • a coupe chicken breasts cut into bite size pieces

  • toasted coconut shavings and cilantro leaves for garnish

  • 2 long red chillies, seeds removed and chopped

  • 1 1/2 inch knob of ginger, peeled and chopped

  • 2 garlic cloves

  • 6 lemongrass stalks, bottom inner third only, finely chopped

  • 1 tbsp curry powder

  • one bunch cilantro stems roughly chopped

Method:


  1. Place the red chillies, ginger, garlic cloves, lemongrass stalks, curry powder and cilantro in a blender (or food processor) and blend until a smooth paste forms.

  2. Heat the oil in a large saucepan over medium heat. Add the chicken and brown until almost cooked through. Add the curry paste and stir continuously for 5 minutes or until fragrant. Add the sugar, tamarind, fish sauce, lime zest and juice and coconut milk and simmer for 15 minutes or until thickened. Scatter over the toasted coconut and cilantro leaves and serve with rice & Green Beans with Sticky Soy Cashews.
I hope you enjoy this one! It really was delicious and authentic tasting. I think the key is making the homemade curry paste. It was so aromatic and flavourful. The original recipe calls for using prawns instead of chicken, but hubby is allergic to prawns so I sadly could not make it with the prawns. :( Oh well, I usually get my fix of prawns when I go out of town! Feel free to try it with whichever you prefer. I'm sure with chicken or prawns it will turn out delicious.
Happy Cooking my Friends! I hope you enjoy this recipe & the rest of the weekend.

14.4.11

Green Beans with Sticky Soy Cashews

I don't know about you, but I am pretty excited for spring & summer to hurry up and get here. I love the long days, the warmer weather, the sunshine and best of all, I love the spring and summer produce that comes with the warm weather. Around here we also get some pretty awesome farmers markets such as the White Rock Farmers Market. It hasn't started up yet, but it will probably start up some time in May and I can't wait!! The reasons I'm talking about spring, summer and farmer's markets is because you can find such great produce there. My favorite produce is fresh green beans. I absolutely love them! You can do so many things with them and they never fail to make me feel like its spring/summer time. I made these green beans with sticky soy cashews a few weeks ago and they were absolutely delicious. You simply must try out the recipe! Green Beans with Sticky Soy Cashews Recipe from Meals in Heels by Jennifer Joyce

Ingredients:


  • 2 tsp sesame oil

  • 80g (1/2 cup) unsalted cashews, roasted

  • 1 tbsp honey

  • 1 tbsp soy sauce

  • 300 g green beans, trimmed

  • 1 tsp black or white sesame seeds, toasted

Method:


  1. Heat half of the oil in a frying pan over high heat. Add the cashews, honey and soy sauce and toss for 30 seconds or until all the liquid has evaporated. Pour onto a baking tray to cool.

  2. Bring a saucepan of salted water to a boil, add the green beans and cook for 2 minutes. Drain and refresh in cold water. Drain again and pat dry with a tea towel.

  3. Heat the remaining oil in a large frying pan over medium heat. Add the green beans and over medium heat. Add the green beans and warm through. Add the sesame seeds and sticky cashews to the pan and mix through.

Pretty easy huh? I hope you enjoy these as much as we did! Spring & Summer are just around the corner and these green beans will make you feel like they're already here.


Happy Cooking my Friends!

11.4.11

Pizza! Pizza! Pizza!!

I think homemade pizza is one of the most scrumptious and easy things to make! You can whip it up so fast especially when you're strategic about the order you do things in! For example, whip up the dough in your food processor, while the dough rises for about 15 minutes, mix up your pizza sauce (you wouldn't put processed store bought pizza sauce on a perfectly otherwise homemade pizza would you???), preheat your oven and prep your toppings. Bake your prepared pizza til golden and cooked through and voila, you have a home made pizza that tops anything you could order from your local pizza joint! And as a bonus this homemade pizza is way healthier for you because you control the type of flour you put in, the amount of fat, and the toppings (which by the way, there are practically a million and one choices for toppings so you can never get bored of this stuff!!).
Here is a great healthy recipe for pizza crust that will leave you wanting to make this all the time!


Spelt Pizza Crust

Recipe adapted from The Girl Can't Cook by Cinda Chavich
Ingredients:

  • 2 cups all purpose flour

  • 1 cup spelt flour

  • 2 tsp instant yeast

  • 1 tsp salt

  • 1 tbsp olive oil (you think Pizza Hut puts that little oil in their dough? think again - try about 2 cups of oil per pizza + toppings!!!)

  • 1 cup warm water

  • 1 tsp sugar

  • cornmeal for dusting

  • pizza stone is optional, but not required

Method:


  1. Place the flour, yeast and salt in the food processor and whirl briefly. Combine the olive oil, warm water, and sugar. With the machine running, slowly add the liquid, until the dough comes together in a ball. You can add up to 1/4 cup more warm water if you need - the dough should be smooth but soft.

  2. Set dough aside in a lightly oiled bowl and cover with plastic wrap while you whip up the sauce and prep the toppings.

  3. Preheat the oven to 500F.

  4. Divide dough in two and roll out each piece of dough to fit on your baking sheet. Top liberally with pizza sauce and desired toppings. Bake in preheated oven for 10-12 minutes until the bottoms of the pizzas are golden and crisp and the cheese is melted.

  5. Let pizza stand on cutting board for two minutes prior to cutting (if you can bear to wait that long!!!)

*note this amount of dough makes enough for two rectangular thin crust pizzas.


*Topping ideas: I did two pizzas - one had mexican salami, capacolla, mozzarella cheese, and roasted red pepper. The other had sauteed garlic mushrooms, roasted garlic pieces, goat cheese and roasted red pepper.

Happy Cooking my Friends!

9.4.11

The Best Hummus Ever & My New Facebook Fan Page

So as promised, I am going to post the best hummus recipe ever! This post is going to be a short one because I didn't take any photos of this hummus. However, I have an exciting announcement to add to this post, so hopefully it won't be too disappointing. :) First, we'll start with the hummus recipe! The recipe was given to me from a friend and every single time I make the recipe many people bombard me asking for the recipe. My friend found the recipe in her cookbook from Rebar Modern Food, a restaurant in Victoria, British Columbia. I haven't had a chance to go to the restaurant, but I have heard many good things about it. So if you're in the area, it would likely be a great place to try out. Bombay Hummus Adapted from Rebar Modern Food Cookbook Ingredients:

  • 1/4 cup oil

  • 1 inch piece of ginger, peeled and thinly sliced

  • 1 19oz can of chickpeas, rinsed and drained

  • 1/4 cup cashews, roasted

  • juice of 1 lime

  • 2 garlic coves

  • 1 tsp salt

  • 1 tsp cumin

  • 1 tsp coriander

  • 1/2 tsp cracked pepper

  • 1/4 tsp of cayenne (this make it pretty spicy - I usually use about 1/2 that amount)

  • pinch turmeric

  • pinch cinnamon

  • 2 tbsp chopped cilantro (I probably use closer to 1/4 cup because I LOVE cilantro, but go with what you like!!)

  • 2 tbsp chopped fresh mint
Method:

  1. Gently heat oil and ginger in a small pan. Let the ginger sizzle, but not brown. After 10 minutes, remove from heat and set aside to cool.

  2. Combine the ginger, oil, garlic, cashews, cilantro and mint in a food processor. Whirl until moderately smooth. Then add the juice of the lime and whirl until smooth and creamy. This may take a few minutes.

  3. Add the rest of the ingredients and whirl until mixture has reached desired smoothness. You may need to add more oil or water to the mixture to get it really smooth. Season to taste if additional seasoning is desired.
Now for my exciting announcement which really isn't all that exciting, but I'm excited about it!! I have a brand new Facebook Fan page for my blog. :) You will receive notifications when I post new recipes on my blog and check out some photos before they're posted to my blog. You can also provide me with suggestions and feedback about my blog and have some say in what I write about! So please check out my fan page here and become a fan!

Happy Cooking my Friends!

7.4.11

Oven-Fried Cod & Crispy Smashed Potatoes

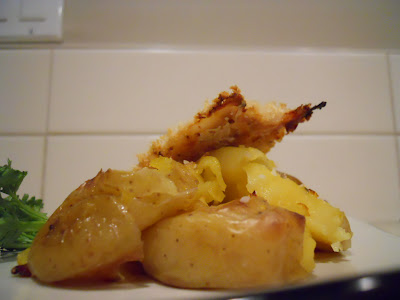
I don't make fish very often... I never seem to cook it properly and I hate the way it makes my house smell for the rest of the evening. This recipe is different though! Get some fresh cod - apparently when fish is really fresh, it shouldn't smell fishy - and follow this recipe and you'll have a restaurant quality dinner that will leave you wanting to make fish more often! The panko bread crumbs result in a healthier but still crisp crust on the fish and the spicy mayo adds a bit of kick to the yummy fish. Oven Fried Cod & Crispy Smashed Potatoes Recipe from The Guy Can't Cook by Cinda Chavich Ingredients:

  • 4 cod loins (about 150g each)

  • 1/3 cup low-fat mayo

  • 1 tbsp dijon mustard

  • 1/4 tsp garlic powder

  • 1/2 tsp to 1 tsp garlic chili paste

  • 2 tsp freshly squeezed lime juice

  • salt & pepper

  • 1 cup japanese panko bread crumbs

  • 20-24 baby yellow potatoes, unpeeled

  • 3 tbsp extra virgin olive oil

  • coarse sea salt

Method:


  1. Preheat the oven to 500F.

  2. Stab the potatoes with a fork and boil in salted water for about 15 minutes. Drain the potatoes and place in a shallow baking dish. Add the olive oil and toss to coat.

  3. Press each potato with a fork until it is slightly flattened. Sprinkle the potatoes with the sea salt and bake in the oven for 20 minutes, until crisp and golden.

  4. In a bowl, combine the mayo, mustard, garlic powder, chili paste, and lime juice. Stir to combine. eason with salt and pepper. Divide the mayo mixture in two, and reserve one half in the refrigerator.

  5. Place the panko on a plate. Coat both sides of the fish pieces in the non-refrigerated half of the mayo mixture, then dip them into the panko, pressing gently to cover the fillets entirely with crumbs.

  6. For easy clean-up later, place the fish on a baking sheet lined with parchment paper. Reduce the oven temperature to 400F, place the fish in the oven and continue to bake until the fish is crispy and golden brown, about 20-25 minutes. Serve the fish with the refrigerated spicy mayo and potato cakes.

Yum, yum, yum! Typing up this post is making me want to make this again... perhaps I can squeeze it into my culinary adventures this weekend... We will see! Coming up this weekend you can expect a recipe for a delicious homemade pizza crust and the best hummus you will ever taste! Stay tuned.


Happy Cooking my Friends!

5.4.11

Mint Chocolate Cupcakes

If you have a mint chocolate addiction, these cupcakes are for you! The cupcake itself is light, moist and chocolately while the mint icing is perfectly minty without being too buttery. Plus, these cupcakes are easy to whip up.
I found the recipe on a blog I follow regularly called Tracey's Culinary Adventures. Tracey is always whipping up something spectacular and all the recipes I've tried off her blog are just fantastic. Do try to get over to her blog and check it out - you'll be hooked as soon as you browse some of her recipe archives!! She made these for St. Patty's day, but these cupcakes with their pretty green icing are just fine for any occasion!


Chocolate Cupcakes

Recipe from Martha Stewart (via Tracey's Culinary Adventures)


Ingredients:


  • 1 1/2 cups all purpose flour

  • 3/4 cup unsweetened cocoa powder

  • 1 1/2 cups granulated sugar

  • 1 1/2 tsp baking soda

  • 3/4 tsp baking powder

  • 3/4 tsp salt

  • 2 large eggs

  • 3/4 cup buttermilk

  • 3 tbsp vegetable or canola oil

  • 1 tsp vanilla extract

  • 3/4 cup warm water

Method:


  1. Preheat oven to 350F. Line muffin tins with paper liners.

  2. In a large bowl, whisk together flour, cocoa powder, sugar, baking powder, baking soda, and salt. Add the eggs, buttermilk, oil, vanilla and water. Whisk together until mixture is smooth and all ingredients are evenly distributed.

  3. Distribute batter evenly among the prepared pans, filling each about 2/3 of the way to the top. Bake for about 20 minutes or until the cupcake spring back when pressed lightly. Remove from the oven and cool in pans for about 5-10 minutes. Then remove from pans and cool completely on wire racks.

  4. Ice liberally with mint icing (see below for recipe).

Mint Buttercream

Recipe from Tracey's Culinary Adventures
Ingredients:

  • 4 cups icing sugar, sifted

  • 8 tbsp unsalted butter, at room temperature

  • 6 tbsp heavy cream

  • 4 tsp vanilla extract

  • 1 tsp mint extract

  • 1/2 tsp salt

  • green gel food colouring

  • semisweet chocolate chips for garnish

Method:


  1. In the bowl of a stand mixer fitted with the paddle attachment, beat the icing sugar and the butter until evenly distributed and crumbly, about 1-2 minutes.

  2. Add the cream, extracts, and salt and beat on high speed until light and fluffy, about 3 minutes. If you want green buttercream, beat in a few drops of green food colouring until you get the desired shade of green.

  3. Frost as desired, garnish with chocolate chips.
These cupcakes smell so good you won't be able to resist! They're so delicious I had to give them away to my co-workers so I didn't eat all of them myself. I could have done it the smart way like Tracey did and simply scale back the recipe, but why would I do that? That would have been the rational thing to do and when it comes to baking, I don't think I'm ever rational!!!! Any way, I would encourage you to try these out! They are so quick to whip up and you will dirty minimal dishes in the process. Happy Baking my Friends! Thanks for stopping by. :)

4.4.11

URGENT - PLEASE SHARE!!!

Some friends of our family recently went missing on their way down to Las Vegas - they haven't been heard from since March 19th and their family is getting really worried about them. Please share this missing persons poster with anyone you know who lives in the area, or anywhere online that might help raise awareness. And if you don't live in the area, please just keep them and their family in your thoughts and prayers. You can find the poster and information here. You can also check out the facebook page that has been setup and join it for any updates that are available. Thank you for your help and support. Erin.

3.4.11

Caramel Apple Cheesecake

Alright, let me just start this post off with a little disclaimer: This is another Bobby Flay Throwdown recipe, so that means it requires a lot of ingredients, lots of time, and a whole lot of effort. This is another all-out recipe... but the time it takes to make all the components from scratch is well worth it! This cheesecake is so light and fluffy and decadently rich. A little bit goes a long way and this cheesecake will feed a lot of people. So if you're up for a culinary challenge, get on board with this recipe and make a plan to make it for your next dinner party. I made it for our Superbowl party in February and it was well received by all our guests. :)
Be sure to read the entire recipe before starting out and plan out your timeline accordingly. I say this because I didn't do that and it ended up with me almost pulling an all-nighter to finish this cheesecake before our Superbowl party the next day!!!


This recipe is from one of my most recent cookbook additions - Bobby Flay's Throwdown. There are three components to this recipe including the cheesecake, the apples and the apple-caramel sauce. Make them in the order specified below for best results.


Cheesecake


Ingredients:


  • cooking spray

  • 8 whole graham crackers

  • 1 cup lightly toasted walnuts, coarsely chopped

  • 2 tbsp light brown sugar

  • 5 tbsp unsalted butter, melted

  • 1/2 cup plus 2 tbsp granulated sugar

  • 1 tbsp grated orange zest

  • 3 (8-oz) packages cream cheese, at room temperature

  • 1/2 cup plus 2 tbp finely packed light muscovado sugar (brown sugar works too)

  • 4 large eggs, at room temperature

  • 1 large vanilla bean, seeds scraped out, seeds and pods reserved

  • 1 tsp pure vanilla extract

  • 1/2 tsp fine salt

  • 1/2 cup heavy cream

Method:


  1. To make the cheesecake, preheat the oven to 350F. Spray the bottom and sides of a 9-inch springform pan with cooking spray.

  2. Combine the graham crackers, 1/2 cup of the walnuts, and the brown sugar in a food processor and process until finely ground. With the motor running, add the butter through the feed tube and process until themixture just comes together. Pat the mixture evenly into the prepared pan, place it on a baking sheet, and bake in the oven until light golden brown and just set, about 8 minutes. Cool completely on a wire rack.

  3. Combine 1/4 cup of the granulated sugar and the orange zest in a food processor and process until combined.

  4. Put the cream cheese in the bowl of a stand mixer fitted with the paddle attachment, and beat until light and fluffy, 3-4 minutes. Add the orange sugar, remaining 1/4 cup plus 2 tbsp of granualted sugar, and the muscovado sugar, and beat until sugar is incorporated and the mixture is light and fluffy. Add the eggs one at a time, and mix until just incorporated, scraping the sides and bottom of the bowl. Add the vanilla seeds (save the pod for the apples), vanilla extract and salt and beat until combined. Add the heavy cream and mix until just combined.

  5. Scrape the mixture into the cooled crust. Set the springform pan on a large piece of heavy duty aluminum foil, and fold the foil up the sides to surround it. Set the pan in a large roasting pan. Pour hot tap water into the roasting pan until it reaches about halfway up the sides of the springform pan. Bake until the edges of the cake are slightly puffed and set and the center still jiggles, about 55 minutes.

  6. Turn off the heat, prop the oven door open with a wooden spoon, and leave the cheesecake in the water bath in the oven for 1 hour.

  7. Remove the springform pan from the water bath, place it on a wire rack, and cool to room temperature, 2 hours. Then cover the pan and refrigerate until the cheesecake is chilled through, at least 4 hours and up to 24 hours.


Apples


Ingredients:


  • 2 cups apple juice

  • 1/4 cup granulated sugar

  • 1 tbsp unsalted butter, cold

  • 3 granny smith apples, peeled, cored and thinly sliced

  • 3 fuji apples, peeled, cored, and thinly sliced

  • 1/4 cup calvados or other apple brandy

  • 1/2 cup creme fraiche

Method:


  1. Bring the apple juice, sugar and the reserved vanilla bean pod to a boil in a large saute pan over high heat. Cook until slightly thickened and reduced to 1/2 cup, 10 minutes. Remove the vanilla bean pod and discard.

  2. Stir in the butter until melted. Add the apples and cook, stirring occasionally, until lightly carmelized and soft, 8-10 minutes. Add the calvados and simmer until reduced by half. Transfer the apples to a plate and let cool slightly.

  3. To serve, remove the foil and sides from the springform pan. Spread the creme fraiche over the cheesecake. Top with the warm apple topping, drizzle liberally with the caramel sauce, and sprinkle with the remaining 1/2 cup chopped walnuts. Serve additional caramel sauce on the side.

Apple-Caramel Sauce

Ingredients:


  • 1 1/2 cups granulated sugar

  • 3/4 cup heavy cream, hot

  • pinch of fine salt

  • 3 tbsp calvados or other apple brandy

  • 1/2 tsp pure vanilla extract

Method:


  1. Combine the sugar and 1/2 cup water in a medium saucepan and bring to a boil over high heat. Cook, swirling the pot occasionally to even out the colour, until amber, 10-12 minutes.

  2. Slowly add the heavy cream and salt to the caramel. Whisk until smooth. Remove from teh heat, and stir in te calvados and vanilla extract. Serve warm.
If you decide to try out this recipe, I would recommend halfing the recipe for the apples and the apple-caramel sauce. Otherwise you'll be stuck with lots of leftover apples and caramel sauce and no more cheesecake to eat them with!! I loved this recipe, the quality of the cheesecake was absolutely spectacular and the addition of the creme fraiche on top of the cheesecake really helped to counter the sweetness of the cheesecake and the caramel sauce. I hope you get a chance to try out this recipe and that you enjoy it as much as we did. Happy Baking my Friends!