Showing posts with label garlic. Show all posts

2.5.12

Asiago Garlic Knots

This week feels like it's taking forever! I'm not quite sure why time has so suddenly slowed down, but it is making me feel a little crazy. I woke up this morning thinking (or more like hoping) today was Friday. Hubby kindly reminded me, no it is only Wednesday. Two more long days to go til the weekend!! I'll hang in there if you will too!


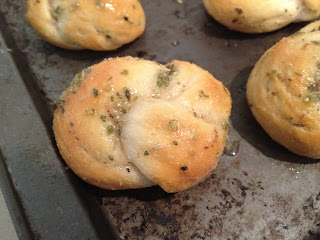
Til then, there's these lovely little Asiago Garlic Knots. Grab a package of pre-made pilsbury biscuits and whip up this lovely flavored oil for brushing and you've got yourself a quick, easy and delightful snack to tide you over til Friday. I found the idea on Pinterest and changed it up slightly.


Asiago Garlic Knots
Recipe adapted from Real Mom Kitchen

Ingredients:
  • 1 tube pilsbury refrigerated buttermilk biscuits
  • 1/4 cup canola oil
  • 3 tbsp freshly grated asiago cheese
  • 1 clove garlic, minced
  • 1 tsp dried oregano
  • 1 tsp dried parsley flakes
Method:
  1. Preheat oven to 400F. Grease a baking sheet and set aside.
  2. Roll each piece of biscuit dough into a 12 inch rope and tie in a knot. Place on prepared baking sheet. Bake 8-10 minutes in preheated oven until golden brown. 
  3. In a small bowl, combine the remaining ingredients and whisk to combine. When biscuits come out of the oven, brush them with the mixture while still warm.

Easy right? Definitely do-able for a week night that's for sure! Do you have any quick and easy snack recipes you would like to share? Let me know and they may just make an appearance in my future blog posts.

Happy Baking my Friends!

11.9.11

Roasted Garlic & Feta Walnut Dip with Toasted Flat Bread


I've been complaining all summer about how bad the weather has been... now, in the first week of September we get 30 degree weather alllll week! Its beautiful, but it feels super hot compared to what we've had. Our townhouse heats up super fast when I turn on the oven, so this is a great option when you don't want to heat yourself out of your house on a hot summer day (assuming you've got roasted garlic on hand already)!

I probably wouldn't have tried this recipe if Hubby hadn't asked me to! I'm not a huge fan of feta and this dip sounded so weird, but he picked it out, so I made it for him and ended up loving it!

Roasted Garlic & Feta Walnut Dip with Toasted Flat Bread
Recipe adapted from Rachael Ray's 30 Minute Meals 2

Ingredients:
  • 2 heads garlic, top 1/4 inch cut off, 1 large clove reserved
  • 4 tbsp extra-virgin olive oil, plus some for drizzling
  • 1 cup walnut halves, toasted
  • 1 1/2 cups feta cheese, crumbled
  • 1/2 cup milk
  • 1 tsp dried oregano
  • 1/4 cup fresh flat-leave parsley
  • freshly ground black pepper
  • 1/2 tsp crushed red pepper flakes
  • 4 flat breads or pitas, cut into wedges and toasted
Method:
  1. Preheat oven or toaster oven to highest setting. Drizzle heads of garlic with about 1 tsp olive oil each, then double wrap the garlic bulbs in foil. Roast 25 mins in the oven.
  2. Combine 4 tbsp extra virgin olive oil, walnuts, feta, milk, oregano, parsley, black pepper, red pepper flakes, and garlic clove in food processor and pulse until smooth. Add more olive oil or milk if dip doesn't come together smoothly. Scrape into serving dish with spatula, drizzle with olive oil.
  3. Remove garlic from oven, and turn off heat. Arrange triangles of cut pita or flat bread on a small, heat-resistanttray or cookie sheet. Place bread into the hot oven (or you can use your toaster oven to keep the house cool!!!). The bread will be warmed through and lightly toasted in five minutes.
  4. Serve with feta walnut dip and soft, sweet roasted garlic for spreading.

 Ohhhhh so good!! I can't wait to make this again. I think Huby and I each ate one whole head of roasted garlic... next time I would make more roasted garlic. :) Such sweet, carmelized goodness. Definitely a weird sounding dip, but the flavours really work to create a delicious, unique starter.

Happy Cooking my Friends!

16.5.11

Not Just Any Old Garlic Bread

Let me just start this post off by saying this recipe is a secret... I was not supposed to share it with anyone. I learned this recipe from a friend of my husband's family a couple of years ago when we stopped by his place on our vacation. Every time I make it when guests come to our house I always get asked for the recipe... but I was sworn to secrecy. But I feel so bad because this recipe is SO worth sharing, so here I am, breaking my "vow" of secrecy so get the best ever recipe for garlic bread out there to you people who will love it!!


Its super easy. You will need a baguette, garlic butter (store bought will do, but homemade is better), mozzarella cheese (or whatever you have in your fridge), Club House Garlic Plus seasoning, and honey. If you want to try making your own garlic butter I would strongly encourage you to follow the guidelines below. You'll notice there are no measurements and that's because garlic butter is definitely a personal thing - just add ingredients until you like the taste.


To make the garlic butter: take some butter, add some finely grated garlic, finely chopped fresh basil & oregano, coarse salt, and some olive oil. Mix together and taste. Add more seasoning if necessary.


Now to make the bread:


  1. Slice the bread in half horizontally. Butter liberally with the garlic butter. Sprinkle with the mozzarella then sprinkle with the garlic plus seasoning mix. Now drizzle lightly with honey.

  2. Broil in oven until cheese is melted and edges of the bread are lightly toasted.

  3. Slice and enjoy. Prepare to make a few loaves because this stuff goes fast!!

I hope you enjoy this "secret" garlic bread recipe. The key is the honey! The little bit of sweetness really makes this garlic bread special.


Happy Cooking my Friends!

9.4.11

The Best Hummus Ever & My New Facebook Fan Page

So as promised, I am going to post the best hummus recipe ever! This post is going to be a short one because I didn't take any photos of this hummus. However, I have an exciting announcement to add to this post, so hopefully it won't be too disappointing. :) First, we'll start with the hummus recipe! The recipe was given to me from a friend and every single time I make the recipe many people bombard me asking for the recipe. My friend found the recipe in her cookbook from Rebar Modern Food, a restaurant in Victoria, British Columbia. I haven't had a chance to go to the restaurant, but I have heard many good things about it. So if you're in the area, it would likely be a great place to try out. Bombay Hummus Adapted from Rebar Modern Food Cookbook Ingredients:

  • 1/4 cup oil

  • 1 inch piece of ginger, peeled and thinly sliced

  • 1 19oz can of chickpeas, rinsed and drained

  • 1/4 cup cashews, roasted

  • juice of 1 lime

  • 2 garlic coves

  • 1 tsp salt

  • 1 tsp cumin

  • 1 tsp coriander

  • 1/2 tsp cracked pepper

  • 1/4 tsp of cayenne (this make it pretty spicy - I usually use about 1/2 that amount)

  • pinch turmeric

  • pinch cinnamon

  • 2 tbsp chopped cilantro (I probably use closer to 1/4 cup because I LOVE cilantro, but go with what you like!!)

  • 2 tbsp chopped fresh mint
Method:

  1. Gently heat oil and ginger in a small pan. Let the ginger sizzle, but not brown. After 10 minutes, remove from heat and set aside to cool.

  2. Combine the ginger, oil, garlic, cashews, cilantro and mint in a food processor. Whirl until moderately smooth. Then add the juice of the lime and whirl until smooth and creamy. This may take a few minutes.

  3. Add the rest of the ingredients and whirl until mixture has reached desired smoothness. You may need to add more oil or water to the mixture to get it really smooth. Season to taste if additional seasoning is desired.
Now for my exciting announcement which really isn't all that exciting, but I'm excited about it!! I have a brand new Facebook Fan page for my blog. :) You will receive notifications when I post new recipes on my blog and check out some photos before they're posted to my blog. You can also provide me with suggestions and feedback about my blog and have some say in what I write about! So please check out my fan page here and become a fan!

Happy Cooking my Friends!

20.12.10

On the Fifth Day of Christmas... Delicious Turkey

Turkey... for most people Christmas dinner is not complete without it. If the turkey is dry or lacking flavour, dinner is not usually considered a success. Turkey causes the most stress for most people taking on the huge task of cooking Christmas dinner - whether its for your immediate family members or for your extended family plus all of your "closest friends". So its important to start with a great recipe and some awesome tips! Hopefully this post will give you a good start.

And, lets not forget the gravy - it is equally important and can cover a multitude of culinary sins when poured over a plate! It can moisten dry turkey and give flavour to not-so-perfect mashed potatoes! So I've got a great gravy recipe to share with you! It got rave reviews at our Thanksgiving dinner and I know it will be a hit at your Christmas dinner too.


Roast Turkey
Recipe adapted from Canadian Living Everyday Favorites

Ingredients:

  • 15 lb turkey (preferably a fresh, never frozen turkey)
  • 1/4 cup butter, softened
  • 1/2 tsp each dried sage and thyme
  • 1 tsp coarse salt & freshly ground pepper
  • bacon (about 1/2 a package, but buy a nice big package because you'll want the other half of the bacon to go in your stuffing!)
  • fresh thyme, rosemary and sage sprigs
  • whole head garlic, cut in half horizontally
  • 1/4 of a large onion, chopped into coarse chunks
  • 1/4 of an apple, coarsely chopped
  • a few bottles of dark beer (approximately 1/2 a bottle for each 1/2 hour of cooking)

Method:

  1. Remove giblets and neck from turkey. Place in large saucepan and set aside.
  2. Rinse turkey inside and outside and then pat dry inside and out. Loosely fill cavity with fresh herb sprigs, garlic, onion, and apple chunks. Don't over stuff it. You just want those yummy ingredients in there to give it some delicious flavour. Lift wings and twist under back. Tuck legs under band of skin or tie together with kitchen twine.
  3. Immediately place turkey, breast side up, on rack in roasting pan. In small bowl, mix together butter, sage and thyme. Rub over turkey. Sprinkle with salt and pepper. Lay strips of bacon over turkey until most of the outside is covered in bacon. Tent with foil, dull side out, leaving sides open.
  4. Roast in 325F oven, basting with 1/2 bottle of dark beer every 30 minutes, for 4 hours. Remove foil; roast until meat thermometer inserted in thigh registers 185F, about 1 hour longer. Transfer to cutting board; tent with foil and let stand for 20 minutes before carving.

*Note: This cooking time is for a 15lb stuffed turkey. For details on how long to cook your turkey (based on size and whether or not it is stuffed), please check out the JD farms website. Cooking time makes a big difference in the taste of your turkey, so be sure to keep a close eye on your turkey while it cooks and makes your house smell so delicious!

Gravy
Recipe adapted from Canadian Living Everyday Favorites

Ingredients:
  • 4 1/2 cups chicken stock
  • half a bottle of dry white wine
  • 1 onion chopped
  • 1/2 cup each sliced carrot and celery
  • 1/4 cup all purpose flour (you might need a bit more)
  • 2 tbsp butter
  • salt and pepper to taste

Method:

  1. While the turkey is cooking, to saucepan with turkey parts, add stock, wine, onion, carrot and celery; bring to boil. Reduce heat to low and skim off the fat. Simmer for three hours. Strain into a measuring cup, adding enough wine to make 3 cups.
  2. When turkey is done, skim fat off roasting pan. Stir flour into pan; cook over medium heat, stirring for 1 minute. Whisk in stock and bring to boil, stirring to scrape up brown bits; reduce heat and simmer for 5 minutes. Whisk in butter. Season with salt and pepper to taste. Strain if desired.

I hope you enjoy these recipes as much as we do! They are delicious and have become a part of our holiday traditions. I'm sure you are almost ready for Christmas by now... I however am not! I still have much Christmas shopping to do... its on my to-do list for tomorrow. I did get my Christmas cards out today (finally!) though! They may be a day or two late though.

Happy Cooking my Friends!

22.11.10

Rustic Roasted Garlic Bread

I'm really out of the loop in the blogging world sometimes... apparently there is a World Bread day - in October!! Next year I'm going to be on top of this. Any way, I was browsing some of the finished products of World Bread Day and found Deeba's post on her blog Passionate about Baking. It looked amazing - Rustic Roasted Garlic Bread! Of course I was all over that one - I set to making it all of 15 minutes after reading the recipe. I was definitely not disappointed and it was really easy to make.


If you tend to shy away from bread making, don't! Its not as hard as it looks or sounds. Just remember to allow adequate time for the bread to rise. :) This bread smelled amazing while it was cooking - honestly, it was difficult to wait for it to cook all the way through because it smelled so good we all just wanted to devour it - immediately. I may have even burned off some of my tastebuds because I didn't wait for it to cool enough before popping a piece in my mouth.


Rustic Roasted Garlic Bread

Ingredients:

  • 3 cups all-purpose flour + more as needed
  • 2 tsp instant yeast
  • 2 tsp coarse salt + more for sprinkling
  • 1 to 1 1/4 cups water
  • 2 heads roasted garlic
  • 4 tbsp + 1 tsp olive oil

Method:

  1. Squeeze the roasted garlic out into a bowl and mash with a fork.
  2. Combine the yeast, flour, roasted garlic and 2 tsp of salt in the bowl of a stand mixer. Turn on the mixer and add 1 cup of water and 4 tbsp olive oil. Add more water until the dough just comes together into a ball and is slightly sticky to the touch.
  3. Turn out dough onto a lightly floured surface and knead lightly by hand for a few seconds until the dough forms a smooth, round ball. Grease a bowl with the remaining olive oil and place the dough into the bowl, turning to coat all over with the oil. Cover with plastic wrap or a damp tea towel and place in a warm, draft-free place to rise for 1-2 hours or until doubled in bulk.
  4. About an hour before you plan to bake the bread, take the dough out and divide it evenly into two pieces. Dust your workplace lightly with flour and shape the two pieces into loaves that will fit on your baking tray. Line the baking sheet with parchment paper and place loaves on baking sheet. Cover with cling film and leave to rest in a warm place for about an hour.
  5. Preheat your oven to about 375F. Just before popping into the oven, give the loaves about 4-5 slashes with a knife. Place baking sheet into the oven and place a small bowl of water in the bottom of the oven below the bread. Bake 35-40 minutes or until loaves are nice and brown , and make a hollow sound when tapped on the bottom.

Enjoy this post and definitely check out Deeba's lovely blog Passionate about Baking. She makes the most beautiful desserts and if you've ever looking for food blogger activities, she is always posting about ways to get involved, so do check back regularly.
Thanks for stopping by! Happy Baking my Friends!