Showing posts with label chocolate. Show all posts

29.5.13

Coconut Almond Bars


Howdy friends! How are you this fine, rainy Wednesday evening? I figured you might need a sweet chocolaty pick-me-up! I know I could. I made these quite a while ago and to be honest just never got around to blogging them. But I was flipping through pictures and noticed I had these lovely little shots my hubby took and I just had to share them with you!

This recipe is from one of my favorite baking books - Back to Baking by Anna Olson! I hope you enjoy as much as we did!


Coconut Almond Bars
Minimally adapted from Back to Baking by Anna Olson

Ingredients:

Base:
  • 1/4 cup butter
  • 1 oz unsweetened chocolate, chopped
  • 1/2 cup sugar
  • 1 egg
  • 1 tsp vanilla extract
  • 1/3 cup all purpose flour
Filling:
  • 1 1/3 cup sweetened coconut flakes
  • 1 cup sliced almonds
  • 1 300 ml tin sweetened condensed milk
  • 2 tsp vanilla extract
  • 1/4 tsp salt
Topping:
  • 5 oz semisweet chocolate chips
  • 2 tbsp. butter
Method:
  1. Preheat oven to 350F. Grease and line an 8-inch square pan with parchment paper so paper comes up the sides.
  2. Melt butter and chocolate in a small pan over low heat, stirring until smooth. Remove from heat and stir in sugar. Then add egg and vanilla and stir til blended. Add flour and stir. Spread this mixture into the bottom of prepared an and bake for 10 minutes until it loses its shine. Cool while preparing the filling.
  3. For the filling, stir the coconut, almonds, condensed milk, vanilla and salt to combine. Spread over cooled base. Bake 25 minutes until light golden brown. Cool to room temperature before adding the topping.
  4. For the topping, melt the chocolate and butter in the microwave on low heat, stirring often.  Pour mixture over cooled filling and spread evenly.
  5. Chill the pan for about 2 hours to set the chocolate. Cut the squares while chilled, but then store and enjoy at room temp. I used a small round biscuit cutter to cut mine into cute little round shapes for a fun way to present them!


These bars have amazing chocolaty flavour, but they are a little on the sweet side! If you don't like super sweet treats, then these probably aren't the bars for you! If however you love a little sugar hit - get on making these right away to cure your mid-week blues!

Happy Baking Friends!

10.11.12

Chocolate Espresso Peanut Butter Chip Cookies

 
A couple weeks ago I was supposed to bake dessert for a cocktail party I was attending - I had planned a couple of delicious show stoppers. The were 1) Chocolate coconut rounds and 2) Marshmallow topped peanut butter pretzel squares. I baked them both the day of the party and as I was portioning them into mini cocktail sized portions, I decided I didn't like how either of them presented, or tasted. So, now with only 1 1/2 hours to finish getting myself ready and find another dessert option, I had to think and do quickly - off to pinterest I went. I found these chocolate espresso brownie cookies, but I didn't have time to get to the store to buy the ingredients I needed, so I made due. Lo and behold, they turned out amazing and were a total hit. Who knew such a simple and easy cookie could be such a superstar. Make these and be prepared to want to eat the whole batch!! They're that good!
 
 
 Chocolate Espresso Peanut Butter Chip Cookies
Recipe minimally adapted from Just a Taste

Ingredients:
  • 3 oz unsweetened chocolate
  • 1 cup semi sweet chocolate chips
  • 1 cup peanut butter chips
  • 8 tbsp butter
  • 3 large eggs
  • 1 cup plus 2 tbsp sugar
  • 2 tsp instant coffee granules
  • 1 cup flour
  • 1/3 tsp baking powder
  • 1/4 tsp salt
Method:
  1. Preheat oven to 350F.
  2. Combine unsweetened chocolate, semi sweet chocolate chips and butter in a microwave safe bowl. Microwave on low heat, stirring at 30 second intervals until melted and smooth. Set aside.
  3. In the bowl of a stand mixer combine the eggs, sugar and coffee granules on high speed until smooth and very thick - about 3 minutes. Slowly add the chocolate mixture to the bowl, whisking until just combined.
  4. Turn off stand mixer and add flour, baking powder and salt to the bowl. Stir until just combined. Add peanut butter chips and stir until just combined.
  5. Place scoopfuls of batter onto parchment lined baking sheets leaving approximately 2 inches in between them. Bake in preheated oven for 15 - 18 minutes or until cookies are puffed. Do not overbake - if in doubt, underbake. Let sit on baking sheet for 2 minutes before transferring to wire rack to cool completely.


Hope you are having a fantastic weekend! I know I am! The sun is shining, I've had a chance to do some baking and some shopping so life is good. To those of you Canadians reading this, be sure to take the time to pause and remember those soldiers who fought and lost their lives for our freedom tomorrow on Remembrance Day. They made it possible for us to have many freedoms not enjoyed by people in all areas of the world and as such, we owe them tribute for their selfless acts. Lest we forget.

Take care and enjoy the rest of your weekend.

Happy Baking my Friends!

27.8.12

Choux Swans for the August 2012 Daring Bakers' Challenge


Hey Friends! How was your weekend? Mine was excellent - had a little fun hiking and baking and got a little accomplished by dejunking and organizing my garage yesterday. Got the satisfaction of hauling an entire truckload full of junk to the dump!! Woohoo! Any way, after a long hiatus, I am finally back and participating in the Daring Bakers' Challenge for the month!

Kat of The Bobwhites was our August 2012 Daring Baker hostess who inspired us to have fun in creating pate a choux shapes, filled with crème patisserie or Chantilly cream. We were encouraged to create swans or any shape we wanted and to go crazy with filling flavors allowing our creativity to go wild!

I didn't go too wild - I kept with the swan shape (or as good as I could manage any way...) and filled them with a mocha (chocolate & coffee) pastry cream. The result was an amazing tasting dessert. The pastry cream was a hit and I will make it over and over again!!


Pate a Choux
Recipe from the Daring Bakers' (can't be doubled)

Ingredients:
  • ½ cup (120 ml) (115 gm) (4 oz) butter
  • 1 cup (240 ml) water
  • ¼ teaspoon (1½ gm) salt
  • 1 cup (240 ml) (140 gm) (5 oz) all-purpose flour
  • 4 large eggs
Method:
  1. Line at least two baking sheets with parchment paper. Preheat oven to moderately hot 375°F/190°C/gas mark 5 .
  2. In a small saucepot, combine butter, water, and salt. Heat over  medium heat until butter melts, then remove from stove.
  3. Add flour all at once and beat, beat, beat the mixture until the dough pulls away from the sides of the pot.
  4. Add one egg, and beat until well combined. Add remaining eggs individually, beating vigorously after each addition. Resulting mixture should be somewhat glossy, very smooth, and somewhat thick.
  5. Using a ¼" (6 mm) tip on a pastry bag, pipe out about 36 swan heads. You’re aiming for something between a numeral 2 and a question mark, with a little beak if you’re skilled and/or lucky.
  6. Remove the tip from the bag and pipe out 36 swan bodies. These will be about 1.5" (40 mm) long, and about 1" (25 mm) wide. One end should be a bit narrower than the other.
  7. Bake the heads and bodies until golden and puffy. The heads will be done a few minutes before the bodies, so keep a close eye on the baking process
  8. Remove the pastries to a cooling rack, and let cool completely before filling.
 
 Next up, make the pastry cream:

Mocha Pastry Cream
Recipe minimally adapted from the Daring Bakers'

Ingredients:
  • 1 cup (225 ml.) whole milk
  • 2 Tbsp. cornstarch
  • 6 Tbsp. (100 g.) sugar
  • 1 large egg
  • 2 large egg yolks
  • 2 Tbsp. (30 g.) unsalted butter
  • 1 Tsp. Vanilla
  • 1/4 cup whole milk
  • 3 oz dark chocolate
  • 1 1/2 tsp instant espresso powder
Method:
  1. Dissolve cornstarch in ¼ cup of milk. Combine the remaining milk with the sugar in a saucepan; bring to boil; remove from heat.
  2. Beat the whole egg, then the yolks into the cornstarch mixture. Pour 1/3 of boiling milk into the egg mixture, whisking constantly so that the eggs do not begin to cook.
  3. Return the remaining milk to boil. Pour in the hot egg mixture in a stream, continuing whisking.
  4. Continue whisking (this is important – you do not want the eggs to solidify/cook) until the cream thickens and comes to a boil. Remove from heat.
  5. Combine 1/4 cup whole milk, chocolate and espresso powder in a small, microwave safe container. Microwave on low heat until chocolate is melted and mixture is smooth. Mix chocolate mixture, butter and vanilla into pastry cream and stir until smooth and incorporated. Chill until ready to use. 

 To assemble your swans:

  1. Take a swan body and use a very sharp knife to cut off the top 1/3rd to ½.
  2. Cut the removed top down the center to make two wings.
  3. Dollop a bit of filling into the body, insert head, and then add wings. 
  4. Your first attempt will probably not look like much, but the more you make, the more your bevy of swans will become a beautiful work of swan art.


Okay, so I'm not going to lie, these were a bit of work, but they weren't nearly as difficult or finicky as I thought they were going to be. My choux swans didn't puff up quite as much as I wanted and they didn't look as seamless as I thought they should once they were all assembled, but I was pleased with the overall result. Probably with a little practice, I could make some pretty cute little swans!!

Thanks so much Kat for hosting such a spectacular challenge! Great idea and it was fun to have something new and challenging to try out. :)

Happy Baking my Friends!

20.8.12

Chocolate Peanut Butter Chip Cookies for SRC!


Hi Friends! Its time for Secret Recipe Club's Group C reveal again and you know what that means - I get to try out a new recipe from a new blog! This month I was assigned Erin's blog (yep, we have the same name) Making Memories with your Kids. I decided to make her Chocolate Pastel Mint cookies, but I didn't have mint chips, so I substituted peanut butter chips on top, plus I added some to the dough as well (because you can never have enough PB chips right?!). The cookies were a huge hit with my family!


Lets get right down to business, here's my version of the recipe (the only changes I made were to use PB chips instead and add some to the dough as well.

Chocolate Peanut Butter Chip Cookies
Recipe minimally adapted from Making Memories with your Kids

Ingredients:
  • 1 cup sugar
  • 1/2 cup butter, at room temperature
  • 1 egg
  • 2 tsp vanilla
  • 1 1/2 cups flour
  • 1/2 cup dutch process cocoa powder
  • 1/4 tsp baking soda
  • 1/4 tsp baking powder
  • 3/4 cup peanut butter chips + extra for topping the cookies with
Method:
  1. Preheat oven to 350F.
  2. In the bowl of the stand mixer, cream together butter and sugar until smooth and fluffy. Add egg and vanilla and mix until well combined.
  3. Add flour, cocoa powder, baking soda & baking powder. Mix until just combined. Add in peanut butter chips until just combined.
  4. Roll cookies into 1 inch balls and place on an ungreased cookie sheet. Bake in preheated oven for 12 minutes or until just set (don't over cook them or they will be dry). Remove from oven and immediately top with 5-6 more peanut butter chips, pressing into the soft cookies slightly.


Thats it! Easy to  make, basic ingredients and only dirties one bowl! Whats not to like? Thanks Erin for a fantastic recipe. :)

19.8.12

S'mores bars with Nuttella Marshmallows


I've been meaning to make marshmallows  for quite a while now. Then the other day (national s'mores day) Bon Appetit featured the top 10 s'mores recipes from various food blogs and there was one from Cherry Tea Cakes for S'mores bars where you made the marshmallow layer from scratch. I was pretty stoked to make them right away. I changed the recipe slightly by putting nuttella flavour into the marshmallow layer and putting peanut butter in the top chocolate layer, but other than that I was quite true to the original recipe. They are addictive and delicious and you've got to make them this summer. Its well worth the effort.


Graham Layer
Minimally adapted from Cherry Tea Cakes

Ingredients:
  • 2 1/2 cups + 2 tbsp all purpose flour
  • 1 cup golden brown sugar, lightly packed
  • 1 tsp baking soda
  • 3/4 tsp kosher salt
  • 7 tbsp cold, unsalted butter
  • 1/3 cup agave syrup
  • 5 tbsp low fat milk
  • 2 tbsp vanilla extract
Method:
  1. Add flour, sugar, soda, and salt to the large bowl of the food processor. Pulse a couple of times to combine. Add the butter and pulse until the mixture is crumbly and butter is evenly distributed through the dry ingredients.
  2. Whisk together the agave, milk and vanilla until combined. Add to the flour mixture and pulse until just combined.
  3. Press mixture into a 9x13 inch rectangle baking dish that has been lined with parchment paper.
  4. Preheat oven to 350F. Bake in preheated oven for 20-25 minutes or until semi-firm to the touch. Remove from oven and set aside to cool. Make the marshmallow layer while it cools.
Marshmallow Layer
Minimally adapted from Cherry Tea Cakes

Ingredients:
  • 1 1/2 packages unflavoured gelatin
  • 1/2 cup ice cold water, divided
  • 3/4 cup granulated sugar
  • 1/2 cup corn syrup
  • 1/8 tsp kosher salt
  • 1/2 tsp vanilla extract
  • 2 heaping tbsp nuttella
Method:
  1. Fit stand mixer with whisk attachment. Combine 1/4 cup cold water and the gelatin in the bowl of the mixer and leave to sit while you make the syrup.
  2. In a medium saucepan, combine 1/4 cup ice water, sugar, corn syrup and kosher salt. Cover and cook on medium heat for 3 minutes. Don't worry about stirring it.
  3. Remove the lid and attach candy thermometer to the side of the pan. Boil for approximately 7 minutes or until the mixture reaches 240 degrees and then remove from heat immediately.
  4. Put stand mixer on low speed and churn the gelatin mixture for a couple of turns. Then with mixture still on low, slowly pour in the hot syrup mixture (BE CAREFUL, THE MIXTURE IS EXTREMELY HOT AND CAN BURN YOU).  When all the syrup is incorporated, cover the front and sides of the mixer with a tea towel and turn the mixer up to high speed. Continue to whip until mixture is luke warm - 12 minutes. In the last minute of whipping, add vanilla and nuttella and mix until incorporated.
  5. Pour marshmallow cream onto the graham cracker base. Sprinkle lightly with powdered sugar.
  6. Let set for 1 hour before topping with chocolate peanut butter layer.


Chocolate Peanut Butter Layer
Minimally adapted from Cherry Tea Cakes

Ingredients:
  • 3/4 cup semi sweet chocolate chips
  • 4 tbsp peanut butter
  • 1 tbsp corn syrup
  • 1/4 tsp vanilla
Method:
  1. Combine all ingredients in microwave safe bowl. Microwave on low heat at 30 second intervals stirring well each time until mixture is completely melted. Pour over marshmallow layer and spread evenly.
  2. Allow to set for a few hours. Enjoy!

So, these are a little bit of work, but they're delicious. I highly recommend making them as a dessert for one of your end of summer get togethers with friends and family. It makes a nice big pan of squares that will feed lots of people.

Happy Baking my Friends!

9.4.12

Coconut Topped Buttermilk Brownies with Chocolate Buttermilk Frosting


Stop right there!! Don't scroll down to the recipe yet... pause and have a look and these beautifully lit photos my darling hubby captured for me. He got up early to get great lighting for me while I was heading off to work. What a sweetie?! He totally deserves mad props in my opinion!!

These little beauties are coconut topped buttermilk brownies finished with a chocolate buttermilk frosting. Yah, I may have had some buttermilk leftover from another recipe I was trying to use up, but it turned out to be a great success. These were eagerly devoured by my co-workers and my hubby's co-workers (did I mention the recipe made wayyyy more than I thought?!). These even started a little rivalry between husbands at my hubby's workplace.. turns out another wife had sent in baking that day too... cookies. It ended with one of his co-workers (who shall remain nameless), telling my hubby that my cupcakes were way better than so-and-so's wife's cookies... whoops!! Maybe we should plan which days we are allowed to send in baking so we don't step on any toes?!


Don't even think about how much work these may be... just go out, get the ingredients and get to it!! They are soooo worth the effort. :)

Coconut Topped Buttermilk Brownies with Chocolate Buttermilk Frosting
Brownie recipe adapted from Bake Space
Coconut topping from In Katrina's Kitchen
Frosting Recipe by me

Ingredients:
Brownies:
  • 2 cups all purpose flour
  • 1 cup granulated sugar
  • 1 cup packed brown sugar
  • 1 tsp baking soda
  • 1 cup butter
  • 1/3 cup unsweetened cocoa powder
  • 1 cup water
  • 2 eggs
  • 1/2 cup buttermilk
  • 1 tbsp vanilla
Coconut Topping:
  • 4 1/2 cups shredded coconut
  • 1 small can sweetened condensed milk
  • 1 1/4 cups icing sugar
Frosting:
  • Find the frosting recipe here. Substitute 1/3 cup of the icing sugar for 1/3 cup of cocoa powder for a chocolate version of the same frosting.


Method:
  1. To make the brownies: Preheat the oven to 350F. Line 3 - 12 cup muffin tins with paper liners. Set aside. In a large bowl, combine the flour, granulated sugar and baking soda.
  2. In a medium saucepan, combine brown sugar, butter, cocoa powder and water. Bring mixture just to boiling, stirring constantly. Remove from heat. Add the chocolate mixture to the flour mixture and mix until all of the flour is incorporated. Add the eggs, buttermilk and vanilla. Whisk until mixture is smooth and silky (it will be quite thin). Fill prepared muffin tins 1/3 - 1/2 way full. Bake in preheated oven for 10-14 minutes (or until tops spring back lightly when touched). Do not overbake or they will be dry. Err on the side of slightly underbaked as they will continue to cook after they are removed from the oven.
  3. Cool on a wire rack.
  4. While brownies are cooling, prepare coconut topping by combining all three ingredients and stirring until evenly distributed. Mixture should be quite stiff. Once cupcakes are cooled, form 1-2 tbsp portions of the coconut mixture into disks and fit them on top of the cupcakes, pressing down gently to adhere them to the cakes. Repeat until all cupcakes have been fitted with a coconut disk.
  5. Prepare the frosting and frost cupcakes however you like. 


This post has been linked up with the Recipe Party over at the Sweet Spot. Head on over to check out what other goodies fellow bloggers have whipped up this week.

Yep, these are pretty incredible!! :) :) Hope you'll take the time to try them out. Happy Baking my Friends!

29.3.12

Peanut Butter Chocolate Filled Banana Bread


 Banana bread is such a delicious snack and its truely a classic! I'm pretty sure most of us grew up eating banana bread (I know I did!!). My mom would often bake banana bread for us and I always loved it when she would put chocolate chips in it. This time I decided to depart a bit from the classic and changed it up by putting a layer of peanut butter chocolate yumminess in the middle of this loaf. It was a total success. The loaf has disappeared quickly in our house with requests for a repeat being made frequently. :) So, today I'm going to share this delish recipe with you.


Peanut Butter Chocolate Filled Banana Bread
Recipe adapted from Starting Out by Julie Van Rosendaal

Ingredients:
Banana Bread:
  • 1/4 cup butter, softened
  • 3/4 cup dark brown sugar, lightly packed
  • 3 very ripe bananas, mashed
  • 2 large eggs
  • 1/3 cup low fat greek yogurt (honey or vanilla flavour is nice, but plain is okay too)
  • 2 tsp vanilla extract
  • 2 cups all purpose flour
  • 1 tsp baking soda
  • 1/2 tsp salt (omit if using salted butter)
Chocolate Peanut Butter Filling:
  • 3 tbsp cocoa powder
  • 1/4 cup dark brown sugar
  • 1/4 cup chunky peanut butter
  • 1/4 cup milk
Method:
  1. Preheat oven to 350F. Spray an 8x4 inch loaf pan with non-stick spray.
  2. In a large bowl, beat the butter and sugar until well combined - mixture will have the consistency of wet sand. Add the bananas, eggs, yogurt and vanilla and beat until wel blended.
  3. Add the flour, baking soda, and salt and gently stir with a spatula until just combined.
  4. Pour one half of the batter into the prepared pan. Then prepare the peanut butter and chocolate mixture by combining all four ingredients and stirring until smooth. Spread chocolate peanut butter mixture on top of batter in pan, then top with the remaining banana bread batter.
  5. Bake in preheated oven for one hour and ten minutes, or until the top is cracked and springy to the touch. Cool in the pan on a wire rack.

This is such a great twist on a classic recipe. It comes together really quick - perfect to make for a Sunday morning breakfast or to bake up and take in lunches. :)

This post has been linked up with the Recipe Party over at the Sweet Spot! Head on over and check out the other delectable goods other bloggers have created this week. :)
Happy Baking my Friends!! I'm looking forward to a marathon weekend in the kitchen, so you should have some yummy posts to look forward to next week. :D

20.2.12

The Savvy Kitchen's Pizza Bites & Chocolate Peanut Butter Pretzels for SRC


After a long month off, we're back on schedule for the Secret Recipe Club! And I couldn't be more excited. This month I was assigned The Savvy Kitchen. The Savvy Kitchen is written by Amy and its a great place to find easy and delicious recipes - with a wide array of types of dishes! And since her parents are italian, she's got some great pasta recipes on there that I can't wait to try out when I have time. I loved her blog so much that I decided to make two recipes to share with you today.


First up I made these delicious pepperoni pizza puffs. They're a quick and easy appetizer and even your fussiest guest is sure to dive right into! Sorry for the quality of the pizza puff photos - we were so excited to eat them that these are the only photos I managed to snap before they were devoured.

Pepperoni Pizza Puffs
Recipe from The Savvy Kitchen

Ingredients:
  • 3/4 cup flour
  • 3/4 tsp baking powder
  • 3/4 cup milk
  • 1 egg, lightly beaten
  • 1 tsp dried basil
  • 1/2 tsp dried oregano
  • 1 cup shredded mozza
  • 1 cup pepperoni, cut into small pieces
  • 1 small can pizza sauce for dipping
Method:
  1. Preheat oven to 375F. Spray a 24 cup mini muffin pan with non-stick spray. In a medium bowl, whisk together flour and baking powder. Whisk in the milk, eggs and seasonings. Then gently stir in the mozza and the pepperoni. Let stand for 10 minutes.
  2. Stir the batter, then divide among the prepared mini muffin cups. Fill almost to the top, then bake in preheated oven for 20-25 minutes or until puffed and golden. Serve with pizza sauce for dipping and try not to eat the whole batch in one sitting!! (good luck with that!!)


Those were such a hit in our house (we eagerly sat around the coffee table, devouring these until they were all gone!!), that I decided to try out another recipe from Amy's blog - this time something sweet.

Chocolate Peanut Butter Pretzel Bites
Recipe from The Savvy Kitchen

Ingredients:
  • 80 mini pretzels
  • 1 cup creamy peanut butter
  • 2/3 cup powdered sugar
  • 1/2 tsp vanilla
  • 1 cup semi-sweet chocolate chips
Method:
  1. Line large baking sheet with a sheet of parchment paper.
  2. Beat peanut butter, powdered sugar and vanilla in a bowl until smooth and creamy. Roll peanut butter into 1/2 inch balls and place in the center of 40 of the mini pretzels. Top each one with another mini pretzel, pressing down slightly to sandwich the icing between the pretzels. Once all pretzel bites are formed, place in the freezer for about 15 minutes.
  3. Meanwhile, melt the chocolate in the microwave on low, stirring often so the chocolate doesn't burn. Remove the pretzels from the freezer and dip each one into the melted chocolate. Place each chocolate covered pretzel onto the parchment lined baking sheet. Allow to cool completely. Store in an airtight container for up to one week.


These were soooo addictive and delicious! We couldn't stop eating them. I'm afraid to make another batch in case I eat all of them too. But make these for a party - they're easy and quick and guests will devour them. :)

I'm so excited about finding Amy's blog! Its wonderful and I can't wait to venture back and try out some more of her recipes. They're so down to earth and low maintenance to make, which is a nice change of pace from some of the stuff I often find myself making. So, if you haven't already checked out The Savvy Kitchen, do it! I'll still be here when you come back.


And lastly, check out the blog hop below - it is a round up of all the other SRC Group C participants this month. Everyone always does a great job choosing and making delicious recipes and then in turn featuring the blog they were assigned.

Happy Baking my Friends!


19.2.12

Truffle Filled Chocolate Cupcakes


These cupcakes are obscenely good... like unbelievably good. I will pause to let you drool over the pictures for a moment. Honestly, these pictures make these cupcakes look good, but they taste even better than they look!!! You must try them. Do it on a weekend or a day off when you have a bit of time, but make them! They're soooo good. Your peeps will be impressed that you even made the truffle thats all melty and delicious in the middle of the cupcake!


 The reason I ended up making this recipe is because my friend D who has the same Anna Olson cookbook as I do, made these a while back and raved about how good they were. Well, I was flipping through my cookbook this weekend and saw this recipe and was reminded that I needed to try this recipe out. So, I went out to the store and bought the chocolate and cream I would need for this recipe. Everything else was already in my baking cupboard! Can you tell I like recipes with basic ingredients?!


Truffle Filled Chocolate Cupcakes
Recipe minimally adapted from Back to Baking by Anna Olson

Ingredients:

Truffles:
  • 6 tbsp whipping cream
  • 3 oz bittersweet chocolate, finely chopped
Cupcakes:
  • 2 oz unsweetened chocolate
  • 1/2 cup butter
  • 1 1/3 cups packed dark brown sugar
  • 1/3 cup + 1/2 cup milk
  • 2 eggs
  • 1 tbsp vanilla extract
  • 1 1/3 cups flour
  • 1 tsp baking soda
  • 1/2 tsp salt
Frosting:
  • 3 oz unsweetened chocolate
  • 3 tbsp butter
  • 1/2 cup sour cream
  • 2 tsp vanilla extract
  • 2 cups icing sugar


Method:
  1. To prepare the truffles, heat the cream to a simmer and pour it over the chopped chocolate. Let it sit for a minute, then gently whisk to blend. Chill this mixture until set, about 2 hours. Spoon this ganache into 20 truffles, shaping them between your hands into 3/4 inch balls. Chill the truffles until ready to use.
  2. Preheat the oven to 375F and line 20 muffin cups with paper liners.
  3. For the cupcakes, melt the chocolate and butter together in a medium saucepan, stirring over low heat. Then stir in 2/3 cup of the brown sugar and 1/3 cup of the milk. Stir over medium heat until the sugar has dissolved. Pour this mixture into a bowl, whisk in remaining 2/3 cup of brown sugar, and cool to room temperature. Whisk in the eggs one at a time, blending well after each addition. Whisk in the vanilla.
  4. In a separate bowl, stir the flour, baking soda, and salt. Add this to the chocolate mixture in 3 additions, alternating with the remaining 1/2 cup of milk, starting and ending with the four, and whisking well after each addition (the batter will be quite fluid). Pour the batter into the prepared muffin tins, filling to halfway.
  5. Gently place a truffle in the centre of each cupcake - do not press it in, as it will settle and become completely enveloped by the batter as it bakes. Bake the cupcakes for 20 minutes, until the cake springs back when gently pressed. Cool the cupcakes completely before frosting.
  6. For the frosting, stir the chocolate and butter in a saucepan over low heat until melted. Transfer this to the bowl of a stand mixer and using the whisk attachment, mix in the sour cream and the vanilla. Beat in the icing sugar until mixture is smooth and spreadable. Spread or pipe the frosting onto each cupcake. The cupcakes should be stored at room temperature in an airtight container and will keep for up to two days. Do not refrigerate.

So, these are a little bit of work, but they are so totally worth the effort. They are decadent and delicious. And if you wish to skip a step, these cupcakes are also delicious with just a fine dusting of powdered sugar instead. The truffle in the middle makes them rich enough and moist enough on their own. :)


This post has been linked up with Fusion Fridays over at Jennifer Cooks. Head on over there to check out some of the great things other bloggers have made this week. :)

This post has also been linked up with the Recipe Party over at the Sweet Spot! Check it out for some great recipes bloggers have posted this week.
Happy Baking my Friends! Here is to having something sweet to start the week. :)

7.2.12

Crazy Cooking Challenge: The Ultimate Chocolate Cake!


Surpise!! I've joined yet another cooking and baking challenge group. I love these things!! You get to try new things with a supportive and encouraging group of fellow bloggers. You learn new things and get to have fun doing it. This time the challenge is the Crazy Cooking Challenge hosted by Tina of Mom's Crazy Cooking. She posts some amazing things on her blog, so I knew the challenges would be great too.
Photobucket

The Crazy Cooking Challenge is a new dish each month of which each participant can make their own rendition of for the challenge. For example, some of the past challenges have been Macaroni & Cheese, Fudge, Mashed Potatoes and Chocolate Chip Cookies. YUM!! This month the challenge was to make the ultimate chocolate cake. It didn't matter what we did to the cake (i.e. icing, decorating, filling, recipe), but it had to be chocolate and it had to be cake. How fun right?!

I was on Pinterest (I love followers, so feel free to follow the link and follow me on Pinterest) the other day and I saw this cake - Mint Chocolate Chip Cake. Ummmmmm thats so my favorite kind of ice cream!!! So, it was settled, I was totally making that for the Crazy Cooking Challenge. I found this recipe on Raspberri Cupcakes (along with dozens of other amazing looking recipes). She had adapted the chocolate cake recipe from David Lebovitz's Devil's Food Cake, so I knew it was going to be delicious.
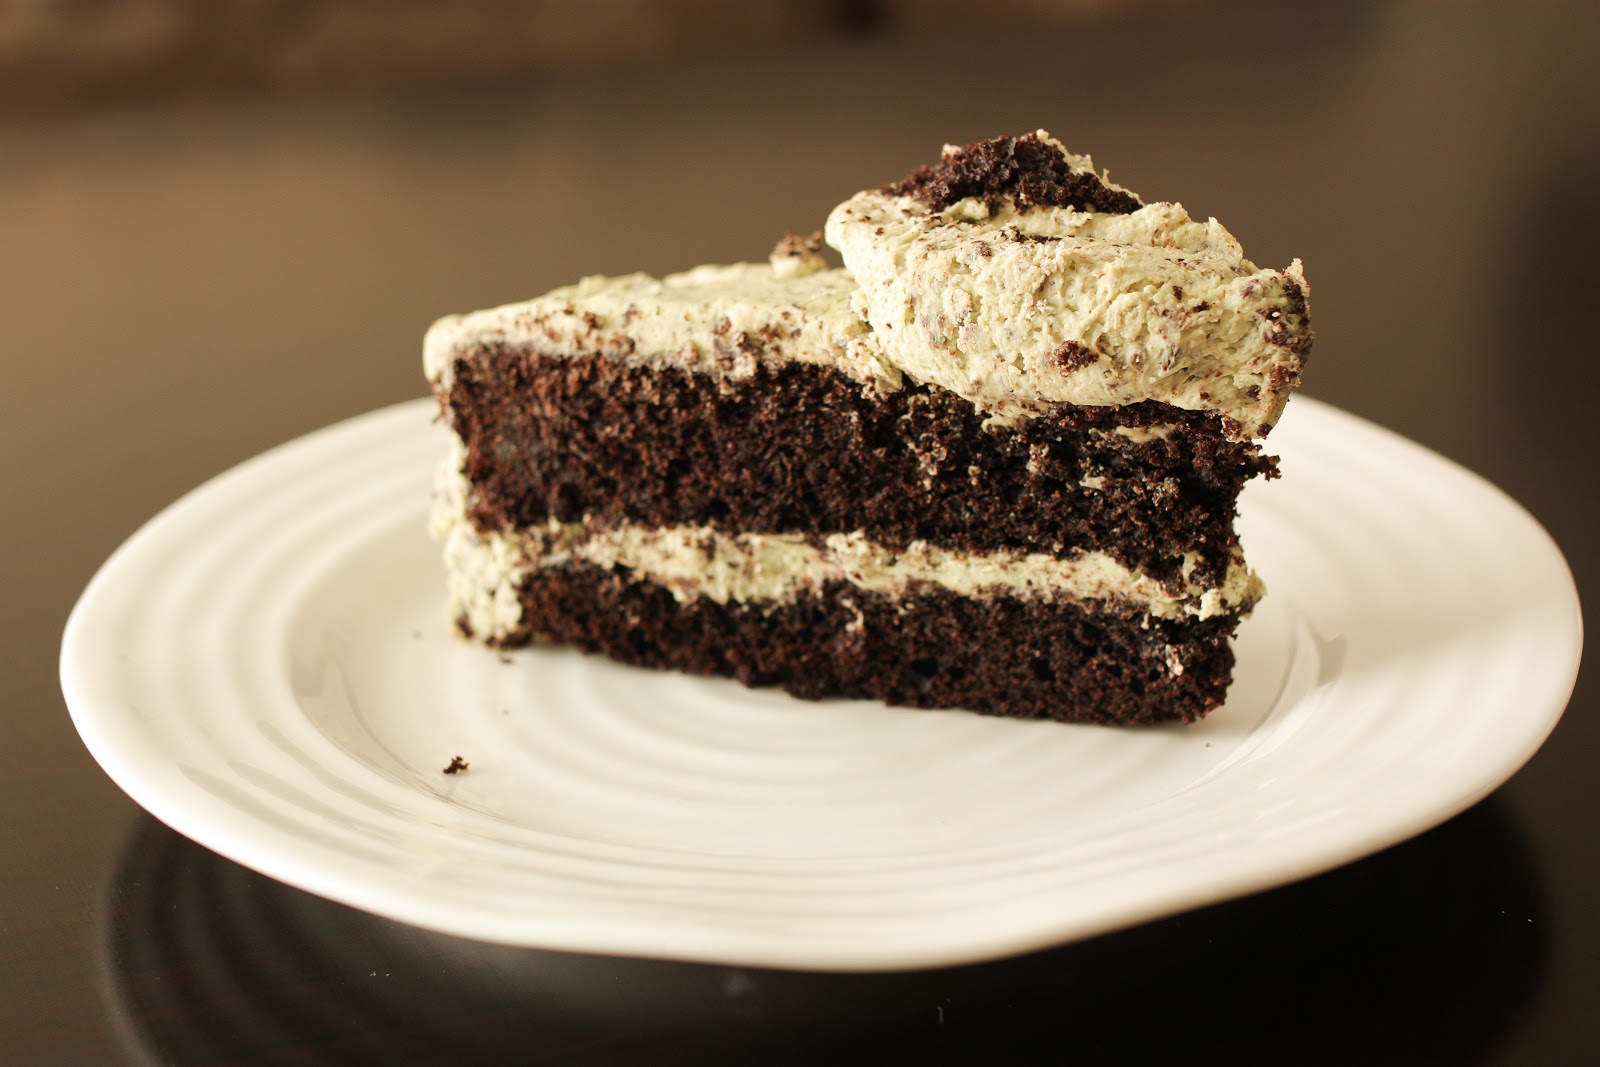
Yep, this is a pretty ugly piece of cake. It was the only piece leftover after serving it to my guests and I realized that I had better take a photo showcasing the lovely chocolate inside of the cake to show that my recipe is actually CHOCOLATE CAKE in light of what this challenge is about!!!
So, here is my entry into the Ultimate Chocolate Cake Crazy Cooking Challenge! Mint Chocolate Chip Cake. It seriously tastes just like the ice cream, so if you're a fan (and probably even if you aren't), you'll love this cake!

Mint Chocolate Chip Cake
Recipe minimally adapted from Raspberri Cupcakes

Ingredients:

For the Cake:
  • 9 tbsp unsweetened cocoa powder
  • 1 1/2 cups cake flour (not self-raising cake flour)
  • 1 1/2 tsp salt
  • 1 tsp baking soda
  • 1/4 tsp baking powder
  • 115g unsalted butter, at room temperature
  • 1 1/2 cups sugar
  • 2 large eggs
  • 1/2 cup strong coffee
  • 1/2 cup cream
For the Frosting:
  • 280g + 1/3- 1/2 cup unsalted butter at room temperature
  • 4 cups icing sugar
  • 2 tsp peppermint extract
  • 150g dark chocolate chips, run through the food processor until finely chopped
  • green food colouring
  • waffle ice cream cones to decorate (minis if you can find them!!)
Method:
  1. Butter and line the base of a 9" springform pan with parchment paper. Preheat the oven to 350F. Sift together the cocoa, cake flour, salt, baking soda and baking powder. Using a stand mixer, fitted with the paddle attachment, cream the butter and the sugar for about 5 minutes or until very fluffy and creamy. Add the eggs one at a time and beat after each addition until fully incorporated.
  2. Mix together the coffee and the cream. Stir half the dry ingredients into the butter mixture. Add the coffee-cream mixture. Then add the rest of the dry ingredients until smooth. Pour the batter into the prepared pan.
  3. Bake in preheated oven for 35-45 minutes or until a skewer inserted into the middle of the cake comes out clean (be careful not to overbake). Remove from oven and cool in baking tin for 5 minutes. Remove from baking tin to a wire rack and cool completely.
  4. Prepare the mint icing: In the bowl of a stand mixer, beat 280g of butter until fluffy and lighter in colour. Add the icing sugar one cup at a time and beat until smooth after each addition. Beat in additional butter (hence the 1/3 - 1/2 cup extra butter) until the icing is a nice spreading consistency. Beat in green food colouring until evenly distributed and coloured to desired green food colouring level. Stir through finely chopped chocolate until evenly distributed.
  5. Using a serrated knife, cut the cake in half to form two layers. Place one layer on a cake plate. Spread 1/4 of the icing on top of first layer of the cake. Then place the other half of the cake on top (trim top if necesary to get a nice flat surface). Ice the entire cake with the remaining icing. Use an ice cream scoop to make "scoops" of any extra frosting and arrange artfully on top of the cake. Top with the mini waffle cones.Can be served immediately or stored in an airtight container overnight. Serve at room temperature.
Mmmmm this was a deliciously moist cake and the frosting tasted so much like mint chocolate chip ice cream. It is a super cute cake that has a bit of a wow factor to it. I served it for a ladies get together at my house and it was a hit. Hope you enjoy it as much as we did!

This post has been linked up with Mouth Watering Mondays over at the Sweet Spot. Head on over there to check out some of the other mouth watering dishes fellow bloggers have cooked up this week. :)

This post has also been linked up with Fusion Fridays over at Jennifer Cooks. Head on over to check out her favorite submissions from last week and what other bloggers are linking up this week.


18.1.12

Macaroon Madness Bars


After yesterday's "healthy" post, I have to catch up by posting something extra un-healthy today! Just kidding! I'm trying to post one healthy recipe per week going forward as I've had a number of requests from my readers for healthy recipes including - low fat, low sugar, diabetic friendly, gluten free and dairy free! I'm going to do my best to try to post a variety of these recipes over the next year. If there is anything you'd like to see me make, or you have a healthy recipe you'd like me to feature, by all means, please leave me a comment or send me an email.  I would love to hear from you!


I found this recipe on Jen's blog Food & Whine. She has a great online recipe box full of amazing recipes - so if you haven't already, do check her out. She doesn't post every day but whenever she does post I'm always excited to see what new recipe she is sharing because they're always good!! I made these macaroon madness bars and they're so delicious I just have to share them with you. If you love coconut, you'll fall hard for these little beauties. Jen notes that you should leave them overnight in the fridge before slicing them and she's right. I let them soften a bit to room temperature prior to slicing and they were a little messy to slice.

Macaroon Madness Bars
Recipe minimally adapted from Food & Whine

Ingredients:
  • 1/2 cup butter, at room temperature
  • 2 cups flour
  • 2 tbsp cornstarch
  • 1 tsp baking powder
  • 1 cup salted butter, melted
  • 1 1/2 cups brown sugar, packed
  • 2 tsp vanilla
  • 3 eggs, lightly beaten
  • 1 can sweetened, condensed milk (14 oz)
  • 2 cups sweetened coconut flakes
  • 2 cups quick cooking oatmeal
  • caramel syrup (I used store bought, but you can find a good recipe on Jen's post)
  • 1/2 cup white chocolate chips
  • 1/2 cup semi-sweet chocolate chips
Method:
  1. For the base, line a 9x13 inch pan with parchment paper and spray lightly with cooking spray. Leave an overhang of parchment on each end to lift out of the pan easily after baking. Combine butter, flour, cornstarch, and baking powder in a medium bowl. Mix until mixture is well combined and crumbly. Press into bottom of prepared pan (use the bottom of a glass to really pack in the crust). Set aside.
  2. Preheat oven to 350F. For the filling, over low heat, combine the butter, brown sugar, vanilla and sweetened condensed milk. Stir until sugar is dissolved. Remove from heat and stir in eggs. Fold in coconut and oatmeal until well combined. Pour over crust in prepared pan. Bake in preheated oven for 25-30 minutes until golden brown (center will still be a bit jiggly). If the center is too wobbly, cook for another 5 minutes.
  3. Cool completely. Cover, refrigerate overnight.
  4. Drizzle bars with caramel syrup. Place back in the refrigerator for 10-15 minutes. Then melt the white chocolate and drizzle over the bars. Refrigerate another 10-15 minutes. Finally, melt the chocolate and drizzle over the bars. Refrigerate another 10-15 minutes or until chocolate is firm. Remove from pan and slice into squares or triangles. Keep left over bars in the fridge, or freeze for later use.


Hope you enjoy these bars! I know we sure did. I've actually saved some of the leftovers in the freezer (and by freezer, I mean my patio - its -8 again today, so no need to take up valuable freezer space when I have a big one outdoors!!) for a girls get together I'm having at my place on Sunday. Oh its going to be a good time - we're going to get a valentines card making tutorial from one of the ladies and what kind of girls get together would be complete without a friendly chocolate tasting competition?! I'll let you know how it goes and obviously give you the DL on what kind of food I make next week.

This post has been linked up with Whatcha Baking Wednesdays over at Cajun Sugar Pie. Head on over to check out what other delicious desserts have been whipped up this week by fellow food bloggers.

This post has been linked up with Jane Deere's Fusion Fridays! Please stop by the Fusion Friday's link party to check out what everyone else was cooking up this week.

Happy baking my friends!