Showing posts with label chocolate chips. Show all posts

9.8.13

{Dairy Free} Chocolate Cappuccino Biscotti


Whew! What a week its been so far. Despite being a shorter week than usual, it seems like it was so much more exhausting than it usually is. Part of it is that two of my four days this week were attending training seminars all day and the fact that my car broke down on my way to said training seminar. I think I was also coming back to reality after such a fantastic yoga retreat last weekend which made this week seem even tougher! You know what you need on weeks like that? Delicious and flavourful biscotti. That's what will make it allllll better. Especially biscotti you can indulge in nearly guilt free - these have no added fat (some fat in the chocolate chips, but no oil or butter products added to this dough) and they have no dairy (I substituted almond milk for the milk).


Chocolate Cappuccino Biscotti
Recipe minimally adapted from Joy of Baking

Ingredients:
  • 2 cups all purpose flour (or you could substitute 1 cup whole wheat for one cup of white flour)
  • 1 cup granulated sugar
  • 1/2 tsp baking soda
  • 1/2 tsp baking powder
  • 1/2 tsp salt
  • 1/2 tsp cinnamon
  • 1/4 tsp cloves
  • 1/4 cup strong coffee
  • 1 tbsp finely ground coffee
  • 1 tbsp almond milk
  • 1 egg
  • 2 tsp vanilla extract
  • 3/4 cup semi sweet chocolate chips


Method:
  1. Preheat oven to 350F. Line two baking trays with parchment paper, set aside.
  2. In a small bowl, whisk coffee, ground coffee, almond milk, egg and vanilla.
  3. In the bowl of a stand mixer beat flour, sugar, soda, powder, salt and spices until combined. Gradually mix in coffee mixer until combined. Add chocolate chips and incorporate without overmixing.
  4. With floured hands, divide the dough in half. Roll each portion of dough into a log about 10 inches long and 2 inches wide. Transfer logs to prepared baking sheets (one on each sheet).
  5. Bake in preheated oven until firm to the touch. Remove from oven and cool on wire rack 10 minutes.
  6. Reduce oven temperature to 300F. On a cutting board, cut the logs lengthwise on a diagonal into 3/4 inch slices. Place cut side up on a baking tray. Bake five minutes, flip over and bake five minutes on the other side. Remove from heat, let cool. Store in an airtight container.
 
These were really yummy with all the spices and with the strong coffee flavour. We really enjoyed them dipped in coffee or tea or even just eaten as a snack. What is your favorite kind of biscotti?
 
Here are a few of my favorites:
 
Happy Baking my Friends!

5.6.13

Coconut Chocolate Chip Cookies


Happy Wednesday peeps! The week is more than half over - you can do it!! These cookies got me revved up about baking again - they're delicious and totally different than any chocolate chip cookie I've ever had. They have a secret ingredient - coconut oil!


 If you're worried about how expensive coconut oil is, let me tell you a little secret! You don't have to pay loads of money for good quality cold pressed coconut oil!! Go down to your local Costco and load up- they had huge jars of really good quality stuff on for around $20! Stop paying the ridiculous prices at grocery stores and health food stores! You absolutely don't need to.


 I found this recipe on the Well Traveled Wife. Head on over there and check out her site - it seems like a good one with lots of yummy recipes. And if this recipe is any testament to the quality of her recipes, her blog is fantastic!


Coconut Chocolate Chip Cookies
Recipe adapted from The Well Traveled Wife

Ingredients:
  • 1/2 cup coconut oil
  • 1 cup white sugar
  • 2 eggs
  • 1 tbsp. vanilla
  • 1 3/4 cup all purpose flour
  • 1/2 tsp kosher salt
  • 1 tsp baking powder
  • 1/4 tsp baking soda
  • 3/4 cup white chocolate chips
  • 3/4 cup semi-sweet chocolate chips
  • 1/2 - 1 cup shredded coconut
Method:
  1. Preheat oven to 375F. Line two baking sheets with parchment paper and set aside.
  2. In the bowl of your mixer, cream the coconut oil and sugar together. Add eggs one at a time beating until incorporated after each addition. Add vanilla and beat til fluffy.
  3. In another bowl, mix the flour, salt, powder and soda. Gradually add to the coconut mixture until just about incorporated (mixing on a very low speed). Add in chocolate chips and coconut and mix til just combined.
  4. Drop by spoonful's onto prepared baking sheets. Bake in pre-heated oven for 8-10 minutes until just lightly browned around the edges and still soft in the middle. Let set on tray for 2-4 minutes after removing from oven, then remove to wire rack to cool completely.

The coconut oil adds such an amazing flavour to these cookies! You really need to try them. The beauty of these cookies is how quick and easy they come together - none of this finicky cookie stuff! Simple and delicious is all you'll find here!


Happy Baking my Friends!
 

3.3.12

Soft, Chewy Black & White Chip Cookies


Howdy peeps! Hows your weekend going so far? I worked this morning then ran around like a chicken with my head cut off trying to get everything done before my two week trip for work... I leave tomorrow. Right now I've got the hockey game on in the background, watching my Canucks get their butts kicked (common theme this year I know) and on one of the commercial breaks, I watched a beer commercial that said "There's an art to everything..." and thats so true isn't it? As with other things, making perfect chocolate chip cookies is also an art. Its hard to find that "perfect" recipe and works out every time, but I think this recipe is one of the best I've ever tried. They've got a secret ingredient - cornstarch!! The cornstarch keeps them soft and fluffy and gives them a really silky texture in your mouth. Give them a try, you won't be disappointed.


Soft, Chewy Black & White Chip Cookies
Recipe minimally adapted from Anna Olson's Back to Baking

Ingredients:
  • 1 cup unsalted butter, softened
  • 1 cup packed dark brown sugar
  • 1/2 cup white sugar
  • 2 eggs
  • 1 tbsp vanilla extract
  • 2 1/2 cups all purpose flour
  • 4 tbsp cornstarch
  • 1 tsp baking soda
  • 3/4 tsp fine sea salt
  • 1 cup white chocolate chips
  • 1 cup dark chocolate chips
Method:
  1. Preheat the oven to 350F. Line two cookie sheets with parchment paper.
  2. Cream the butter with the sugars together until fluffy, about 5 minutes. Beat in the eggs and vanilla.
  3. In a separate bowl combine the flour, cornstarch, baking soda and salt together with a whisk until evenly blended.
  4. Add the flour mixture to the butter mixture and stir until evenly blended. Stir in white and dark chocolate chips.
  5. Using a medium cookie scoop, drop scoops of cookie dough onto the prepared trays, leaving about 1 1/2 inches between the cookies.
  6. Bake for 12 minutes, until the cookies are just golden around the edges and don't look quite done in the middle. Let cookies cool on tray for 5 minutes then remove to a rack to transfer completely.

So easy and delicious! Hope you enjoy these.

Note that I won't be around much the next couple of weeks, but I will try to get a couple posts up while I'm gone... maybe a couple restaurant reviews?!

Happy Baking my Friends!

7.2.12

Crazy Cooking Challenge: The Ultimate Chocolate Cake!


Surpise!! I've joined yet another cooking and baking challenge group. I love these things!! You get to try new things with a supportive and encouraging group of fellow bloggers. You learn new things and get to have fun doing it. This time the challenge is the Crazy Cooking Challenge hosted by Tina of Mom's Crazy Cooking. She posts some amazing things on her blog, so I knew the challenges would be great too.
Photobucket

The Crazy Cooking Challenge is a new dish each month of which each participant can make their own rendition of for the challenge. For example, some of the past challenges have been Macaroni & Cheese, Fudge, Mashed Potatoes and Chocolate Chip Cookies. YUM!! This month the challenge was to make the ultimate chocolate cake. It didn't matter what we did to the cake (i.e. icing, decorating, filling, recipe), but it had to be chocolate and it had to be cake. How fun right?!

I was on Pinterest (I love followers, so feel free to follow the link and follow me on Pinterest) the other day and I saw this cake - Mint Chocolate Chip Cake. Ummmmmm thats so my favorite kind of ice cream!!! So, it was settled, I was totally making that for the Crazy Cooking Challenge. I found this recipe on Raspberri Cupcakes (along with dozens of other amazing looking recipes). She had adapted the chocolate cake recipe from David Lebovitz's Devil's Food Cake, so I knew it was going to be delicious.
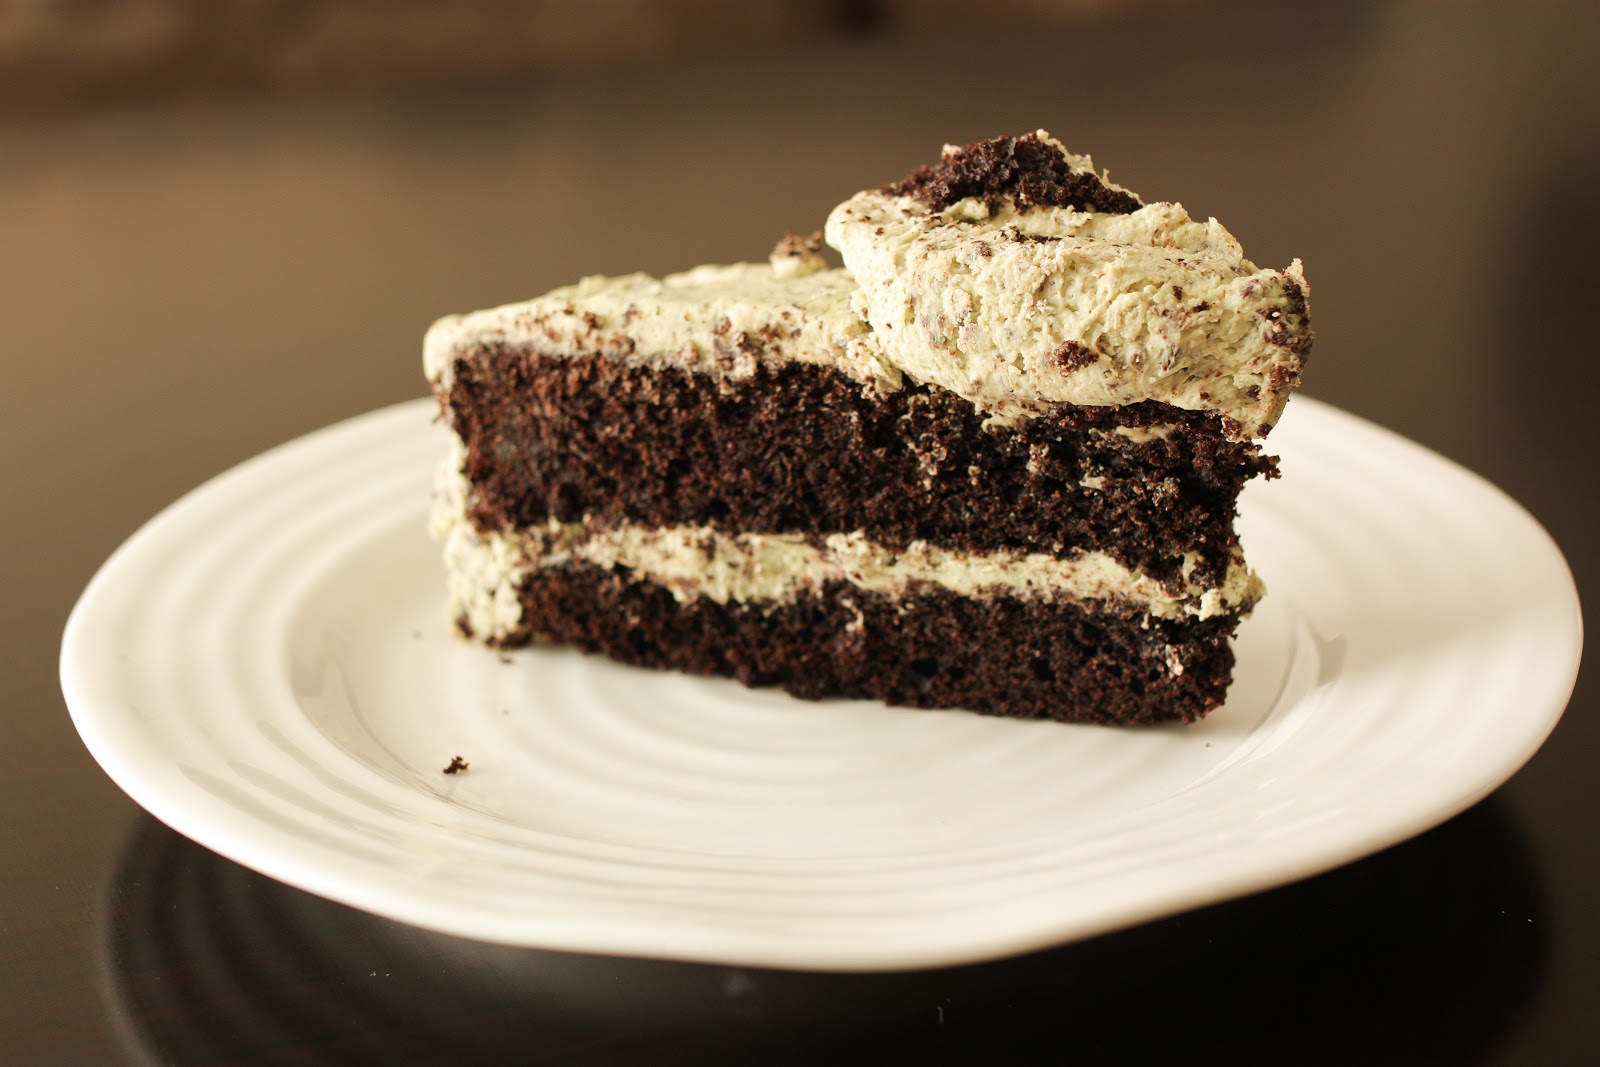
Yep, this is a pretty ugly piece of cake. It was the only piece leftover after serving it to my guests and I realized that I had better take a photo showcasing the lovely chocolate inside of the cake to show that my recipe is actually CHOCOLATE CAKE in light of what this challenge is about!!!
So, here is my entry into the Ultimate Chocolate Cake Crazy Cooking Challenge! Mint Chocolate Chip Cake. It seriously tastes just like the ice cream, so if you're a fan (and probably even if you aren't), you'll love this cake!

Mint Chocolate Chip Cake
Recipe minimally adapted from Raspberri Cupcakes

Ingredients:

For the Cake:
  • 9 tbsp unsweetened cocoa powder
  • 1 1/2 cups cake flour (not self-raising cake flour)
  • 1 1/2 tsp salt
  • 1 tsp baking soda
  • 1/4 tsp baking powder
  • 115g unsalted butter, at room temperature
  • 1 1/2 cups sugar
  • 2 large eggs
  • 1/2 cup strong coffee
  • 1/2 cup cream
For the Frosting:
  • 280g + 1/3- 1/2 cup unsalted butter at room temperature
  • 4 cups icing sugar
  • 2 tsp peppermint extract
  • 150g dark chocolate chips, run through the food processor until finely chopped
  • green food colouring
  • waffle ice cream cones to decorate (minis if you can find them!!)
Method:
  1. Butter and line the base of a 9" springform pan with parchment paper. Preheat the oven to 350F. Sift together the cocoa, cake flour, salt, baking soda and baking powder. Using a stand mixer, fitted with the paddle attachment, cream the butter and the sugar for about 5 minutes or until very fluffy and creamy. Add the eggs one at a time and beat after each addition until fully incorporated.
  2. Mix together the coffee and the cream. Stir half the dry ingredients into the butter mixture. Add the coffee-cream mixture. Then add the rest of the dry ingredients until smooth. Pour the batter into the prepared pan.
  3. Bake in preheated oven for 35-45 minutes or until a skewer inserted into the middle of the cake comes out clean (be careful not to overbake). Remove from oven and cool in baking tin for 5 minutes. Remove from baking tin to a wire rack and cool completely.
  4. Prepare the mint icing: In the bowl of a stand mixer, beat 280g of butter until fluffy and lighter in colour. Add the icing sugar one cup at a time and beat until smooth after each addition. Beat in additional butter (hence the 1/3 - 1/2 cup extra butter) until the icing is a nice spreading consistency. Beat in green food colouring until evenly distributed and coloured to desired green food colouring level. Stir through finely chopped chocolate until evenly distributed.
  5. Using a serrated knife, cut the cake in half to form two layers. Place one layer on a cake plate. Spread 1/4 of the icing on top of first layer of the cake. Then place the other half of the cake on top (trim top if necesary to get a nice flat surface). Ice the entire cake with the remaining icing. Use an ice cream scoop to make "scoops" of any extra frosting and arrange artfully on top of the cake. Top with the mini waffle cones.Can be served immediately or stored in an airtight container overnight. Serve at room temperature.
Mmmmm this was a deliciously moist cake and the frosting tasted so much like mint chocolate chip ice cream. It is a super cute cake that has a bit of a wow factor to it. I served it for a ladies get together at my house and it was a hit. Hope you enjoy it as much as we did!

This post has been linked up with Mouth Watering Mondays over at the Sweet Spot. Head on over there to check out some of the other mouth watering dishes fellow bloggers have cooked up this week. :)

This post has also been linked up with Fusion Fridays over at Jennifer Cooks. Head on over to check out her favorite submissions from last week and what other bloggers are linking up this week.


25.6.11

Cheesecake Chocolate Chip Cookie Bars

So I'm pretty sure the first thing you're going to notice about this post is that I don't have any photos of the finished product... I'm pretty sure they disappeared too fast for me to take photos of! Thats my story and I'm sticking to it. For photos of how the dessert looks after its baked, head on over to Tracey's blog aptly named Tracey's Culinary Adventures. On her blog you'll find beautiful photos and all kinds of deliciously yummy recipes. I have a whole list of things bookmarked from her page to bake and cook, but its nearly impossible to get through that list because she keeps adding more and more delicious posts by the day. :)


Now that we've established that, I have to tell you - this recipe is delicious - I mean who wouldn't like a layer of cheesecake sandwiched between chocolate chip cookie goodness right?! Don't overbake these - they're meant to be a little chewy! Make these for that summer BBQ you have to attend or bake them and bring a plate to your neighbor... I promise you'll find yourself making all kinds of friends because of your baking "skills" (even though these bars are so dead easy that you could likely make them in your sleep!!). So? What are you waiting for? Go round up the ingredients and get started!!!


Cheesecake Chocolate Chip Cookie Bars

Recipe adapted from Tracey's Culinary Adventures


  • 1 cup butter

  • 1 cup light brown sugar

  • 1/2 cup granulated sugar

  • 1 tbsp vanilla extract

  • 1/2 tsp salt

  • 1 tbsp cider vinegar

  • 1 egg

  • 1 tsp baking soda

  • 2 cups all-purpose flour

  • 2 cups semi-sweet chocolate chips

  • 8 oz pkg cream cheese, softened

  • 1/2 cup granulated sugar

  • 1 egg

  • 1 tsp vanilla

Method:


  1. Preheat oven to 350F. Spray a 9x13 inch pan with nonstick spray.

  2. In the bowl of a stand mixer, fitted with the paddle attachment, cream the butter, brown sugar, the first amount of white sugar, vanilla and salt on medium speed until fluffy, about 3-4 minutes.

  3. Beat in the first egg until well combined. With the mixer on low speed, mix in the flour and the baking soda and mix until just incorporated. Stir in the chocolate chips. Divide the dough in half and press one half of the dough into the bottom of your prepared pan. Set aside the other half of the dough.

  4. In the bowl of a stand mixer fitted with the paddle attachment, beat the cream cheese until fluffy, about 2-3 minutes. Beat in the second amount of sugar, second egg, and the second amount of vanilla until just incorporated. Pour the cream cheese mixture over the cookie layer in the pan and spread to the edges of the dish so you have one smooth, even layer.

  5. Use the second half of the cookie dough (that you set aside earlier) and press in a layer over the cream cheese. The easiest way to do this is to take chunks of the dough, flatten into disks, and layer over the cream cheese mixture. It doesn't matter if the cream cheese part is completely covered, because the cookie dough will spread during baking. See below for a couple pictures of what mine looked like before I baked it.

  6. Bake in preheated oven for 35-40 minutes, or until the top is brown and cooked through (the bars will begin to pull away slightly from the sides of the pan). Transfer pan to a wire rack to cool completely. Store in the refrigerator.

Absolute deliciousness! My sister couldn't stop eating them. I think I'll likely make these for the next treat day I do for our office. :) Hope you are having a nice weekend and getting some nice weather.

Happy Baking my Friends!

13.2.11

Chocolate Chip Cookies

I hope you're all having a fantastic weekend! Mine has been great - a welcome rest from the craziness of last week. I felt moderately productive this weekend too! Hubby and I managed to finish a bench we have been "refinishing" for the last year. And I made some great meals this weekend - Lamb Rogan Josh on Saturday night and Pork Carnitas tonight! Deliciousness. :) In light of all the cooking / baking this weekend, I thought I would post something nice and simple with comfort-food qualities... I mean, who doesn't like chocolate chip cookies?!

This is a great recipe - simple, delicious and quick to make! I found it in the Better Homes & Gardens New Cook Book years ago. It is my go-to recipe. I do have other recipes that I like too, but I've made this one so many times I pretty well have it memorized! I hope you enjoy it as much as we always do.

Chocolate Chip Cookies
Recipe from Better Homes & Gardens New Cook Book

Ingredients:

  • 2 1/2 cups all purpose flour
  • 1 tsp baking soda
  • 1/2 tsp salt
  • 1 cup butter
  • 1 cup packed brown sugar
  • 1/2 cup granulated sugar
  • 2 eggs
  • 1 1/2 tsp vanilla
  • 2 cups chocolate chips (I only use 1 - 1 1/2 cups)

Method:

  1. Stir flour, soda and salt together. In the bowl of a stand mixer, beat butter on medium speed for 30 seconds. Add both sugars and beat until fluffy. Add eggs and vanilla; beat well.
  2. Add dry ingredients to beaten mixture, mixing until well combined. Stir in chocolate chips.
  3. Bake at 375F for 8-10 minutes. Be sure not to over cook them!


Happy Baking my Friends!

1.12.10

Flourless Peanut Butter Chocolate Chip Cookies


Okay, I realize its been a while since I've posted. I have a confession to make - I have been very, very busy studying for a huge test I have to write on the 17th of December. Such a cruel time of the year to make people study and spend large amounts of time on homework and other lovely tasks. All you really want to do is turn on the Christmas music, pour a nice warm beverage and snuggle in front of the fireplace. Or in my case, turn on the Christmas music, write a blog post or two, get some baking done and decorate my house for Christmas!!! Unfortunately, I haven't had time for any of that lately. My point is, I may be posting a little less frequently over the next couple of weeks depending how the studying goes... but bear with me ok?!

Next up, is that of course I'm inspired about a lovely December theme for my blog - the 12 days of Christmas - a different Christmas recipe for each day with the end result being a fabulous Christmas feast - all posted in time to be incorporated into your Christmas menu planning. I had originally planned for these recipes to be posted between December 1 -12th, but that is not going to happen, so we are going to have the 12 days of Christmas theme for my blog, but the days will not be consecutive!!! I hope you enjoy. I am really looking forward to cooking/ baking for and writing these blog posts.

Now, on to my actual blog post right!! The other day I was browsing another blog I follow called Tracey's Culinary Adventures when I came across an intriguing recipe for flourless peanut butter chocolate chip cookies. I had never made flourless cookies, but I absolutely adore peanut butter cookies so I figured I would give them a shot. I mean, anything with chocolate chips and peanut butter chips in it must be delicious right? Of course I was right! The recipe was amazing!! I mean, absolutely and utterly amazing! The cookies were so perfect and delicate and the flavour was exquisite! So do, check out the recipe on Tracey's Culinary adventures by clicking here. Let me know what you think!


Oh, by the way, do stop by Tracey's blog and check out some of her other recipes! Everything, I mean everything looks just fantastic! :)
Happy Baking my Friends! Stay tuned for the 1st day of Christmas Recipes!!!

9.9.10

Coconut Chocolate Chip Brownies

First things first - I got a new haircut and have to show it off - new haircut to start my new job! Here is a photo - its definitely different and I lost about eight inches of hair. :D (I AM aware that this is not remotely food or wine related, but I'm excited ok?!)

Alright, now that my face has been plastered all over my blog... lets get on to what you came here for - awesome food! I have a confession to make - I've made some really bad batches of brownies this summer. I'm choosing to blame it on the recipes I've tried, but you never know... maybe I just have a brownie handicap. That is what I was beginning to think - "I've lost my baking touch"... it was a really panicky feeling. But then I went back to the basics - I busted out my "Clueless in the Kitchen - a cookbook for Teens" cookbook. I'm a little embarassed about that... but guess what? It worked! I took the brownie recipe, adapted it and voila - amazingly perfect brownies. So without further delay, here is the recipe for my coconut, chocolate chip (or whatever you have in your pantry) brownies.
Coconut Chocolate Chip Brownies

Adapted from Clueless in the Kitchen, page 153

Ingredients:
  • 3/4 cup unsweetened cocoa powder
  • 1/2 tsp baking soda
  • 2/3 cup oil
  • 1/2 cup boiling water
  • 2 cups sugar
  • 2 eggs
  • 1 1/3 cup flour
  • 1 tsp vanilla
  • 1 tsp coconut extract
  • 3/4 cup chocolate chips
  • 1/2 cup coconut

Method:

  1. Preheat oven to 350F. Grease a 9x13 inch baking pan.
  2. In a large bowl, stir together the cocoa and baking soda. Blend in 1/3 cup of the oil and mix until smooth. Pour in the boiling water, stirring until mixture thickens (for complex scientific reasons, it will thicken). Now stir in the rest of the oil, the sugar, and the eggs. Mix until smooth.
  3. Add the flour, the vanilla and the coconut extract. Blend completely - there should be no lumps. Now mix in the chocolate chips and the coconut, and pour into the greased baking pan. Spread the batter evenly to avoid crispy edges.
  4. Bake in preheated oven for 35 to 40 minutes, until just set in the middle. Don't overcook brownies - they're always better slightly moist.
  5. Let cool and cut into squares. Dust with icing sugar to make them look pretty (if you can wait that long before you devour them). Enjoy!

This recipe was a big hit - my husband didn't want me to share them with anyone (I usually give away about 1/2 of my baking so we don't end up eating all of it), kind of like my cinnamon buns - hubby hides them on everyone else in the house so he can enjoy them all to himself. :) I guess I should take it as a compliment.

Any way, I hope you enjoy this recipe and have an opportunity to give it a try - its easy and delicious. Happy Baking my Friends!

12.8.10

Nutty Chocolate Chip Biscotti

Biscotti originate from Italy where the name literally means "twice baked". Biscotti were baked twice to produce a very dry cookie that would keep for long periods of time. Today biscotti are just considered a decadent treat with many variations of the recipe. Many biscotti makers today tend not to bake their biscotti traditionally and produce a softer biscotti that many people seem to love. I also prefer my biscotti a little bit softer than is traditional, so please keep that in mind as I share baking times with you - if you prefer your biscotti more traditionally crunchy, feel free to bake a little bit longer during the second baking time!

The recipe I made is from my cookbook The Guy Can't Cook by Cinda Chavich. I seem to share a lot of recipes with you out of her cookbooks, but they're just so good that I can't resist sharing them! The recipe is quite easy and not overly technical, so beginners or people who don't like the kitchen much will have no problems making this recipe. Hope you enjoy it as much as I did!


Nutty Chocolate Chip Biscotti
Recipe adapted from Cinda Chavich, p. 467 The Guy Can't Cook

Ingredients:

  • 3/4 cup softened butter
  • 2 cups granulated sugar
  • 3 eggs
  • 3 1/2 cups flour
  • 2 tsp baking powder
  • 1 cup lightly toasted almond slices (or pistachios)
  • 1 cup chocolate chips

Method:

  1. Preheat oven to 350F.
  2. In a large mixing bowl, use an electric mixer to cream the butter and sugar together until fluffy. Add the eggs one at a time, beating after each addition.
  3. In a separate bowl, combine the flour and baking powder. Gradually add 1/2 the flour mixture to the batter, beating to incorporate. Stir in the nuts and chocolate. Stir in the remainder of the flour mixture and incorporate. Turn the dough onto a lightly floured surface and separate into three equal portions. Roll each portion into a rope about 12 to 14 inches long.

4. Line a baking sheet (or two) with parchment paper and place the ropes side-by-side, leaving at least 3 inches of space for the cookies to expand into slightly flattened logs as they bake.

5. Bake for 20-30 minutes in the preheated oven, or until logs are firm to the touch. Remove from oven and let cool for 20 minutes. With a serrated knife, cut each log on an angle into 1/2 inch thick biscotti. Lay biscotti on the baking sheet and return to oven for 5 minutes to crisp up a bit. If desired, drizle melted chocolate over the biscotti once they've cooled, or dip one end of each biscotto in melted chocolate and chill until chocolate sets. Makes 4-5 dozen biscotti.


This recipe makes some of the most delicious biscotti I have ever made at home! If you choose one recipe to make - choose this one - you will impress yourself, your friends and your family!


Thanks for taking the time to stop by and check out my blog! Have you ever made biscotti? If so, what type of biscotti did you make? Until next time - happy baking my friends!