27.11.13

Roasted Garlic and Yam Soup

Hey Friends! I realize its been a while since I updated my blog... Not even going to try to make excuses for whats going on or why I haven't been posting much. What I am going to do is bring you a delicious soup that will warm you through and through despite this cold weather we've all been having. A delicious roasted garlic and yam soup.

This soup is a bit time consuming due to the many layers of flavours that go into it! You can make the veggie stock a day or two before and you can roast the veggies ahead of time too if you want to speed up the process. If you really don't have time and need to skip one of the steps - just buy the veggie stock. Don't skip roasting the veg - it adds such a delish layer of flavours that you can't miss out on to enjoy the true delightfulness of this soup.

First things first - make the veggie stock. You can find a delish recipe here - though it will make more than you need for this recipe, just freeze the rest and use it up as you see fit. Next you can get started on the recipe below. 

Roasted Garlic and Yam Soup
Minimally adapted from Rebar

Ingredients:
  • 6 cups veggie stock (recipe linked above)
  • 3 large yams
  • 2 heads of garlic
  • 4 roma tomatoes
  • 2 red peppers
  • 2 tablespoons vegetable oil
  • 1 medium yellow onion, diced
  • 2 tsp salt
  • 3 garlic cloves, minced
  • 2 tbsp minced fresh sage
  • 2 tbsp minced fresh oregano
  • 1 tsp ground coriander
  • 1 tsp ancho chile powder
  • pinch of allspice
  • 2 tsp chipotle puree (puree one can of chipotle peppers in adobo sauce and measure out 2 tsp)
  • 1 tbsp maple syrup
  • juice of one lime
  • salt and pepper to taste
Method:
  1. Preheat oven to 375F. Using a fork, pork a few holes in each yam. Cut the top 1/4 off the garlic to expose each of the pieces of garlic inside, drizzle each head with olive oil then wrap in foil. Place yams and garlic on a baking tray and roast in preheated oven for approximately 45 minutes. Yams may need a bit longer, but garlic should come out after 45 minutes. Yams are done when they are very tender. Cool slightly, then remove yams and garlic from their skin.
  2. Halve and seed the peppers. Place peppers and whole tomatoes on a well-oiled baking tray and roast until skins are browned and puffed (about 15 minutes). Transfer to a bowl and cover with plastic wrap for approximately 10 minutes. Peel away the skins and set aside.
  3. Heat the oil in a large soup pot, add onions and saute until translucent. Add garlic, spices and herbs and cook until garlic is fragrant (about 1 minute). Stir in the peeled, roasted veggies, the stock and the chipotle puree. Bring to a boil, reduce heat and simmer for about 20 minutes.
  4. Puree the soup until smooth. Whisk in maple syrup and lime juice. Season to taste with salt and pepper. Serve hot and topped with crushed tortilla chips and a bit of cheese. Also delicious with a dallop of sour cream or greek yogurt.


Happy Cooking my Friends! What have you been cooking and baking lately?

26.10.13

From Scratch: Delicious Vegetable Stock

Some things just taste better when they're made from scratch. Stock is definitely one of those things! Whether its a hearty chicken or beef stock, a delicate seafood stock or a delicious veggie stock, it always tastes better when its home made. The reason is that you control how much salt goes in it (the storebought versions are usually full of sodium) and you get to control the layering of flavours and tailor them to suit your tastes. The other beautiful thing about stock is that you can make it using up scraps you would have otherwise thrown out! This stock recipe can be changed up based on what you have on hand! The only things to avoid tossing in are:
  • Broccoli
  • Cabbage
  • Cauliflower
  • Beets
  • Peppers
  • Asparagus
These will either colour your stock with an odd colour or they will give it an overwhelming flavour that won't be suitable for a multi-purpose use that a stock usually is.

 
Apologies for the iPhone photos... The last few things I've made I haven't had a chance to photograph them with my good camera, but they turned out so delicious I still wanted to share them with you.
 
Here's how to make this delicious stock:
 
Vegetable Stock
Recipe minimally adapted from Rebar
 
Ingredients:
  • 1 tbsp vegetable oil
  • 1 yellow onion
  • 2 leeks, greens only
  • 1 garlic bulb
  • 4 carrots
  • 2 celery sticks
  • 1 apple
  • 4 bay leaves
  • 1/2 tbsp whole black peppercorns
  • 1 tbsp cumin seeds
  • 1 tbsp coarse salt
  • A few sprigs of fresh thyme & sage
  • 16 cups cold water
Method:
  1. Peel and roughly chop the onions, leeks, carrots and celery. Separate the garlic bulb and smash the cloves with the flat of your knife. Quarter the apple.
  2. Heat oil in a large stock pot and add onions, leeks, carrots, celery, salt and bay leaves. Saute for five minutes, stirring often.
  3. Add all of the remaining ingredients, including the water and bring to a boil. Reduce heat and simmer gently for 45 minutes. Strain and cool if not using immediately. Store in the fridge for up to 3 days or in the freezer for up to 2 months.
 
Don't you love how easy that is? You can have fresh, flavorful and delicious stock in under an hour! Better tasting and way healthier for you than store bought. Give it a try and let me know what you think!

Happy Cooking my Friends!

4.10.13

Weekend Wine - 49 North 2012 White


Happy Friday my lovelies! I thought we could kick off the weekend right with a delish and refreshing wine suggestion from Forty Nine North! At $10 per bottle, you can't beat the price point!


The grapes for this wine were harvested in October 2012 and includes a blend of grapes from vineyards in Osoyoos, Oliver, Kelowna, and Naramata in British Columbia. The tasting notes on the Artisan Wine Shop website include the following:

This is a fresh, mouthwatering white blend showing peach, pear and subtle floral notes. The crisp palate is filled with green apple, grapefruit, spice and citrus flavoured acidity. It is a wonderful accompaniment to seafood, white meat dishes or served as an aperitif. 

I really enjoyed this wine - it was refreshing, crisp and relatively dry. Let me know what you think of it or if you've tried it before!

Cheers!

30.9.13

Szechuan Pork and Veggies

Happy Monday Friends! I wasn't planning to share this recipe with you  this time around because it was my first time trying it out. Buttt.... people got really excited when I instgrammed a couple of pictures... so I decided I would share it with you. But you've got to bear with me - my pictures are just what I snapped with my iPhone and instagrammed. I will update this post with better photos when I make this recipe again (which I will be doing soon because it was so darn good I've been dreaming about it!).                                

                                
I adapted this recipe slightly from the Guy Can't Cook by Cinda Chavich. If you follow my blog regularly, you'll know that I LOVE the Guy Can't Cook and the Girl Can't Cook cookbooks. They're life savers with tips to easily and practically tackle tougher dishes to impress friends and family with your culinary prowess (even if you seriously lack in that area). Give them a go - you won't be disappointed! From consistent recipes, explanations for new ingredients, along with tips and tricks for newbies!

Szechuan Pork and Veggies
Recipe adapted from the Guy Can't Cook

Ingredients:
  • 1/3 cup canola oil, divided
  • 2 small zucchini's
  • 1 lb boneless pork loin chops, cut into thin strips
  • salt and freshly ground pepper
  • 1 large onion, finely chopped
  • 1 cloves of garlic, minced
  • 1 tsp Asian Chili paste (or more depending on how spicy you like it)
  • 3 tbsp tomato paste
  • 1 cup chicken broth
  • 1/4 cup rice wine vinegar (I used seasoned rice wine vinegar)
  • 1 tbsp tamari
  • 1 tsp fish sauce
  • 1/4 cup brown sugar
  • 1/4 tsp hot curry powder
  • 1 red bell pepper, seeded and chopped into thin strips
  • 1/4 cup chopped cilantro

Method:
  1. In a wok, heat 1-2 tbsp of the oil over medium high heat. Cook chopped zucchini in batches until lightly browned, but not overcooked. Remove zucchini to a bowl and set aside for later. Season pork strips with salt and pepper. Add 1-2 more tbsp of the oil to the wok and add the pork. Cook it in batches until it is nicely browned. Remove with a slotted spoon and set aside for later.
  2. Add a little more oil to the wok and then add the onion. Cook, stirring until starting to brown. Add the garlic and cook for 30 seconds or until fragrant. Combine the chili paste, tomato paste, broth, vinegar, tamari, fish sauce, brown sugar and curry powder and stir together. Add to the wok and bring to a boil. Reduce the heat and simmer for 3 minutes.
  3. Return the pork to the pan, stir in the bell pepper and return to a boil. Cover the wok and simmer over medium heat for 30-45 minutes (sauce will thicken and develop a really rich taste). Add the zucchini and chopped cilantro. Adjust seasonings if necessary. Serve over rice.


21.9.13

Pantry Basics: Whats the Deal with Eggs?

Photo Credit: Laura Hawkins
I'm late posting this week's pantry basics post! Better late than never I guess! Today we're going to talk about eggs! First we'll talk a little bit about the impact of eggs on your health, how to purchase eggs and finally how to cook them. For those of you who are allergic to them or sensitive to them, I've also got a little bit of info on egg substitutions.

Eggs and your Health

Eggs have a bad rap due to the amount of cholesterol contained in them. According to an article in the Globe and Mail, eggs have approximately 183 mg of cholesterol. The recommended daily intake of cholesterol for a healthy person is 300mg and the recommended daily intake for someone with heart disease or other issues is only 200mg. In a number of studies conducted, when healthy people ate one egg per day, there was no clear link to cardiovascular disease. But those one a day people's risk of developing Type 2 diabetes did increase and people with Type 2 diabetes have a 69% higher risk of developing cardiovascular disease. Its a vicious cycle isn't is? Seems like you just can't win when it comes to your health these days.

Does this mean you should cut eggs out of your diet? No way! People with cardiovascular disease or cholesterol issues already should definitely limit their intake of egg yolks, but egg whites are cholesterol free and fair game for those folks. For healthy people, eggs still offer a number of great health benefits including loads of vitamins, protein and nine essential amino acids. Eggs in moderation and combined with a healthy overall diet can provide a number of great health benefits for the body! So enjoy your eggs on the weekend and don't sweat it! Maybe go easy on the hollandaise sauce though. ;)


What you Need to Know Before you Purchase Eggs

Purchasing eggs is a pretty big bone of contention these days. There is information everywhere about how bad the chickens are treated and how awful the food they consume is. I won't go into details here because it is very graphic and disturbing, but if this is something you would like to learn more about, you can hop over to www.certifiedhumane.com to learn more. With this in mind, I will tell you a little more about the labelling on egg cartons and how to know which are best for you from a health perspective and also from a humane perspective to the chickens. These two items are often linked very closely to one another - healthfully cared for chickens = healthier and better for us eggs. Seems like a no-brainer doesn't it?

Information discussed below is from my cookbook Feeding the Whole Family by Cynthia Lair.

Conventional eggs are the typical supermarket eggs with no special labelling. These eggs are produced in large factories where two chickens are stuffed into a wire cage of approximately 2 feet square. These chickens don't get outside and their feed is allowed to contain antibiotics, meat, meat biproducts and bioengineered corn. This method of production is banned in some areas of Europe, but still fair game in North America. Given the condition the chickens are stored in and the feed they eat, you can imagine that their eggs are the least nutritious and contain many toxins.

Cage Free, Free Run, Free Roaming and Free Range sounds nicer doesn't it? But this can be deceiving. These labelling terms mean there aren't any cages in the chicken barn or that they have access to the outdoors. These terms don't mean the chickens actually go outside, nor does it mean that their diet is any different than conventionally raised chickens.

Sometimes you'll see Omega-3 on the label. This means that the chickens feed is supplemented with 10-20 % flax seed which increases the nutrient content of each egg. This doesn't mean that the eggs are free from the above hormones and toxins because the rest of their food and conditions aren't any different than the two categories discussed above.

Organic eggs are a little different from the above noted egg types. To be labelled organic, the farmer must guarantee that flocks have access to an organic outside area year round and are fed at least 80% organic non-GMO feed. No meat, meat by-products, antibiotics or hormones are allowed in the feed and each bird must have a minimum of 2 square feed of floor space. They aren't caged - this just means that if you have a 40 square food barn, you can't have more than 20 chickens. These eggs are expensive - in most grocery stores they are approximately $7 per dozen compared to $3 for conventional eggs. But the price tag is worth it! It is an investment in your health and you can avoid being exposed to hormones and toxins that can be harmful to your body. I recommend buying organic eggs unless the next category is readily available to you.

Pastured eggs means that chickens are kept in a moveable enclosure with nests that are moved once or twice daily to a new piece of grass. This results in the chickens obtaining at least 20% of their diet from foraging and eating insects (which is their natural diet). This method of production provides the highest quality eggs you can buy! You can find them at local farmers' markets (ask the vendor) or by making friends with your neighbor who has chickens!


How to Cook Eggs

Some basic egg cooking methods and tips can be found below:

Boiled
Bring eggs to room temperature. Put eggs in a pot and cover with cold water. Turn heat on high until it is just about to boil, then turn down to a simmer (just barely bubbling). Start your timer now! For soft cooked eggs - 2-3 minutes, medium cooked eggs - 4 minutes and for hard-cooked eggs, simmer 10-15 minutes.

Scrambled
Whisk eggs with salt, pepper and 1-2 tbso of cream or milk. Melt a pat of butter in a non-stick pan over medium heat. Add eggs and stir, scraping up cooked bits from the bottom of the pan. Stop stirring whil eggs are still a bit runny on top. Cover pan, remove from heat and leg eggs cook in pan for five minutes. You can toss in some minced chives and grated cheese at this time and let it melt into a delicious, flavourful dish at this time!

Fried
Place a pat of butter in a non-stick skillet over medium-low heat. Cook until whites of eggs are firm, but yolks remain soft (tip: shake the pan to see how soft egg is in the center).As they finish cooking, put lid on for one minute.

Poached
Bring eggs t room temperature. Heat two inches of water in a large non-stick skillet and add 1 tbsp. vinegar or lemon juice and 1/2 tsp salt. Bring to rolling boil. Tip eggs into boiling water and immediately cover the pan and turn off the heat. Poach for 3 minutes for soft yolks, 4 for firmer yolks. Lift eggs out with slotted spoon, drain well and serve. (These eggs make delicious eggs benedict if you're up for a treat).

Photo Credit: Wikipedia
Egg Substitutes
Some of you may have egg allergies or sensitivities. If a recipe calls for two eggs, you can substitute the following (though keep in mind - eggs bind ingredients together so the texture will change if you make these substitutions.

Increase liquid and fat in recipe by 1/4 cup each (so if you have milk and butter in your recipe, add an extra 1/4 cup of each to the recipe).

Substitute 1/2 cup of your favorite fruit or vegetable puree (dates, bananas, applesauce, sweet potatoes are good ones).

Grind  2 tbsp. flaxseed, add 6 tbsp. boiling water then let mixture set for 15 minutes. Whisk with a fork.

I hope you found this post informative and useful! If you have any questions or if you have anything to add, feel free to use the comments section of this post!! Thanks for stopping by!

16.9.13

Chewy Brown Sugar Coconut Cookies


Summertime is all about desserts and treats that show off the beautiful bounty of produce we have available to us! Beautiful, juicy strawberries, raspberries, cherries, peaches, etc. But as the weather cools down and fall arrives, I crave something a little heavier and comforting. Enter freshly baked cookies! The oven warms your house a bit as you bake them and that homey, delicious smell is so comforting and satisfying. Today I have an awesome cookie recipe for you! Its a twist on the classic chewy gingersnap cookie - it is a brown sugar-molasses cookie made with coconut oil. I doubled the batch and it didn't even last the afternoon in our house. They're soooo yummy!

My sister found this recipe on Averie Cooks. She has a great website full of amazingly delicious sounding recipes. This is the first one I've tried, but it sure won't be the last. Pop over and check out her blog - I'll still be here when you get back!

Chewy Brown Sugar Coconut Cookies
Recipe minimally adapted from Averie Cooks

Ingredients:
  • 1/2 cup coconut oil
  • 1 cup dark brown sugar, packed
  • 1 large egg
  • 2 tbsp vanilla
  • 1 tbsp unsulphered mild molasses
  • 1 3/4 cup all-purpose flour
  • 2 tsp corn starch
  • 1 tsp baking soda
  • 1/4 tsp salt
Method:
  1. Place coconut oil and brown sugar in the bowl of a stand mixer. Beat on medium high til combined. Add egg and beat until light and fluffy - about 4-5 minutes. Scrape down sides of bowl, add vanilla and molasses. Beat to incorporate - 1-2 minutes. Add flour, cornstarch, baking soda and salt. Mix until just combined.
  2. Using a medium cookie scoop, form mounds that are approximately 2 heaping tbsp. Place dough mounds on a large plate and chill in fridge for 20 minutes - 2 hrs (the longer you chill, the less the cookies will spread. I chilled mine for 20 minutes).
  3. Preheat oven to 350F. Line baking sheet with parchment paper. Place dough on prepared cookie sheet leaving 2 inches in between. Bake for 8-10 minutes or until tops have just set. Even if the cookies are slightly undercooked, pale and glossy in the center - they will firm up as they cool.
  4. Allow cookies to cool on baking tray for 5-10 minutes before moving.


Yep, thats it! I love the short ingredient list for this cookie recipe! Majority of the items are pantry basics! Gotta love a recipe like that hey?!
Check out Averie's blog for many more versions of this recipe as well (note some involve nut butter, cookie butter, white chocolate etc). Be creative and mix it up! I love the coconut oil and heavy dose of vanilla in this recipe though!
Happy Baking my Friends!

12.9.13

Jalepeno Roasted Vegetables


A couple of weeks ago I went to our local farmers' market and picked up some fabulous looking produce. I bought purple carrots, regular orange carrots, jalepeno peppers, black jalepeno peppers and some delicious chicken and apple sausage. I got home and tried to think of a delicious way to bring those components into a cohesive meal and came up with jalepeno roasted vegetables with barbequed chicken and apple sausage. It turned out to be such a unique and delicious meal! Hubby and I thoroughly enjoyed it!

Isn't that produce beautiful? I had never found purple carrots before and just thought they were gorgeous! They don't taste any different, but they sure are pretty!
To make the vegetables:

Ingredients:
  • Carrots, sliced
  • Potatoes, sliced
  • 1 green jalepeno, sliced
  • 1 black jalepeno, sliced
  • 2 tbsp coconut oil, melted
  • 1 tsp salt
  • 1/4 tsp black pepper
  • 1/2 tsp chili powder
Method:
  1. Preheat oven to 425F. Place carrots, potatoes and jalepenos in a large bowl. Mix together coconut oil, salt, pepper and chili powder. Pour over veggies and toss to coat. Don't worry if the coconut oil clumps up a bit - it will all melt and distribute once its in the oven.
  2. Place veggies on a large baking tray lined with tin foil. Make sure they are in one even layer. Bake in preheated oven for 25-35 minutes or until the veggies are tender.

To make the sausage you'll just need your favorite sausage and some yummy BBQ sauce. Preheat your bbq to medium heat. Grill sausage until cooked through then brush with BBQ sauce to finish.

Pile the veggies in the middle of a plate, top with sausage and then pile on a few more of the roasted jalepeno rings. Voila! A super easy, simple and flavourful dish full of seasonal, local ingredients.


Happy Cooking my Friends!

28.8.13

Pantry Basics: What's the Deal with Organic?


We've all seen the buzz words and the mountain of information about whether to pay more for organic and natural foods and the possible health benefits of them. But the more I hear about organic vs. natural foods, the more I feel like I don't quite understand. So, if I'm going to pay more for something I put in my body, I want to learn about why I'm paying more and whether it is worth it. This post is dedicated to shedding some light on the mystery behind organic foods and educating ourselves to be able to make an informed decision on whether or not to start incorporating organic foods into our diet. We'll also briefly touch on the difference between organic and natural foods at the end to make sure we're all clear on that one (I was surprised when I found out).
What is Organic?
Lets start things off right - what does organic really mean? In the context of food there are two meanings to the word organic. First is in regard to the agricultural practices used to produce the food and second is in regard to the food itself.
 
According to the Organic Trade Association agriculture meeting the standards of organic production is a system of farming that maintains and replenishes the soil fertility without the use of toxic and persistent pesticides and fertilizers. The Whole Foods website indicates that this type of farming emphasizes renewable resources, conservation of soil and conservation of water. These products are produced through agricultural management processes that promote environmental health and prohibit the use of GMO seeds or crops, sewage sludge (yep, some food production uses these products... its gross!), long-lasting pesticides, herbicides or fungicides. Rather they focus on planting crops that actually belong in the terrain they're being planted in and focusing on raising healthy plants that can protect themselves from disease or insects rather than having to treat those conditions with nasty chemicals (similar to how if we eat well, exercise and generally lead a healthy lifestyle, we can fend off many illnesses we would have otherwise contracted).
 
In addition to those farming practices, organic products are raised with priority being placed on raising healthy, humanely treated animals through giving them healthy feed, open air conditions and no antibiotics or growth hormones. Organic food is simply products raised and produced in the above described environment. According to the Organic Trade Association,
 
"Organically produced foods also must be produced without the use of antibiotics, synthetic hormones, genetic engineering and other excluded practices, sewage sludge, or irradiation. Cloning animals or using their products would be considered inconsistent with organic practices.  Organic foods are minimally processed without artificial ingredients, preservatives, or irradiation to maintain the integrity of the food."
What do the different Organic Labels Mean?
There is a lot of uncertainty regarding what the different organic labels mean. See below for the USDA and the Canadian versions of the labels.
 
Certified organic means that an item has been raised in line with strictly enforced production standards that are verified by independent organizations (in fact, the USDA verifies approximately 90% each year). Certification involves inspection of farm fields, processing facilities, detailed records, and periodic testing of soil and water to ensure that growers and handlers of organic food are meeting and maintaining compliance with the strict standards set out for organic food producers.
 
In the USA, the USDA sets out three main categories for organic foods:
  1. 100% Organic - only made with organic ingredients. No antibiotics, hormones, genetic engineering, radiation, synthetic pesticides or fertilizers may be used. These items are allowed to display the USDA organic logo along with a logo stating who certified the particular producer as organic.
  2. Organic - Contains 95% organic ingredients. The remaining 5% coming from ingredients on the approved National list (there is some controversy surrounding this list - check out the OTA for more details).
  3. Made with Organic Ingredients - Made with at least 70% organic ingredients, 3 of which must be listed on the package with the remaining ingredients being on the National list of approved ingredients. These products may display the certifier's logo, but not the USDA organic label.
Are Organic Foods Free from Pesticides and Chemicals?
So - we've established that chemicals and pesticides aren't added during the production of organic food. Does that mean that organic foods are free from chemicals and pesticides? Nope! Due to the prevalent use of chemicals in North American farming practices and also in development of society, there are chemicals that occur in soil and in water. Organic produce may be inadvertantly exposed to these chemicals during the production process. What this does mean though is that organic produce has significantly lower levels of chemicals and pesticides than crops produced using conventional farming methods.
 
This picture below shows the results of a survey of American families regarding organic foods:

What's the deal with how Expensive Organic Food is?
Organic food is more expensive than conventionally farmed food. This is just a fact. But lets make sure we understand why this is the case. According to the OTA, there are additional costs associated with becoming certified organic. These costs support ensuring compliance with the rules to protect the consumer (such as inspections, regulatory functions, etc). Farmers obtaining and maintaining their certification tend to have more labour and management intensive operations due to the increased monitoring and different farming practices required by this method which result in smaller scale operations which in turn results in less economies of scale in production as are experienced in bigger farms. All of these factors contribute to higher prices of organic produce. Lets look at whether this organic food is really that much better for us to justify paying higher prices for it.
Is Organic Food Really Better for Us?
There have been a number of studies done on whether there really are more nutrients in organically produced food. Studies are beginning to emerge that indicate that this is the case! In a number of studies, higher levels of some nutrients, antioxidants and beneficial fatty acids occurred in organically produced food vs. non-organically produced food. You can check out links to those studies here if you're interested. The general concensus among researchers though is that more research needs to be done before concluding that these claims are in fact representative of all organically produced foods.

What we can say though, is that limiting our exposure to unnecessary chemicals and harmful agents can't be a bad thing. Paying a few cents more for organic food is hardly a high price to pay for limiting our exposure to such things.
More Reasons to Go Organic
If the above information didn't convince you that going organic (or eating more organic food) is a good thing. Here's some more reasons:
  • Organic food tastes great! I used to scoff at this one - "who can even taste a difference?" then I tried organic bananas. Its a night and day difference! Try it, you'll be convinced.
  • Organic agriculture results in less chemicals and contaminants being put into our eco-system.
  • Organic agriculture builds healthy soil instead of depleting it as conventional farming tends to do.
  • Organic farming helps keep rural communities and small farms healthy. By producing a market segment for these farmers to compete, smaller operations are able to farm in an eco-friendly way while charging fair prices for their produce. If they had to compete with conventional, large-scale farming, there is no way they could cover their costs.
  • Health of farmers and farm workers. High occurrences of cancer and other health issues have been noted in farm workers on conventional farms due to high exposure to pesticides and chemicals. Farming without these substances will result in decreased exposure and in turn decreased health risks for these workers.
  • For future generations. If farming practices are sustainable and work in harmony with the land, we will preserve the land so that future generations can benefit from it and continue to produce healthy food for themselves.
Those all seem like pretty good reasons to me! Those reasons were taken from the Whole Foods website and the Daily Green.
Organic vs. Natural
One last topic I wanted to touch on is the organic vs. natural topic. I was under the impression that natural was a similar label to organic and that it was always a healthier option than "regular" food items. The label "natural" or "100% Natural" is supposed to mean that the product is free from artificial colour, flavour or synthetic substances. However, since this food label is not governed by any government body as Organic is, there is typically very little consistency in the natural label on products. When an item is labeled as organic (see above discussion) you know you can trust that the product truely is produced without those substances and has met strict standards to carry that label.

I'm not telling you not to buy naturally labeled products. What I'm telling you is that it is even more important to read and understand the labels, ingredients and nutritional information of those products labeled as natural in order to ensure it truely is natural and free from unhealthy ingredients. Don't pay more for an item labeled natural if it isn't truely free from artificial ingredients!

The Verdict - Final Words of Wisdom
The above info seems like a fairly strong case toward starting to consume as much organic food as we can. I understand it can be a big adjustment in the budget department, but some foods are worse than others regarding chemical absorption. Here is a list of the Dirty Dozen and the Clean Fifteen. The dirty dozen consists of a dozen produce items that absorb more chemicals than their counterparts the Clean Fifteen. If faced with a choice of which organic produce items you can afford, stick to ensuring the dirty dozen are organic to minimize the health risks associated with the chemicals in non-organically produced food. Switching to organic is a gradual process - a little bit at a time is a great approach! It makes it manageable and less overwhelming. Remember - every little change you make in your lifestyle is a step in the right direction!

If you're interested, here is some more reading you can do on the organic topic and some great resources:

I hope you found this post useful and informative! If you have comments on this post or have other great resources, please leave me a note below or send me an email! I would love to hear from you.

Let me know if there are any topics you would like me to cover in upcoming pantry basics posts. Happy Cooking my Friends!

26.8.13

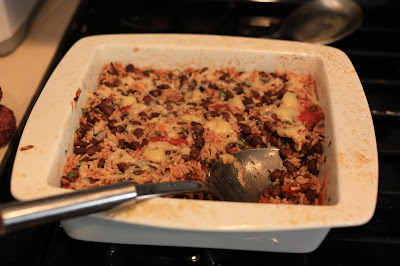
Black Bean and Brown Rice Casserole


Monday always seems to roll around far too quickly, but this week I'm happy to see it arrive - it means I'm that much closer to leaving on vacation on Friday! Woohoo! I seriously can't wait for a break from work and real-life responsibilities. Despite the anticipation I have for this week to begin and pass by, Monday still comes with the reality of needing a quick, nourishing meal to whip up for hubby and I after work. This Black Bean and Brown Rice Casserole is just thing! Comes together in under half an hour, its super healthy and oh so flavourful.

Black Bean and Brown Rice Casserole
Minimally adapted from Thrifty Veggie Mama

Ingredients:
  • 2 cups cooked brown rice (about 1 cup uncooked)
  • 2 cans black beans, rinsed and drained
  • 2 cloves garlic, minced
  • 1/4 cup cilantro, chopped
  • 1 can stewed tomatoes with basil (you may want to squish the tomatoes to break them up a bit)
  • 1/2 tsp salt
  • 1/2 tsp black pepper
  • 2 tsp chili powder
  • 2 tsp cumin
  • 1/4 cup applewood smoked cheddar, shredded
  • hot sauce to serve
Method:
  1. Combine all ingredients except the cheese and hot sauce and place in an 8x8 inch pan. Top with cheese.
  2. Bake at 400F for 15 minutes or until cheese is melted. Drizzle with hot sauce to serve if desired. Sour cream would also be delish!


A super simple recipe that comes together so quick on a rushed weeknight. Hope you enjoy this as much as we did... leftovers disappeared quickly in our house!

Happy Cooking my Friends!

23.8.13

BBQ Madness with Elite Kitchens and Baths!


Happy Friday friends! I hope you have some sweet plans this weekend. I am hanging out with my Mom and my Sister who I haven't seen for a few weeks. We'll do some cooking, maybe take some walks and of course share a bottle of wine.

A couple of weeks ago, Elite Kitchens and Bathrooms in Langley BC hosted a contest for an amazing gift basket prepared by Well Seasoned. I entered the draw and was the lucky winner! I was a little shocked since I never, ever win anything. But none-the-less an amazing surprise! When I went to pick up my gift basket I had the pleasure of meeting Ken who is the owner of Elite (pictured above). He was kind enough to tour me through their facilities and their show room! What a cool operation - they make all the cabinets in-house and work with their clients to design the kitchens and bathrooms of their dreams. The show room was beautiful and had so much inspiration; especially for a foodie like me! Thanks so much Ken for the lovely gift basket and for sharing a bit about your business with me.
Hubby took some pics of all the amazing goodies in this gift basket... wow, I hit the motherload. So many different sauces, marinades and spice rubs. But I think the best part about the basket was the cooking classes I won at Well Seasoned. :) I can't wait to take those in!


I decided I should start using up some of the yummy stuff I received in that gift basket, so I thought what better opportunity to try out the rotisserie attachment on our BBQ. I used some Smoke on Wheels marinade and marinated a beautiful pork tenderloin roast in it for about 3-4 hours. Then I removed it from the marinade and rubbed it all over with some House of Q seasoning.
Next up, I threaded the roast onto the rotisserie and heated the BBQ. If you have a temperature gauge, try to aim to keep it between 350-400F. You'll need to cook the pork for about 20 minutes per lb. So for this small roast, it was less than an hour til it was done. Try not to overcook it - use a meat thermometer if in doubt.

Serve with some roasted garlic mashed potatoes and some maple roasted veggies and you've got a delish summer meal. To make the maple roasted veg, just chop your favorite veggies, toss with some olive oil, maple syrup, salt, pepper and garlic powder and roast in an oven preheated to 450F for 20-30 minutes or until tender. I used zucchini, carrots, mushrooms and cauliflower this time.
So thats what I've got for you today! Nothing too formal, just thought I would share my awesome basket with you and some of the things I've created with it so far. Happy Friday! Hope you all have a great weekend.

Happy Cooking!

21.8.13

Pantry Basics: Coconut Oil


This week's Pantry Basics post will focus on Coconut Oil. I have just started using coconut oil recently and really didn't know much about it other than that I really liked the taste of it. So, I decided to do a little research and see what I could find out about it to share with you. We'll look at general information about coconut oil such as how it is processed, types of coconut oil available, health facts about coconut oil, and recipes to put it to good use. That's a lot to cover in one post, so we better dive in!
 
How Coconut Oil Is Produced
I did a little online reading and the general consensus among a number of different websites is that there are two main methods for producing coconut oil. The first method is the wet process and the second is, you guessed it, the dry process. Here is a brief description of each method:
 
  1. The Wet Process: For the wet production process, oil is extracted from fresh coconut meat using a variety of processes including boiling, fermentation, centrifugal force and other processes. The highest quality type of coconut oil (see types of coconut oil below) is made using a wet extraction process and then cold pressed to extract the oil without the addition of heat or chemicals.
  2. The Dry Process: For the dry production process, coconut is first dried to produce a product called Copra. This copra is then pressed and solvents are added to extract the oil from it. This oil often needs to be refined further to be fit for human consumption and is often hydrogenated in order to raise the melting point further (regular coconut oil has a melting point of approximately 24 degrees C, hydrogenated coconut oil's melting point can be raised to 36-40 degrees C).
That above is the most basic method of processing coconut oil for human consumption. Lets talk about the main two types of coconut oil produced using the above methods that are available for purchase.
 
Types of Coconut Oil
There are two main types of coconut oil on the market - Extra Virgin Coconut Oil (can be cold pressed or not) and Refined, Bleached, Deodorized Coconut Oil (RBD).
 
Extra virgin coconut oil is made using the wet process of production as this typically produces the highest quality coconut oil. This oil has a fresh, mild coconut flavour. Cold pressed is the highest quality since it doesn't have any heat or chemicals applied during production which means minimal flavour change or loss of nutrients. Either way, you will notice that extra-virgin coconut oil is the most expensive because using the wet process yields far less oil than the dry process and as a result more coconut goes into the making of extra virgin coconut oil.
 
The second type of coconut oil is RBD. This oil is highly processed to the point where the coconut smell and flavour are removed from the oil. This oil is often used for cooking where the coconut flavour is not desired. This oil is also often used for cosmetic and other industrial applications.
 
Moral of the story: Based on the above information, in most cases extra virgin coconut oil is best - it has superior flavour, is processed less and if you buy cold pressed it doesn't have chemicals applied during processing. Especially from a health perspective, I would go with the extra-virgin oil.


Cooking with Coconut Oil
When you're cooking or baking with coconut oil, the substitution ratio with butter and other oils is one-to-one. That means if a recipe calls for one tablespoon of olive oil, you can use one tablespoon of coconut oil. Coconut oil can make a great substitute for olive oil, butter, shortening and canola or vegetable oil.
 
Coconut oil has a high smoke point - 350F for regular coconut oil and 320F for virgin coconut oil. This makes it great for most cooking and baking related applications! Remember that oil shouldn't be used at temperatures past its smoke point.
 
 
Health Facts about Coconut Oil
There are a lot of claims out there about the miraculous coconut oil. I don't really buy into most of them because there doesn't seem to be a lot of scientific research to support those claims, but what I do know is that there are some great things about coconut oil and some not so great things. Here's what I know:
  • Coconut oil has a significantly higher level of saturated fat compared to most other oils which can lead to increased cholesterol and other health issues if consumed in large quantities on a regular basis (saturated fat per serving of coconut oil is 91% saturated fat compared to 13% of olive oil). If you want to read more about that, you can look at this article.
  • Using coconut oil on the skin or hair can improve condition of them - providing added moisture to skin and making hair very shiny.
After doing some reading online, there has been a small amount of research done on coconut oil's health benefits, but there has not been much in the way of conclusive results. According to the Mayo Clinic website:
"Although eating coconut oil in moderation for a short-term diet probably won't harm your health, it may not help you lose weight. And keep in mind that coconut oil actually has more saturated fat than do butter and lard. For successful, long-term weight loss, stick to the basics — an overall healthy-eating plan and exercise."
That seems to be the general consensus among researchers and medical doctors that are science based. Any other benefits that may be experienced may be legitimate, but the benefits so far haven't been able to be reproduced over the general population. 
 
Recipes using Coconut Oil
Despite the inconclusive results regarding the wild health claims made about coconut oil, its no worse for you than any other type of oil when used in moderate quantities, and it has great flavour, so you may as well try it out! Here are some recipes and ideas for incorporating it into your kitchen routine:
 
Hope this gives you a good start! Do you already cook or bake with coconut oil? If so, what is your favorite thing to make with coconut oil? Please feel free to share in the comments. :)
 

Happy Cooking my Friends!

19.8.13

BBQ Halibut with Mango Salsa


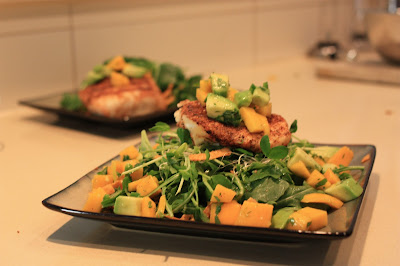
I love summer! It is my absolute favorite time of the year - the sunshine, the bright colours, the warm air and the general feeling of happiness and lightness in the air. I love to transfer those colours and feelings onto my plate at meal time - anything bright, light and fun and I'm in! That's exactly what this dish is all about. Summertime on a plate!


BBQ Halibut with Mango Salsa
Recipe by A Tale of One Foodies Culinary Adventures

Ingredients:

Halibut:
  • Two pieces of fresh halibut
  • 1 tsp each: cumin, garlic powder, chili powder, ground coriander, sugar, salt and pepper
Salsa:
  • 1/2 an avocado, diced
  • 1 mango, diced
  • 1 small jalapeño, diced
  • 3 tbsp. fresh cilantro, finely chopped
  • 4 fresh basil leaves, finely chopped
  • juice of 1/2 lime
  • 1 tsp olive oil
Salad:
  • Arugula
  • Sprouts (any kind will do)
  • Pea shoots
  • a handful of tortilla strips
  • juice of 1/2 lime
  • drizzle of olive oil
Method:
  1. For the halibut - preheat your grill. Sprinkle spice rub evenly over both sides of the halibut. Pat the spice rub into the fish. Grill seasoned halibut on the grill until just cooked through and remove from heat.
  2. While the halibut is cooking, combine the salsa ingredients and stir well. Set aside to let the flavours marry.
  3. Divide arugula, sprouts and pea shoots between two places. Drizzle with lime juice and olive oil. Sprinkle with tortilla strips. Top with grilled halibut and spoon salsa over liberally. Enjoy!

What's your summer cooking philosophy? Do you have a favorite meal that you only make during the summer? Feel free to share in the comments below. Thanks for stopping by!

Happy Cooking!