Showing posts with label snack. Show all posts

19.10.12

Bavarian Style Soft Pretzels!


 So the first thing you probably noticed is that my pretzels are ugly... like super ugly. But, what they lack in beauty, the made up for in taste! These guys were delicious. They're a little bit of work, but most of the work is down time waiting for them to rise, freeze, then rise again, then the worst part - waiting for them to bake - its so hard when they smell sooooo delicious!

If you have a rainy Saturday with not much planned, these are a perfect way to spend the day! You can make them at a leisurely pace and enjoy the process and the fruits of your labour!

 We'll get on to the recipe and th process ASAP since its a bit longer than most recipes I post on my blog. :)

Bavarian Style Soft Pretzels
Minimally adapted from Fine Cooking - Oct/Nov 2012 Issue

Ingredients:
  • 1 1/2 tsp active dry yeast
  • 19 1/2 oz (4 1/2 cups) flour
  • 2 tbsp packed light brown sugar
  • 2 1/4 tsp kosher salt
  • vegetable oil or cooking spray
  • 3 tbsp baking soda
  • 1 large egg, lightly beaten
  • 1 tbsp pretzel or coarse salt
Method:
  1. In a stand mixer fitted with the dough hook, combine the yeast and 1 1/2 cups lukewarm water and let stand until dissolved, about 5 minutes. Add the flour, sugar, oil and salt. Mix on low speed until the ingredients are hydrated and form a coarse ball of dough, 2-3 minutes. Add more water as needed, 1 tsp at a time, if all of the flour isn't incorporated into the dough.
  2. Increase the speed to medium low and mix until the dough becomes smooth, supple and elastic, about 3 minutes. The dough should be soft but only slightly tacky; if it seems sticky or very tacky, sprinkle in more flour, as needed.
  3. Form te doug into a ball, transfer to a large, lightly oiled bowl, cover with plastic wrap and let rise at room temperature until it is about 1 1/2 times its original size, 1 - 1 1/2 hours.
  4. Lightly mist a work surface with oil and transfer the dough to it. Divide the dough into 6 equal pieces (about 6 oz each). Form each piece into a smooth, round ball, lightly mist wit oil, and cover with plastic wrap. Let rest on the work surface at room temperature for 20-30 minutes to allow the gluten to relax.
  5. Line a large baking sheet with lightly oiled parchment paper and set aside (I needed two of them). Lightly mist a work surface and using your palms and fingers, roll each piece ofdough on the work surface into a rope that is about 30 inches long and 1/3 - 1/2 inch thick (note, this is why mine are ugly - I didn't roll my ropes long or thin enough). If the doug resists or shrinks back, let it rest for a few minutes while you work on other pieces; short rests will let the gluten relax enough to allow for the full rollout.
  6. Working with 1 dough rope at a time, shape it into a large U that is 5-7 inches across with the curved side closest to you. Take the two ends of the rope in your fingers and cross one over the other so ends overhang the cross by about 3 inches. Twist the ends of the rope, shortening the overhang to about 2 inches. Next, pull the twisted section toward you and fold it down over the bottom curve of the U so the ends are a couple inches apart and overhand the bottom by about 1/4 inch.
  7. Carefully transfer the partzels to the prepared baking sheet, spacing them evenly and reshaping as needed. Cover with plastic wrap and freeze til hard, at least 2 hours and up to three weeks.
  8. Bring 2 cups of water to a boil in a small saucepan. Remove from the heat and add the baking soda and stir til completely dissolved. Transfer to a bowl and let cool to lukewarm, about 30 minutes.
  9. Using stainless steel tongs, dip one pretzel into the baking soda bath at a time and soak for five seconds. If the liquid doesn't completely cover the pretzel, turn it over and submerge the other side for five seconds. Remove pretzel from liquid and allow excess to drip off. Return to baking sheet.
  10. Brush tops and sides of pretzels with some of the beaten egg. Let pretzels thaw and rise at room temperature until they are soft and puffy, 1 1/2 to 2 hours.
  11. Position a rack in the center of the oven and heat to 400F. Brush pretzels once more with egg. Lightly sprinkle with salt. Bake until dark golden-brown, approximately 20-22 minutes. Transfer to rack and cool for at least 15 minutes before serving.

So, like I said, a little labour intensive, but well worth the effort. Hope you enjoy!

Happy Baking my Friends!

11.5.12

Mr. Big Brownies


My hubby was just in Winnipeg visiting his lovely Grandparents. They're the sweetest people and like his mom, they just love to give you little "gifties". Little gifts that don't really cost much and don't seem like much, but they're a little something to brighten your day, often for trivial occasions, or no occasion at all. This time Scott's Grandpa gave him a box of Mr. Big Snack Cakes that he had picked up last time he went to town. I laughed so hard when he brought them back home and thought, oh geez, what are we going to do with these? Well, inspiration struck! Might as well put them in a brownie. So that's what I did.

For this recipe, I adapted one of Anna Olson's recipes from her newest cookbook Back to Baking. Which is a pretty spectacular book (if you haven't already heard my praises for this cookbook, check out my post about me attending a cooking class hosted by Anna that demonstrated recipes from her book here)!!


Mr. Big Brownies
Recipe adapted from Anna Olson's Back to Baking

Ingredients

Brownies:
  • 1/2 cup butter
  • 4 oz semisweet chocolate chips
  • 3 oz unsweetened chocolate, chopped
  • 1 tbsp instant coffee granules
  • 1/2 cup granulated sugar
  • 1/2 cup packed brown sugar
  • 2 eggs
  • 2 tsp vanilla extract 
  • 2/3 cups all purpose flour
  • 1/4 tsp baking soda
  • 1/8 tsp salt
  • 4 Mr. Big Snack Cakes
Frosting:
  • 3 oz milk chocolate chips
  • 2 tbsp butter
  • 1 tsp instant coffee granules
  • 1/2 package cream cheese, softened
  • 1 cup icing sugar
Method:
  1. Preheat oven to 350F. Line an 8 inch square pan with parchment paper so it hangs over the edges slightly.
  2. Melt the butter, chocolates, and instant coffee in a medium saucepan over low heat, stirring constantly until melted. Remove the pot from the heat.
  3. Stir in the sugars, then add the eggs one at a time, stirring well after each addition. Stir in the vanilla.
  4. Stir the flour, baking soda, and salt into the chocolate mixture, mixing just until blended.
  5. Pour half the batter into the pan (just until the bottom of the pan is covered). Top with the Mr. Big Snack Cakes. Pour remaining batter to cover the snack cakes. Smooth top.
  6. Bake in preheated oven for about 35 minutes, until the top of the brownies take on a dull finish. Cool completely in the pan before frosting.
  7. To make the frosting, melt the chocolate, butter, and instant coffee in the microwave, being careful not to burn the chocolate. Beat the cream cheese to soften in the bowl of a stand mixer. Pour in the melted chocolate mixture and beat until blended. Add icing sugar and blend. Remove the brownies from the pan and ice the top of the entire brownie. Let set for an hour before slicing.

These are some seriously delicious brownies! You've got to try them. :) Would probably work well with Wagon Wheels too!! Yah, I'm a little weird, but it works. :D Hope you've got lots to look forward to this weekend. I know I do! Its my Birthday and Mothers' Day on Sunday. So its going to be a good weekend. Wish I lived closer to my Momma though.


Happy Baking my Friends! Enjoy the weekend.

2.5.12

Asiago Garlic Knots

This week feels like it's taking forever! I'm not quite sure why time has so suddenly slowed down, but it is making me feel a little crazy. I woke up this morning thinking (or more like hoping) today was Friday. Hubby kindly reminded me, no it is only Wednesday. Two more long days to go til the weekend!! I'll hang in there if you will too!


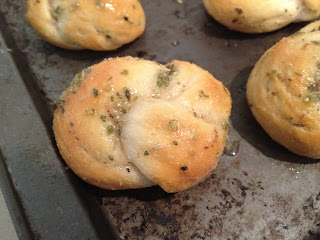
Til then, there's these lovely little Asiago Garlic Knots. Grab a package of pre-made pilsbury biscuits and whip up this lovely flavored oil for brushing and you've got yourself a quick, easy and delightful snack to tide you over til Friday. I found the idea on Pinterest and changed it up slightly.


Asiago Garlic Knots
Recipe adapted from Real Mom Kitchen

Ingredients:
  • 1 tube pilsbury refrigerated buttermilk biscuits
  • 1/4 cup canola oil
  • 3 tbsp freshly grated asiago cheese
  • 1 clove garlic, minced
  • 1 tsp dried oregano
  • 1 tsp dried parsley flakes
Method:
  1. Preheat oven to 400F. Grease a baking sheet and set aside.
  2. Roll each piece of biscuit dough into a 12 inch rope and tie in a knot. Place on prepared baking sheet. Bake 8-10 minutes in preheated oven until golden brown. 
  3. In a small bowl, combine the remaining ingredients and whisk to combine. When biscuits come out of the oven, brush them with the mixture while still warm.

Easy right? Definitely do-able for a week night that's for sure! Do you have any quick and easy snack recipes you would like to share? Let me know and they may just make an appearance in my future blog posts.

Happy Baking my Friends!

23.4.12

Birthday Cake Oreo Cookie Bark & Zucchini Carrot Cake for SRC


Guess what? Its time for Secret Recipe Club again! And I'm super excited about my assignment this month. This month I was assigned Mom's Crazy Cooking written by Tina. Tina is amazing! I follow her blog regularly and am always in awe of the delicious recipes she makes and how frequently she posts. In addition to her crazy blogging, Tina also hosts the Crazy Cooking Challenge every month which I have recently started participating in. What fun! If you're looking for another cooking challenge to join with supportive and friendly participants, check this challenge out!!

With all of Tina's delicious recipes, I couldn't just choose one... so I made Cookie Bark and Zucchini & Carrot Cake with Lemon Cream Cheese Frosting. I've posted the recipe for Cookie Bark below because I adapted it slightly, but for the Zucchini & Carrot Cake I didn't change a darn thing but the presentation, so I'm going to send you over to Tina's blog for that recipe.

Birthday Cake Oreo Cookie Bark
Recipe minimally adapted from Mom's Crazy Cooking

Ingredients:
  • 1 lb milk chocolate melting wafers
  • 1 lb white chocolate melting wafers
  • 5 birthday cake 100th anniversary oreo cookies
  • 1/3 cup mini chocolate chips
Method:
  1. Melt 1 lb milk chocolate melting wafers in the microwave, stirring at 40 second intervals until mixture is smooth. Spread into a thin layer on a piece of parchment paper. Set aside at room temperature until completely set (mine took about 15 minutes, but can take up to an hour if you live somewhere warm).
  2. Melt 1 lb white chocolate melting wafers using the same method as above. While the chocolate is melting, roughly chop the oreo cookies and set aside.
  3. Spread melted white chocolate onto milk chocolate layer and immediately sprinkle with the oreo cookies and the mini chocolate chips, pressing in lightly. Let set completely - about an hour. Then break into rough pieces to serve.
*NOTE: Don't put chocolate in the freezer to set - otherwise the top layer of chocolate won't adhere as well to the base layer and your bark will break into separate layers when you break it into pieces. Be patient and let it set at room temp!!


It makes quite a lot of bark, but it goes fast!! So if you're having a party with lots of friends, you might want to double the recipe. :)


 And here is a picture of my zucchini carrot cake with lemon cream cheese frosting - I cut out circles of cake using a round cookie cutter and then topped with an ice cream scoop of frosting. Then I finished it with a light sprinkle of icing sugar. Simple and beautiful! This would make the perfect plated dessert to wrap up a dinner party - and just between us - this is super easy to make!!


Happy Baking my Friends! Hope you'll use the  blog hop to check out what all the other Group C'ers made for this month's challenge. You might find a new blog or two to follow!! :)

22.4.12

Snickerdoodles... sort of!


Good morning friends! Thanks for stopping by. I'm just hanging out with two lovely Golden Retrievers and my delicious iced coffee (check back later this week for that amazing recipe) on this beautiful Sunday morning. Not quite as beautiful as yesterday morning, but still great!

I know I haven't been putting as much effort into my blog lately as I would like to, but sometimes life just goes that way doesn't it?

Here's what I've been up to lately:

Coming to the end of a crazy and insane busy season at the accounting office I work for. It seems so much crazier than last year... not sure why, but it just is. The last two weeks, I haven't been working quite as many hours, but I'm still feeling a tad burnt out. I have also been getting more responsibility on the enagement's I've been staffed on and that seems to come with more stress and accountability, so I have been learning to adapt to that role without going crazy from the increased stress!!

For the past five weeks I've been trying to change my lifestyle so that I can lose some weight, get more active and just generally improve my health. You can imagine how tough that is with all this delicious baking around... but it is necessary... my goal is to lose 53 lbs over the next year. So far in five weeks I've lost 15.2 lbs and lost 13.5 inches. I'm pretty proud of that accomplishment and hope it continues to come off that quickly! I've been getting more exercise and trying to make my health a priority. So, you may see more healthy recipes coming through here in the future (don't worry, I'll still post yummy and sinful recipes too, just probably not as many!!).

I'm also in the final year of getting my CA (chartered accountant) designation. Its a stressful year - I have to pass two more modules - one of which is known to be very technical and diffucult - in order to qualify to write the final UFE (uniform final examination). So, this summer is going to be filled with studying for the UFE and to pass those courses. I'm just praying I pass everything in the first go so I can say goodbye to this stressful part of my life and move on to a life that is non-student!!


But, enough about me for now! Lets get to this yummy recipe! These aren't traditional snickerdoodles, but I'll give a suggestion below on how to make them taste more traditional. If you make the recipe as is, they will taste more like a sugar cookie coated lightly with cinnamon and sugar. They are delicious as is, but not traditional tasting!

Snickerdoodles... sort of!
Recipe adapted from Anna Olson's Back to Baking

Ingredients:
  • 1 cup butter, softened
  • 1 cup sugar
  • 2 eggs
  • 2 tsp vanilla extract
  • 2 1/2 cups all purpose flour
  • 1 tsp cream of tartar
  • 1 tsp cinnamon (add this in for more traditional tasting snickerdoodles - note this was not included in the original recipe, so omit if you want a less traditional snickerdoodle)
For the coating:
  • 1/2 cup sugar
  • 1 1/2 tsp ground cinnamon
Method:
  1. Preheat oven to 350F and line two baking trays with parchment paper.
  2. Cream the butter and the sugar together until fluffy (about 2-4 minutes). Beat in eggs one at a time until well blended. Add vanilla extract and stir until incorporated.
  3. In a separate bowl, combine the flour, cream of tartar and cinnamon (if using). Add to the butter mixture and blend well (don't over mix of you will get tough cookies).
  4. For the cinnamon sugar coating, in a small bowl mix both ingredients together well. Using a large cookie scoop, scoop out portions of the dough and roll them into balls and then roll in the cinnamon sugar mixture to coat completely. Place on a baking tray and press lightly to flatten them.
  5. Bake in preheated oven for 15-17 minutes, depending on the size of your cookies. As soon as the edges start to turn light brown, they are done. You want the center of the cookie to still look soft. Don't worry - it will finish cooking once you take it out of the oven and will be completely cooked on the inside.


And thats that! Those are easy cookies to whip up in an evening. Your family will love them... I mean, who doesn't love Snickerdoodles?!

Sorry for the long post today! I just wanted you to know whats been going on with me, especially since I haven't written much on my blog lately. Hope you enjoy this recipe! I've got the Secret Recipe Club April challenge going up on Monday (its a good one that I'm really excited about!!!), and the Daring Bakers' Challenge going up on the 27th, so its going to be a delightful week of recipes. Hope you'll stop by to check them out.

Happy Baking my Friends!

17.4.12

Maple & Ham Scones


If you ever make ham for your family, I'm sure you are well aware that you always have leftovers. And while leftovers are fun in their original form the next day or so, they quickly become monotonous and may even go to waste. Not with this recipe though!! Ohhhh are these ever good. I was inspired by the maple scalloped potatoes I made for easter and thought if they went well with ham, so would maple syrup, in scones! Oh yah, I did that!


I LOVE Anna Olson's scone recipes! They always turn out so light and delicious. So I flipped to my favorite recipe of hers for Apple Cheddar Walnut Scones and heavily adapted it to serve my purpose. Here's my rendition of the recipe made with Ham & Maple.

Ham & Maple Scones
Recipe adapted from Anna Olson's Back to Baking

Ingredients:
  • 1 2/3 cups all purpose flour
  • 2 tbsp pure maple syrup, plus extra for brushing
  • 1 tbsp baking powder
  • 5-6 tbsp butter, cut into small pieces and chilled
  • 1/3 cup finely grated asiago cheese
  • 9 oz leftover ham
  • 1/2 cup heavy cream, plus extra for brushing
Method:
  1. Preheat oven to 400F and line a baking tray with parchment paper.
  2. Pulse the flour and baking powder together in the bowl of a food processor until combined. Cut in the butter until the mixture is crumbly, but pieces of butter are still visible. Remove from the food processor into a medium bowl and stir in the cheese and 1/2 of the ham until coated. Add the heavy cream and the maple syrup and stir until dough starts to come together. Turn out on work surface. Knead lightly until dough comes together fully, being careful not to overwork. Lightly pat dough out into 1/2 inch thick square. Sprinkle with remaining ham pieces and press lightly into the dough. Fold the dough in half, pressing the ham in at the same time. Repeat process until you've worked in about 4 folds.
  3. Shape dough into a square, about 8 inches by 8 inches. Cut the dough into 16 pieces and place on prepared baking tray.
  4. Stir together about 2 tbsp heavy cream and 2 tbsp maple syrup. Brush tops of scones with mixture and bake in preheated oven for about 12-15 minutes, or until they are a rich golden brown.

I baked these for hubby to take to his guys weekend last week and they were a hit!! I have been asked to kindly make these again next time I make a ham. Hope you enjoy these - they're a little different than your usual scone combination, but they work. :)

Happy Baking my Friends!

7.4.12

Blueberry Earl Grey Muffins for the Crazy Cooking Challenge


 After sitting the last Crazy Cooking Challenge out, I've had a chance to get back into the swing of things. I'm super excited to be participating in this month's challenge - to make the Ultimate Blueberry Muffin. And I think I've done it - Blueberry Earl Grey muffins with a Lemon Earl Grey Glaze! Yep, a little over the top, but none-the-less, delicious. My sister thinks these taste like a london fog from a fancy coffee shop and my good friend K thinks these taste like "Afternoon Tea".

Photobucket

If you're wondering what the Crazy Cooking Challenge is - every month a group of bloggers gets together and tries to find the Ultimate version of an every-day favorite dish. Some of the past challenges have been chocolate cake, spaghetti with red sauce, macaroni & cheese, and others. If you're interested, head on over to Mom's Crazy Cooking and check out Tina's informative page.


It is really funny - this month I was browsing around and I was inspired by the same blog I was in the month we did the Ultimate Chocolate Cake! I didn't realize it at first until I went to look up the recipe again to write this post. So funny to see how I am constantly drawn to the same style of blogs and recipes. :) Any way, the blog I'm featuring is Raspberri Cupcakes. Its great! Head on over to check out some of the yummy treats she has been baking up.

Blueberry Earl Grey Muffins
Recipe adapted from Raspberri Cupcakes

Ingredients:
  • 4 earl grey tea bags
  • 1 cup milk
  • 2 1/2 cups flour
  • 2 tsp baking soda
  • 3/4 cup brown sugar
  • 2 tsp vanilla
  • 1/2 cup butter, melted
  • 2 eggs lightly whisked
  • 1 heaping cup blueberries
  • 1/2 cup icing sugar
  • 1 earl grey tea bag
  • juice of one lemon
Method:
  1. Warm the milk until nearly boiling. Remove from heat and add first four tea bags. Steep and let cool for one hour. Remove tea bags and discard.
  2. Preheat oven to 350F. Line a 12 cup muffin pan with paper liners. Place the flour and baking soda in a large bowl. Add the milk, vanilla, brown sugar, butter and eggs. Stir gently to combine. Fold in blueberries. Spoon evenly into prepared muffin pan. Bake in preheated oven for 25-27 minutes until a skewer comes out clean. Don't overbake these muffins or they will dry out.
  3. Cool on a rack. While muffins are cooling, prepare the glaze. Mix the icing sugar, earl grey tea and juice of one lemon together in a bowl until it reaches the desired consistency to drizzle on the muffins (you may have to add more icing sugar or more lemon juice, but adjust it til you like the consistency).


This post has been linked up with the Recipe Party at the Sweet Spot. Head over and check out the other goodies bloggers have linked up this week.
Thanks for stopping by! Hope you enjoy my version of the Ultimate Blueberry Muffin! I know we did. :)
Happy Baking my Friends!

2.4.12

Savory Oatmeal Cookies


I have a confession to make... I'm pretty obsessed with Pinterest. I may have disclosed this at some point in the past couple of months, but seriously, this obsession has gotten worse (yes, I'm aware gotten isn't proper english and this is my caring face heehee). Any way, seriously, I check out Pinterest first thing when I wake up in the morning, at lunch time in the office, and of course lying in bed at night before I go to sleep. Now that I have the Pinterest app on my phone... well, my obsession has intensified. On one of my many Pinterest binges, I came across these amazing looking savory oatmeal cookies. And this weekend I finally got around to making them. I made some minor changes to the recipe, and the result was glorious!!

Savory Oatmeal Cookies
Recipe very slightly adapted from the Kitchn.com

Ingredients:
  • 1 cup steel cut oats
  • 1/4 cup warm water
  • 1/3 cup extra virgin olive oil
  • 1/3 cup honey
  • 1 large egg, beaten
  • 1 cup all purpose flour
  • 1/4 tsp baking soda
  • 1 tbsp finely chopped fresh rosemary
  • 1/2 tsp freshly ground black pepper
  • 1 cup finely grated parmesan cheese
  • kosher salt for sprinkling
  • Roasted garlic goat cheese
Method:
  1. Preheat oven to 350F. Line large baking tray with parchment paper.
  2. Place oats in a large bowl and sprinkle with warm water. In a smaller bowl, combine the olive oil, honey, and egg until well mixed. Pour mixture over the oats and stir to combine. Set mixture aside.
  3. In another mixing bowl, combine the flour, baking soda, rosemary and black pepper. Whisk until well incorporated. Then gently stir in the parmesan cheese. Add the flour mixture to the oat mixture and stir until blended (try not to overmix).
  4. Scoop onto prepared baking tray (I did about 1/8 cup portions or the size of an ice cream scoop). Flatten slightly then sprinkle with kosher salt.
  5. Bake 18 minutes or until edges are lightly browned. Remove from oven and cool on wire rack.
  6. Once cookies are cooled, serve spread with roasted garlic goat cheese.


Yep, they're pretty easy and use very basic ingredients that you probably already have in your pantry and fridge. These are a great snack or starter to a yummy dinner and pair really well with white wine. If you have a chance, head over to the Kitchn to check out other delicious recipes and some great tips.
This post has been linked up with the recipe party over at the Sweet Spot! Head over and check out all the amazing Easter Goodies that have been linked up with the party. :)

Happy Baking my Friends!!

29.3.12

Peanut Butter Chocolate Filled Banana Bread


 Banana bread is such a delicious snack and its truely a classic! I'm pretty sure most of us grew up eating banana bread (I know I did!!). My mom would often bake banana bread for us and I always loved it when she would put chocolate chips in it. This time I decided to depart a bit from the classic and changed it up by putting a layer of peanut butter chocolate yumminess in the middle of this loaf. It was a total success. The loaf has disappeared quickly in our house with requests for a repeat being made frequently. :) So, today I'm going to share this delish recipe with you.


Peanut Butter Chocolate Filled Banana Bread
Recipe adapted from Starting Out by Julie Van Rosendaal

Ingredients:
Banana Bread:
  • 1/4 cup butter, softened
  • 3/4 cup dark brown sugar, lightly packed
  • 3 very ripe bananas, mashed
  • 2 large eggs
  • 1/3 cup low fat greek yogurt (honey or vanilla flavour is nice, but plain is okay too)
  • 2 tsp vanilla extract
  • 2 cups all purpose flour
  • 1 tsp baking soda
  • 1/2 tsp salt (omit if using salted butter)
Chocolate Peanut Butter Filling:
  • 3 tbsp cocoa powder
  • 1/4 cup dark brown sugar
  • 1/4 cup chunky peanut butter
  • 1/4 cup milk
Method:
  1. Preheat oven to 350F. Spray an 8x4 inch loaf pan with non-stick spray.
  2. In a large bowl, beat the butter and sugar until well combined - mixture will have the consistency of wet sand. Add the bananas, eggs, yogurt and vanilla and beat until wel blended.
  3. Add the flour, baking soda, and salt and gently stir with a spatula until just combined.
  4. Pour one half of the batter into the prepared pan. Then prepare the peanut butter and chocolate mixture by combining all four ingredients and stirring until smooth. Spread chocolate peanut butter mixture on top of batter in pan, then top with the remaining banana bread batter.
  5. Bake in preheated oven for one hour and ten minutes, or until the top is cracked and springy to the touch. Cool in the pan on a wire rack.

This is such a great twist on a classic recipe. It comes together really quick - perfect to make for a Sunday morning breakfast or to bake up and take in lunches. :)

This post has been linked up with the Recipe Party over at the Sweet Spot! Head on over and check out the other delectable goods other bloggers have created this week. :)
Happy Baking my Friends!! I'm looking forward to a marathon weekend in the kitchen, so you should have some yummy posts to look forward to next week. :D

27.3.12

Daring Bakers' Challenge March 2012 - Dutch Crunch Bread


Well, its time for this month's Daring Baker's Challenge again. This challenge wasn't all that daring, but it was delicious. Sara and Erica of Baking JDs were our March 2012 Daring Baker hostesses. Sara and Erica challenged us to make Dutch Crunch Bread, a delicious sandwich bread with a unique, crunchy topping. Sara and Erica also challenged us to make a one of a kind sandwich with our bread.

The bread is quite interesting - it is a white sandwich bread topped with a thick layer of a mixture of rice flour, yeast and water. This mixture cracks and turns golden as the loaf bakes, giving the bread it's unique appearance. I'm going to send you over to the Daring Baker's website for the recipe since I didn't change a thing. I used the white sandwich bread recipe and topped it with the dutch crunch topping.

 I decided to make my bread into a Muffuletta sandwich. I adapted the recipe from Bobby Flay's Throwdown cookbook (which is a stellar cookbook, well worth the purchase!!).

 Muffuletta
Recipe adapted from Bobby Flay's Throwdown

Ingredients:
  • 1 round loaf of dutch crunch bread
  • 1/3 lb thinly sliced genoa salami
  • 1/3 lb thinly sliced serrano ham
  • 1/3 lb thinly sliced lean capicola
  • 1/3 lb thinly sliced spanish salami
  • 1/4 lb thinly sliced provolone cheese
  • 1/4 lb thinly sliced swiss cheese
  • 1 recipe special dressing
Special Dressing:
  • 1/2 cup mayonnaise
  • 1 1/2 tbsp dijon mustard
  • 1 tbsp sherry cooking wine
  • 1/2 tbsp white vinegar
  • 1 cup pitted green olives
  • 1 roasted red bell pepper
  • 2 cloves garlic, minced
  • 4 pepperocini peppers
  • 1 tbsp capers
  • salt and pepper
Method:
  1. First, make the special dressing. Combine all ingredients except the capers in the bowl of a food processor. Whirl until mixture is almost smooth, but still a little chunky. Stir in the capers.
  2. Slice the bread in half horizontally. Spread both halves of the bread generously with the dressing. Layer the meats and cheeses on the bottom half of the bread and cover with the top half.
  3. Serve cold. Serves 8 - 10 people.

 Here are some pictures of this monster sandwich. Don't worry about the olives in that dressing... my hubby hates olives, but he was madly in love with this sandwich. It all goes together so perfectly with no flavour overwhelming the others.


 It was a little hard to cut due to all of the toppings, but it still tasted great.

This post has been yeast spotted!

This post has been linked up with Fusion Fridays over at Jennifer Cooks. Head over to check out other delicious goodies other bloggers have whipped up this week.

Thanks Sara and Erica for hosting an interesting challenge. I can't wait to go around and check out what kind of sandwiches everyone else made. Happy Baking my Friends!

25.3.12

Green Smoothie {Healthy, gluten-free and Vegan}

 Many of us are becoming more conscious of what we're putting in our bodies every day. With all of the genetically modified foods, chemical treatments and other scary things out there, I'm not surprised. But, it can be hard to find the time and energy to make sure we're purchasing healthy ingredients and making healthy food. That's where this green smoothie comes in - its a great way to start your day and you can feel good knowing that everything that goes into it is good for you and will give you that kick of energy to start the day. Its quick and easy and you can pre portion out the fruit and veggies a few days in advance so all you do is dump in blender and go! Plus, you won't have to worry about getting enough fruit and veggie servings for the day, this one's packed full of whole fruits and veggies!!

The reason I'm sharing this recipe with you is because of my mom. My mom has been struggling with some serious health issues for the past few years and nothing seems to help her much... not the most expensive medicine, expensive doctors or expensive supplements. But a friend of hers recommended that she try going vegan for a while and see if it helps. She thought "what do I have to lose". She has been drinking variations of this smoothie as part of a vegan diet for the past few months and over those month's we've seen a huge transformation in her. No, she's not cured, but she is feeling much better and most days she can get up and walk around and has way more energy than she did before. She asked if I would share this recipe on my blog for anyone out there looking for a healthy and delicious (if you can get over the colour!!) breakfast or snack.  So of course I agreed to share with you. Hope you enjoy!
Green Smoothie {Healthy, gluten-free and Vegan}
Recipe from my Mom

Ingredients:
  • 1 organic banana (make sure its ripe, because you need the sweetness and flavour)
  • 1 organic ambrosia apple, cored and roughly chopped
  • juice of one organic lemon
  • 2 cups roughly torn organic greens (kale, lettuce, swiss chard, or any combination of them)
  • 2 cups cold water
Method:
  1. Combine all ingredients in blender (vita-mix is best, but any blender will do). Blend all ingredients until smooth and vibrant green (colour will vary depending on mixture of greens used in smoothie). Makes two large servings. Store leftovers in the fridge for later.


 You can mix it up a number of different ways to give yourself some variety - vary the type of greens you use (for some crazy colour try some organic purple kale!!), you can put pear in instead of apple, or any other fruit you want! If you find this isn't quite sweet enough for you, try sweetening it with a couple teaspoons of agave syrup. And a little trick to get over the green colour of the smoothie - drink it out of a travel mug through a straw!
Do you have a favorite vegan recipe? Would you like it featured on my blog? Send me an email with the recipe (don't forget to include the source of the recipe) and a photo from last time you made it and I will most definitely feature it on my blog. Can't wait to hear from you.

Happy Cooking my Friends! Stay healthy!