27.10.11

The Daring Bakers' Challenge - October 2011 - Povitica!

Wow!! Can you believe it? For the first time in a few months I'm finally participating in a Daring Bakers' Challenge. And how I've missed this group... the wonderful challenges, the encouragement of fellow Daring Bakers and the general sense of accomplishment that comes from from tackling a new challenge in the kitchen and learning from the experience.

The Daring Bakers' Challenge for October 2011 was Povitica, hosted by Jenni of the Gingered Whisk. Povitica is a traditional eastern European dessert bread that is as loverly to look at as it is to eat! 

Jenni definitely hit the nail on the head with this recipe! It was absolutely divine. The dough was fantastic to work with and the traditional walnut filling was heavenly. :) I will definitely be making this one over and over and over again! All the while experimenting with different fillings of course... I couldn't resist making four different loaves, but our family definitely had their favorites.

 First off - if you're looking for the recipe, I'm going to send you over to the Daring Kitchen website. There are a few components to the recipe and many steps, so I'm going to save myself some effort (what?? its getting late okay?!). :) Browse around the archives... you might stumble across something else you want to make... oh yeah and if you haven't already done so, maybe you should sign up and participate in our monthly challenges! Its fun, you'll learn things and you'll probably be able to cross things off your baking "bucket list"!!
 If I'm not posting the recipe you might be wondering what I plan to fill this post with... well, how about some step-by-step pictures? And maybe a few suggestions for fillings for your yummy bread (afterall, a full batch of this recipe makes four whole loaves of this delicious bread!!).

 I had to make one loaf with the traditional walnut filling as posted by Jenni. And it was amazing! I would probably make two of the loaves with the walnut filling when I make this recipe again. This bread is so delicate and flavourful without being overwhelmingly sweet. Can you tell I liked it?!

 Then I tried a combination of spinach, feta and fresh chopped oregano. MMMMMM!!!! This one was awesome too - it was the favorite in our house. Hubby and sister couldn't get enough. I used one package of frozen chopped spinach (thawed and thoroughly drained), about 200-300 g of feta crumbled, and about 3-4 tbsp fresh chopped oregano for one loaf of the bread. Premix the fillings then just sprinkle the mixture over your dough once it's been rolled out.


 I also made a roasted garlic, cheddar and carmelized onion loaf.... mmmm!! Super yummy! And lastly I made a loaf with roasted garlic, goats cheese and cranberry jalepeno jelly! All were delish and I can't wait to experiment with different fillings in my "cough" spare time! :D

 Thank you to Jenni for hosting such an amazing challenge! I had never even heard of Povitica... to think I've been missing out on such a good thing all these years... guess I've got some catching up to do.


Happy Baking my Friends! Thanks for stopping by.

24.10.11

The Mom Chef's Spicy Sausage and Mushroom Pizza for SRC

I am constantly surprised at how fast a month flies by each and every time I receive my Secret Recipe Club assignment... I know I say this every time I post an SRC post, but honestly, where on earth does the time go?! This month I was pretty excited to receive the blog Taking on Magazines by The Mom Chef (aka Christiane). Her blog is entertaining, real and oh-so-helpful! It was so cool to see her take and her thoughts on some of the recipes I had been eyeing up in my Bon Appetit magazines the last couple of months.
On my recent trip to Portland, I hit the outlets there for some serious shopping. My serious shopping often involves shoes and handbags like "normal" females, but it also involves hitting the kitchen outlet stores... on this last trip I found a smokin' deal on a pizza stone. So, my recipe search on Christiane's blog was fairly biased... I was on the lookout for a yummy sounding pizza recipe and I was in luck... she featured a number of pizza recipes, but the one that stood out to me was the Spicy Sausage and Mushroom Pizza. I adapted the recipe slightly, but it was fantastic! I am hooked on her blog and I love how she provides great feedback on all the recipes she tries... very helpful!
Spicy Sausage and Mushroom Pizza
Recipe adapted from Taking On Magazines

Ingredients:
  • 1 lb refrigerated fresh pizza dough (I made my own because I've had a couple very bad experiences with store-bought dough... but feel free to purchase if you don't have time to whip up a batch!)
  • 4 oz hot italian sausage
  • 1/2 cup carmelized onions\
  • 8-oz pre-sliced white mushrooms
  • 1 tbsp yellow cornmeal
  • 1/2 cup pizza sauce (store bought is fine, but I made my own in my food procesor)
  • 1/2 cup mozza, grated
  • 1/4 cup parmigiano reggiano, shredded
Method:
  1. Place pizza stone in cold oven and preheat to 400F.
  2. Place dough in a bowl and coat lightly with oil or cooking spray. Let stand covered for 15 minutes.
  3. Heat a large non-stick skilled over medium-high heat. Remove casings from sausage and add sausage to pan. Cook 3 minutes stirring to crumble. Add mushrooms and saute 6 minutes.
  4. Remove heated pizza stone from oven and sprinkle with cornmeal. Roll dough into a 12 inch cirle and place on prepared pizza stone (careful, it will be super hot). Spread sauce over dough leaving 1/2 inch border. Top with sausage mixture and carmelized onions. Sprinkle with cheeses and bake in preheated oven for 20-25 minutes or until crust is golden and cheese is melted.


Pretty easy and delicious!! Thanks Christiane for sharing such a delicious recipe. And thanks to Group C's wonderful hostess - Angie. She puts in a lot of hard work and we all appreciate it.

Happy Cooking my Friends!

23.10.11

Lemon Meringue Cupcakes!

I recently helped host a kick-off event for Operation Christmas Child and I baked these cupcakes to feed to our wonderful supporters.  These cupcakes were a total hit and there were absolutely no leftovers!!! They are a tad bit involved, but you can make it a little easier on yourself by purchasing lemon curd instead of making it from scratch... but I will guilt you a little by telling you how much better homemade lemon curd is!!! Even if you do decide to go the store-bought lemon curd route, I won't tell any one. :)

 Lets get started!

Lemon Meringue Cupcakes
Recipe adapted from Martha Stewart.com

Ingredients:
  • 3 cups all-purpose flour
  • 1 tbsp baking powder
  • 1/2 tsp salt
  • 1 cup butter, room temperature
  • 2 cups sugar
  •  4 large eggs
  • finely grated zest of three lemons (about three tbsp)
  • 2 tbsp fresh lemon juice
  • 2 tsp pure vanilla extract
  • 1 cup buttermilk
  • 1 batch lemon curd (recipe below)
  • 1 batch seven minute frosting (recipe below)
Method:
  1. Preheat oven to 325 degrees. Line standard muffin tins with paper liners. Whisk together flour, baking powder, and salt.
  2. With an electric mixer on medium-high speed, cream butter and sugar until pale and fluffy. Add eggs, one at a time, beating until each is incorporated, scraping down sides between additions. Beat in zest and vanilla. Add flour mixture in three batches, alternating with two additions of buttermilk and lemon juice, and beating until just combined after each addition.
  3. Divide batter evenly among prepared muffin tins, filling each tin three quarters full. Bake until cake tester inserted in center comes out clean, about 25 minutes. Transfer to wire racks to cool completely. Cupcakes can be stored overnight at room temperature, or frozen up to two months in airtight containers.
  4. Pipe about 1 tbsp lemon curd into each cupcake, overflowing the filling a little so the top of the cupcake is also covered in lemon curd. Then pipe the seven minute frosting onto the cupcakes. Using a small kitchen torch, brown the frosting to the desired shade so it looks like the meringue on a lemon meringue pie.

 To make the lemon curd, use this recipe on my friend's blog Lizardbreath Creations. Double the recipe and use all lemon juice rather than a mixture of lemon-lime juice.

Seven-Minute Frosting
Recipe from Martha Stewart.com

Ingredients
  • 1 1/2 cups + 2 tbsp sugar
  • 2/3 cup water
  • 2 tbsp light corn syrup
  • 6 large egg whites, room temperature
Method:
  1. Combine 1 1/2 cups of the sugar with the water and corn syrup in a small saucepan. Clip a candy thermometer to the side of the pan and bring to a boil over medium heat, stirring occasionally until sugar disolved. Continue boiling, without stirring, until syrup reaches 230 degrees.
  2. Meanwhile, in the bowl of a stand mixer, whisk egg whites on medium-high speed until soft peaks form. With mixer running, add remaining two tbsp sugar and beat to combine.
  3. When syrup reaches 230 degrees, remove from heat. With mixer on medium-low speed, pour syrup down side of bowl in a slow, steady stream. Raise speed to medium-high and whisk until mixture is completely cool (test by feeling bottom of mixing bowl - it should be cool to the touch) and stiff (but not dry) peaks form, about seven minutes. Use immediately.
I hope you enjoy these! They make a great weekend treat, or a nice grown-up cupcake that tastes delicious and looks beautiful. Lemon meringue is such a classic flavour that most people really love.

Happy Baking my Friends!

22.10.11

How to... Carmelize Onions

 There are some skills that are really important to have! One of them is roasting garlic and another one is carmelized onions. Carmelized onions can take an okay dish and elevate it to a delicious and special dish that will impress your guests. Plus they taste amazing (and take this from someone who doesn't really care all that much for onions - these things are delicious when done like this)! You can make these carmelized onions and keep them in the fridge for up to a week or you can make them and freeze them for up to a couple of months. They are one of those things to make in a large batch and then freeze/ store them so you always have them on hand!

You can top off a great burger with carmelized onions, put them on baguette slices with yummy olives and goat cheese, use them on flatbreads or homemade pizzas, put them in omelets, or even with a simple pasta with olives and cherry tomatoes... the possibilities are endless! So what are you waiting for? Get chopping your onions and get started!

Caramelized Onions
Recipe adapted from the Guy Can't Cook

Ingredients:
  • 3 large onions, peeled and thinly sliced (can be white, red, yellow or a mix of all three)
  • a couple tablespoons of olive oil
  • a couple tablespoons of butter 
  • 1 tsp sugar
  • 1 tsp balsamic vinegar
Method:
  1. Heat the oil and butter in a saute pan over medium-low heat. Add the onions and stir until they are coated with the oil/ butter mixture. Cover the pan and sweat the onions for five minutes. Remove the cover and saute until the onions begin to turn golden (see photo above) - if they are browning or burning, the heat is too high.
  2. Continue to cook until the onions are very soft and jammy, with a nice golden colour. Stir in the sugar and the vinegar and cook until the liquid is gone. Pile into a bowl and serve warm with bread, or put them in a container and refrigerate until you're ready to use them.
And there you go! Delicious carmelized onions that will elevate any dish you put them in. Hope you have a fantastic weekend.

Happy Cooking my Friends!

17.10.11

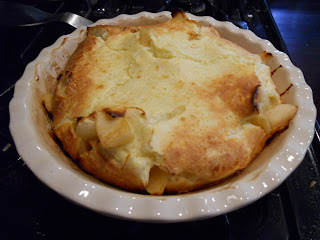
Puffy Apple Pancake... you know you want it!

 I woke up Sunday morning wanting something warm and hearty for breakfast. This doesn't happen to me very often, but typically it strikes when the weather is cooling down and I'm craving some comfort food. I didn't feel like slaving in the kitchen before I'd had time to wake up, so I flipped open one of my beginner cookbooks and found this recipe for Puffy Apple Pancake. It sounded intriguing, I had all the ingredients, and best of all it sounded easy! I was sold.

Julie Van Rosendaal, author of Starting Out had this to say about the recipe:

"This spectacular looking pancake is similar to a big Yorkshire pudding or popover - baked in the oven, with or without sauteed fruit, it rises up all puffed and crunchy around the edges. Although it's traditionally made with apples, a puffy pancake is also perfect made with pears, bananas, peaches, berries, or plums. Sturdier fruits can be sauteed first and baked right into the pancake or set aside to be served atop. Fragile fruits like berries or bananas are better served in the hollow of the finished pancake, which rises even more dramatically when the batter is baked alone."

Intrigued yet? Thought so. Hungry? I knew it! Here's the recipe:

 Puffy Apple Pancake
Recipe adapted from Starting Out

Ingredients:
  • 2 apples
  • 1 tbsp butter
  • 2 tbsp sugar
  • 1/4 tsp cinnamon
  • 3 large eggs
  • 3/4 cup all purpose flour
  • 3/4 cup milk
  • maple syrup for serving (optional)
Method:
  1. Preheat oven to 450F.
  2. Peel, core and slice the apples. In a large skillet, saute the apples in nbutter over medium heat for a minute or two. Sprinkle with sugar and cinnamon and cook until they start to turn golden. Remove from heat.
  3. Whisk together the eggs, flour, and milk. Don't worry if there are some lumps left. It will still taste good! Pour apples into greased pie plate, then pour the batter over top.
  4. Bake in preheated oven for 20-25 minutes, until the pancake is puffed and golden. Cut into wedges and serve drizzled with maple syrup. Serves 2-4 people (mine served 3 people perfectly).
I hope you enjoy this one friends! It is the perfect autumn weekend breakfast.

Happy Baking my Friends!

11.10.11

Chicken with Wild Mushroom & Balsamic Cream Sauce with Brown Butter & Balsamic Ravioli

 Not good pictures... I know!! These photos definitely don't do this meal justice because it was absolutely delicious. Don't be shy - try these recipes out either together or separately. They're rich and decadent tasting and a small quantity will satisfy anyone.

Chicken with Wild Mushroom & Balsamic Cream Sauce
Recipe adapted from Rachael Ray on the Food Network

Ingredients:
  • 4 boneless, skinless chicken breasts
  • pepper
  • 2 tbsp butter
  • 12 cremini or baby portobello mushrooms, sliced
  • 12 shitake mushrooms, stems removed and sliced
  • 12 white mushrooms, sliced
  • 2 garlic cloves, chopped
  • 1 tbsp thyme leaves, a couple of sprigs, chopped
  • 2 large shallots, thinly sliced
  • 2 tbsp all purpose flour
  •  1 1/2 cups chicken stock
  • 1 tbsp balsamic vinegar
  • 3 tbsp heavy cream, or half-and-half
  • 1/4 cup flat leaf parsley, chopped
Method:
  1. Preheat a large, nonstick skillet over medium-high heat and add extra-virgin olive oil. Season chicken liberally with salt and pepper and add to the hot skillet. Cook the chicken for 5-6 minutes on each side. Remove the chicken from the pan and cover with foil to keep warm.
  2. Return the skillet to the heat, turn heat back a bit, and add the butter. Once the butter melts add the mushrooms and brown stirring occasionally for about 4-5 minutes. Once the mushrooms are brown, season with salt and pepper then add garlic, thyme and shallots. Cook stirring occasionally for about 2 minutes or until the shalots are wilted. Sprinkle flour into pan and cook two minutes more. Whisk in the stock, balsamic vinegar and the cream. Turn the heat up to high and simmer for 2 minutes or until thickened. Slice the chicken on an angle. Add the parsley and the chicken back to the skillet to heat up, about 1 minute.
Brown Butter & Balsamic Ravioli
Recipe adapted from Racheal Ray on the Food Network

Ingredients:
  • 1 pkg, 12-16 ounces, fresh ravioli, any flavor filling
  • 3 tbsp butter, cut into small pieces
  • 2 tbsp balsamic vinegar
  • 2 handfuls grated parmigiano-reggiano
  • salt and pepper
  • 1/4 cup chopped flat-leaf parsley
Method:
  1. Bring a large pot of water to a boil for ravioli. Salt water and drop ravioli in water. Cook 8 minutes or until raviolis expand, float to top of water, and are al dente.
  2. Heat a medium skillet over medium low to medium heat. Add butter to pan and let it begin to brown. When butter for ravioli has browned, add cooked ravioli to the pan and turn in butter to heat through. Add balsamic vinegar to ravioli and cook a minute or two longer to reduce the vinegar and glaze the ravioli. The vinegar will become thick and syrul like. Add cheese, parsley, salt and pepper to the pasta and remove from the heat.
Hope you enjoy! I made this for hubby & my 4th anniversary at the end of August and we both really enjoyed it. Happy Cooking my Friends!

1.10.11

German Chocolate Layer Cake

 Wow!! You can't imagine how happy I am to be back in my kitchen, cooking and baking now that this exam is over. :) I have been meaning to share this cake with you for a while... I made it and brought it in to work for my co-workers. They LOVED it!! Despite having German grandparents, I never ever ate German Chocolate Cake growing up. Once I saw that this recipe was full of coconut and chocolate, I couldn't resist - I had to make it. One note that I have about this recipe - if I made it again, I would add far less liquid to the chocolate ganache - with the amount of liquid called for in the recipe, the ganache was more pourable than spreadable. Start with about 1/2 of the amount of liquid called for below. Other than that, recipe is delicious as is!!

 German Chocolate Layer Cake
Recipe adapted from Meals in Heels by Jennifer Joyce

Ingredients:
  • 350g unsalted butter, chopped and softened, plus more for greasing the pans
  • 350g cake flour, sifted
  • 80g unsweetened cocoa powder
  • 4 large eggs
  • 1 tbsp vanilla extract
  • 1 tsp baking soda
  • 450g granulated sugar
Coconut Filling Ingredients:
  • 2 large egg yolks
  • 175g granulated sugar
  • 170ml evaporated milk
  • 60g unsalted butter, chopped
  • 90g unsweetened coconut
  • 120g chopped pecans, toasted
  • 1 tsp vanilla extract
Chocolate Ganache Ingredients:
  • 200ml double cream
  • 200g milk chocolate, chopped
 Method:
  1. Preheat oven to 350F. Line 3 8 inch cake tins with parchment paper and grease the paper with butter.
  2. Whisk the cocoa with 350ml boiling water in a bowl until smooth. Allow to cool to room temperature. When cool, transfer 75ml into a large bowl and whisk together with the eggs and vanilla extract until well combined.
  3. Please flour, 1 tsp salt, baking oda and sugar in the bowl of an electric mixer and beat on low speed for 30 seconds. Add the butter and remaining dissolved cocoa mixture and beat on low speed for 7-8 minutes or until well comined, then increase to medium and beat for 1 1/2 minutes. Add the egg mixture, in three batches, beating for 30 seconds after each addition. Don't over-beat the mixture or the cake will be heavy. Divide amond cake tins and smooth the tops.
  4. Position the oven racks so you can fit 2 cakes in the middle and one in the lower third of the oven. Rotate the cakes halfway through the baking time. Bake for 25-30 minutes or until a skewer comes out clean. Cool in the tins for 10 minutes, then remove from tins, peel off the baking paper and cool completely on wire racks. At this stage, you can wrap the cakes in plastic wrap and refrigerate for up to 2 days before frosting.
  5. For the coconut filling: Whisk together the egg yolks and sugar in a saucepan. Add the milk and butter and whisk continuously over medium heat for 10 minutes until the mixture thickens enough to coat the back of the wooden spoon. Do not allow to boil. Remove from the heat and stir in the coconut, pecans and vanilla extract. Allow to cool completely.
  6. For the chocolate ganache: Place cream in a heatproof bowl set over a saucepan of boiling water and heat the cream until just below boiling point. Remove from heat and stir in the chocolate. Whisk until smooth and allow to cool for five minutes, then refrigerate, stirring occasionally, for one hour or until thickened.
  7. Line a cake stand or serving platter with baking paper and place cake on top. Spread with half the coconut filling, top with another cake, spread with the remaining filling and top with the third cake. Using a large palette knife, spread the top and sides with the chocolate frosting in a swirling pattern. Carefully pull out the baking paper to serve.

Alright, so definitely not an easy or quick recipe, but sure was delicious. Soooo welcome back to me and happy baking my friends! Hopefully you'll be hearing from me a little more frequently over the next little while. Thanks for sticking around. :)