31.5.12

Balsamic Pulled Pork Sandwiches


Wow! I am finally getting another blog post up. Feels like forever! Sorry about that folks. But I'll make up for it with this amazing recipe Balsamic Pulled Pork. Its spectacular. It was supposed to be balsamic honey pulled pork, but funny thing - my "well stocked" pantry did not contain an ounce of honey. HAHA whoops! So, I did without and this recipe was still great. Make it this weeked - you'll love it because its one of those slow cooker recipes where you just throw it all in and walk away (well, until the last hour any way, then it takes a little bit of effort, what with making the sauce and all). But it is honestly worth the little bit of effort. I promise!


Balsamic Pulled Pork Sandwiches
Recipe adapted from Better Homes and Gardens

Ingredients:
  • 1 3lb boneless pork shoulder roast
  • 1 large onion, chopped
  • 1 1/2 tbsp each ground cumin and smoked paprika
  • 1 cup chicken broth
  • 1/2 cup balsamic vinegar
  • 1/2 cup ketchup
  • 1/2 cup garlic bbq sauce
  • 1/4 cup packed brown sugar
  • 1 tbsp worcestershire sauce
  • 1 tbsp dijon mustard
  • 1 clove garlic, minced
  • 1/2 tsp freshly ground black pepper
  • 12 fresh buns
  • coleslaw and pickles to garnish, if desired
Method:
  1. Rub pork roast all over with cumin and smoked paprika. Set aside. Place chopped onion on the bottom of the slow cooker. Place pork roast on top of onion and slowly pour over 1/2 cup of the chicken broth. Place lid on slow cooker and cook on high for 5 hours.
  2. During the last half hour of cooking, make the sauce. Combine the remaining 1/2 cup chicken broth, vinegar, ketchup, bbq sauce, brown sugar, worcestershire sauce, dijon mustard, garlic and pepper in a medium saucepan. Bring to a boil then reduce heat to low. Simmer for 25 minutes, or until sauce has thickened slightly. Taste sauce, if sauce is too vinegary, add more chicken stock.
  3. Remove pork from slow cooker and shred. Remove juice and onions from the bottom of the slow cooker and place shredded pork back in the slow cooker.  Pour sauce over and stir to combine. Replace lid and cook on low for one hour.
  4. Top buns with pulled pork, coleslaw and pickles. Enjoy!


This was unbelievably good! I love pulled pork, but this one was just over the top. I made these potato buns - stay tuned - I will post the recipe soon. :) Also coming up - details and a recipe from my most recent cooking class at Well Seasoned and the Crazy Cooking Challenge. Hope to see you soon!


Happy Cooking my Friends!

21.5.12

Penne Alla Salsiccia for Secret Recipe Club


It is the start of the May Long Weekend and I'm just writing my post for Monday's Secret Recipe Club reveal. I feel like the last few months have just got away on me!! But with each month that passes, I can tell you one thing - I'm always thrilled with my assignment for Secret Recipe Club. Whether its a blog that challenges me with recipes that are out of my comfort zone, not my usual fare, or too many delicious recipes to choose from, its always fun browsing through that blog trying to pick what you're going to make! Some of my past choices for SRC have been:

Salted Caramel Filled Brownies
Quinoa & Black Bean Chili 
Birthday Cake Oreo Cookie Bark
Zucchini Carrot Cake
Pizza Bites
Chocolate Peanut Butter Pretzels
Lime & Blueberry Scones

All of them were absolutely delicious and so worth the effort of making. :)


This month I was assigned Cookin' with Moxie written by Jamie. Jamie is a beautiful Italian girl who absolutely loves to cook and loves to eat! Her love for cooking, particularly for cooking meals true to her Italian heritage totally shows through when you look through her blog. It was so hard to pick a recipe because I wanted to try everything!!! After looking through loads of recipes, I finally settled on Spaghetti Alla Salsiccia, for which I didn't have any spaghetti on hand, so I used penne pasta instead and it worked like a charm! Oh man was it good! My homemade pasta sauce doesn't very often end up tasting 10x better than the stuff you buy in a jar, so I usually avoid making it. But this recipe is a keeper. With a short list of easy to find ingredients, you'll be on your way to an authentic tasting pasta dish in no time at all. I made a couple of small changes to the recipe based on what I had on hand in the house, but other than that, I left the recipe as is!


Penne Alla Salsiccia
Recipe minimally adapted from Cookin' with Moxie

Ingredients:
  • 1 lb penne
  • 2 tsp olive oil, divided
  • 1 16oz package of sliced crimini mushrooms
  • 1 lb mild italian sausage (can use mild italian flavoured turkey sausage for lower fat dish)
  • kosher salt and freshly ground black pepper
  • 3/4 cup red wine
  • 2 tbsp worcestershire sauce
  • 1 small can of tomato paste
  • 1 1/2 cups pasta water, reserved from cooking penne
  • shredded provolone to finish dish
Method:
  1. Bring a pot of salted water to a boil. Cook pasta until al dente according to the directions on the box. Reserve 1 1/2 cups cooking water for later. Drain pasta and set aside.
  2. While pasta is cooking, heat 1 tsp olive oil in a saute pan. Saute mushrooms over medium heat until lightly browned, about 5-8 minutes. Season with salt and pepper. Stir to distribute seasonings and then remove from pan. Set aside.
  3. Add the remaining 1 tsp olive oil (I found I didn't need this as the sausage was oily enough) and saute the sausage until just about cooked through. Add the red wine and cook until reduced by half. Once the wine is reduced, add the mushrooms, worcestershire sauce and tomato paste. Cook stirring 1-2 minutes so everything gets coated.
  4. Add reserved pasta water and stir to combine. Simmer sauce uncovered, until slighly thickened 20-30 minutes. Season with additional pepper to taste.
  5. Combine pasta and sauce and stir to evenly distribute.
And as Jamie would say Tutti Mangia!


Loved my SRC assignment this month and loved the recipe I picked! Thanks Jamie for the lovely selection of recipes. :) Can't wait to try some more.

Happy Cooking my Friends!

15.5.12

Tiger Butter Fudge


If you stop by regularly, you may have noticed I haven't been blogging a whole lot. Well, thats because I haven't been baking or cooking much the last little while. I try to make a couple things on the weekend and make sure they hit the blog, but I'm definitely not posting as often as I would like to. But that being said, I'm trying to make sure the things I actually do post are special and extra delicious. This recipe, is extra special and extra delicious. Trust me. You've just gotta make it!


 I found inspiration for this recipe on Pinterest (surprise, surprise!!)!! Come follow me! I LOVE new followers. The original recipe came from Bakers' Royale who I've heard a lot about in the blogosphere, but never really stopped by to check out the recipes... well, that was a mistake! I will most definitely be frequenting Naomi's blog in the near future for other inspiration and recipes to try. Check it out if you get a chance - I guarantee you'll be drooling after only a couple minutes.


Tiger Butter Fudge
Recipe adapted from Bakers' Royale

Ingredients:
  • 1 can sweetened condensed milk, portioned in half
  • 10 peanut butter sandwich cookies (I used Pirate brand)
  • 1 cup white chocolate chips
  • 2 tbsp butter
  • 1 cup peanut butter chips
Method:
  1. Prepare a rectangle loaf pan by lining with tin foil. Divide the sweetened condensed milk between two microwave safe bowls. Set aside. Roughly chop up the peanut butter sandwich cookies and set aside.
  2. Add white chocolate to one of the bowls of sweetened condensed milk. Add butter. Melt in microwave at medium power stirring often until completely melted. Fold in the chopped cookies and stir gently to combine. Pour into prepared pan and smooth into an even layer.
  3. Add the peanut butter chips to the remaining bowl of sweetened condensed milk. Microwave at medium power stirring often until completely melted. Pour onto white chocolate layer in prepared pan. Refrigerate at least one hour or until set.

Then taste this delicious fudge!! I guarantee you won't be able to stop til the whole pan is gone. It is so delicious. I recommend sharing so you don't consume the whole pan (while it may sound like a good idea, you may regret it when a) you feel like you're in a sugar coma and/ or b) your favorite skinny jeans no longer zip up... just sayin!! Feel free to share with me! ;)


Happy Baking my Friends! Hope you're looking forward to a lovely long weekend coming up in just a few days. I know I am.

11.5.12

Mr. Big Brownies


My hubby was just in Winnipeg visiting his lovely Grandparents. They're the sweetest people and like his mom, they just love to give you little "gifties". Little gifts that don't really cost much and don't seem like much, but they're a little something to brighten your day, often for trivial occasions, or no occasion at all. This time Scott's Grandpa gave him a box of Mr. Big Snack Cakes that he had picked up last time he went to town. I laughed so hard when he brought them back home and thought, oh geez, what are we going to do with these? Well, inspiration struck! Might as well put them in a brownie. So that's what I did.

For this recipe, I adapted one of Anna Olson's recipes from her newest cookbook Back to Baking. Which is a pretty spectacular book (if you haven't already heard my praises for this cookbook, check out my post about me attending a cooking class hosted by Anna that demonstrated recipes from her book here)!!


Mr. Big Brownies
Recipe adapted from Anna Olson's Back to Baking

Ingredients

Brownies:
  • 1/2 cup butter
  • 4 oz semisweet chocolate chips
  • 3 oz unsweetened chocolate, chopped
  • 1 tbsp instant coffee granules
  • 1/2 cup granulated sugar
  • 1/2 cup packed brown sugar
  • 2 eggs
  • 2 tsp vanilla extract 
  • 2/3 cups all purpose flour
  • 1/4 tsp baking soda
  • 1/8 tsp salt
  • 4 Mr. Big Snack Cakes
Frosting:
  • 3 oz milk chocolate chips
  • 2 tbsp butter
  • 1 tsp instant coffee granules
  • 1/2 package cream cheese, softened
  • 1 cup icing sugar
Method:
  1. Preheat oven to 350F. Line an 8 inch square pan with parchment paper so it hangs over the edges slightly.
  2. Melt the butter, chocolates, and instant coffee in a medium saucepan over low heat, stirring constantly until melted. Remove the pot from the heat.
  3. Stir in the sugars, then add the eggs one at a time, stirring well after each addition. Stir in the vanilla.
  4. Stir the flour, baking soda, and salt into the chocolate mixture, mixing just until blended.
  5. Pour half the batter into the pan (just until the bottom of the pan is covered). Top with the Mr. Big Snack Cakes. Pour remaining batter to cover the snack cakes. Smooth top.
  6. Bake in preheated oven for about 35 minutes, until the top of the brownies take on a dull finish. Cool completely in the pan before frosting.
  7. To make the frosting, melt the chocolate, butter, and instant coffee in the microwave, being careful not to burn the chocolate. Beat the cream cheese to soften in the bowl of a stand mixer. Pour in the melted chocolate mixture and beat until blended. Add icing sugar and blend. Remove the brownies from the pan and ice the top of the entire brownie. Let set for an hour before slicing.

These are some seriously delicious brownies! You've got to try them. :) Would probably work well with Wagon Wheels too!! Yah, I'm a little weird, but it works. :D Hope you've got lots to look forward to this weekend. I know I do! Its my Birthday and Mothers' Day on Sunday. So its going to be a good weekend. Wish I lived closer to my Momma though.


Happy Baking my Friends! Enjoy the weekend.

7.5.12

The Ultimate Grilled Cheese Sandwich for CCC

Woohoo! Its time for the Crazy Cooking Challenge again. Wondering what the CCC is? Well, its this great monthly challenge hosted by Tina of Mom's Crazy Cooking. Every month, Tina chooses a classic dish and challenges each of us to make the "ultimate" version of it. People then vote on their favorite by clicking on their favorite dish in the blog hop down below!! So, if you like what you see here today, be sure to find me in the blog hop at the bottom of this post and click on me!!

Photobucket


My past entries in the challenges have been:


And these recipes are delicious! So check them out - I'll still be here when you get back. :)


This month the challenge was to make the Ultimate Grilled Cheese Sandwich!! How fun is that? There are so many opportunities to get creative and turn something ordinary into something extraordinary! I made a crispy chicken jalepeno popper grilled cheese with cheddar sauce. Overkill? Yes. Delicious? Heck yes!! You've got to try this once. For all the guys in your life! They will LOVE it.

*DISCLAIMER: This is not something to make for ladies night! Its messy, hugely full of calories, and unbelievably huge. Make it for your husband and his buddies on game nigh or your teenage sons as a treat! I guarantee it will win you some mega brownie points!


I have to apologize, I didn't document this recipe very well, so measurements are lacking a little bit! But here's an overview of what I did and the ingredients I used. :)

Funnily enough, my inspiration for this sandwich didn't really come from a grilled cheese post... I saw a couple jalepeno popper grilled cheese recipes on Pinterest... and I liked the flavour combo, but it just didn't seem "ultimate" enough. Then I saw this Crunchy Cheddar Chicken over at the Happy Little Tomato. I knew the flavours would go perfectly sandwiched between two jalepeno popper grilled cheese sandwiches and the cheddar sauce would make the perfect condiment for my crazy sandwich. Check out this cute little blog! There's lots of delicious looking recipes on there. :)


Jalepeno Popper Grilled Cheese with Crunchy Cheddar Chicken

Step 1: Make bacon. Lots of it. I think we made 1 lb of bacon and used about 2/3rds of it for three sandwiches. You'll need about 4 pieces of bacon per chicken sandwich you make. Be sure to make your bacon crispy! Thats the best way to do it for sandwiches.

Step 2: Make the crunchy cheddar chicken. Get it into the oven to cook while you make the other parts of this sandwich. If you time it right, the chicken will be done when you are ready to assemble the sandwiches. The only thing I omitted from the recipe was the parsley. Too healthy for this sandwich right? ;)

Step 3: Make some garlic butter (or buy prepared) by combining butter, olive oil, kosher salt, fresh chopped basil and some minced garlic. Mix well and set aside.

Step 4: Make your jalepeno popper filling by combining a couple spoonfuls (about 1/3 cup each) of mayo and sour cream in the bowl of a food processor. Throw in some red chili peppers (I used two) with seeds removed. Toss in about 3/4 cup shredded jalepeno jack cheese. Whirl until red chili's are worked into the rest of the ingredients. Sauce will be semi-smooth. Set aside.

Step 5: Make the cheddar sauce from the crunchy cheddar chicken link in step 2.

Step 6: Grill your grilled cheese. Assemble each sandwich as follows: Grab two pieces of bread - spread one side of each piece with garlic butter. Top non-buttered side of bread with a little shredded cheddar, a few spoonfuls of the jalepeno popper filling, two strips of bacon, a little more cheddar cheese and then top with remaining piece of bread (butered side out). Grill until lightly golden on both sides and cheese is melted. Make two grilled cheese sandwiches for each chicken sandwich your prepare.

Step 7: To assemble chicken sandwiches - start with one grilled cheese sandwich, top with one piece of chicken. Drizzle with a spoonful or two of the cheddar sauce, top with some banana pepper rings and finally top with remaining grilled cheese sandwich. Grab a big knife and cut this bad boy in half. You'll need to in order to eat it! Enjoy (but not too often because these are really bad for you!!).


So, that's my version of a crazy, ultimate grilled cheese sandwich! Hope you enjoy. :) Don't forget to vote for me below. Happy Cooking my Friends!


2.5.12

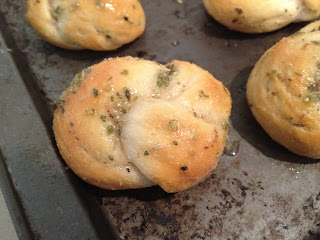
Asiago Garlic Knots

This week feels like it's taking forever! I'm not quite sure why time has so suddenly slowed down, but it is making me feel a little crazy. I woke up this morning thinking (or more like hoping) today was Friday. Hubby kindly reminded me, no it is only Wednesday. Two more long days to go til the weekend!! I'll hang in there if you will too!


Til then, there's these lovely little Asiago Garlic Knots. Grab a package of pre-made pilsbury biscuits and whip up this lovely flavored oil for brushing and you've got yourself a quick, easy and delightful snack to tide you over til Friday. I found the idea on Pinterest and changed it up slightly.


Asiago Garlic Knots
Recipe adapted from Real Mom Kitchen

Ingredients:
  • 1 tube pilsbury refrigerated buttermilk biscuits
  • 1/4 cup canola oil
  • 3 tbsp freshly grated asiago cheese
  • 1 clove garlic, minced
  • 1 tsp dried oregano
  • 1 tsp dried parsley flakes
Method:
  1. Preheat oven to 400F. Grease a baking sheet and set aside.
  2. Roll each piece of biscuit dough into a 12 inch rope and tie in a knot. Place on prepared baking sheet. Bake 8-10 minutes in preheated oven until golden brown. 
  3. In a small bowl, combine the remaining ingredients and whisk to combine. When biscuits come out of the oven, brush them with the mixture while still warm.

Easy right? Definitely do-able for a week night that's for sure! Do you have any quick and easy snack recipes you would like to share? Let me know and they may just make an appearance in my future blog posts.

Happy Baking my Friends!