16.8.13

Weekend Wines: 14 Hands Chardonnay


Its been a while since I've put together a wine suggestion blog post for you. So I thought we would kick the weekend off right with a delicious wine suggestion. I don't drink a lot of wine that isn't from British Columbia, but a work friend gave me a bottle of Chardonnay from 14 Hands Vineyards in Washington, USA.

Keith Kenison is the winemaker at 14 Hands and has a really interesting philosophy on wine making that clearly works well for them. His philosophy is to "let the fruit express itself" which in my opinion, it truly does. I loved the fruity yet dry taste of this chardonnay and how unique it is from other chardonnays I have tasted in the past. Keith also says  "I guide the wine [it] to its final destination with as few manipulations as possible, making every decision by taste because, ultimately, that's what matters to the person buying a bottle." Who wouldn't want to taste a wine made with that particular philosophy?


Here are the tasting notes from the 14 Hands website for the 2011 Chardonnay:

"Aromas and flavors of fresh apple with subtle hints of vanilla and buttery caramel. On the palate, notes of sweet oak and spice give way to a soft, lingering finish."


I would recommend this wine to anyone who likes a relatively dry and oak-y tasting wine. It is a unique twist on a typical chardonnay while staying true enough to the traditional chardonnay flavour that it is sure to please lovers of chardonnay! Have you tried this wine before? Have you tried other varietals from this vineyard? Let me know in the comments below! I would love to hear from you.

Cheers!

14.8.13

Pantry Basics: Olive Oil

 Its Wednesday and that means its time for another Pantry Basics post. This week the theme of our pantry basics post will be Olive Oil. Check out last week's post on what makes a Well Stocked Pantry for the kickoff to the Pantry Basics Series.

Olive oil comes in a lot of varieties and I think there are a lot of misconceptions and confusion about what the various grades and varieties are or what the differences are. Here is a bit of information I found on Wikipedia:

First - the USA doesn't follow the same grading standards as other countries which is no surprise since they usually have their own system in place for most things (imperial vs. metric anyone?). I am going to talk about the standards the rest of the world follows which are in line with the International Olive Council (IOC). For more info on the USDA naming conventions and grades, see the Wikipedia page linked above.

The following grades of Olive oil are available:
  • Extra-Virgin Olive Oil: The lowest level of acidity and judged to be the most superior tasting Olive oil. It is typically used in applications such as salad dressings, dipping or other uses where the oil flavour is the star of the show.
  • Virgin Olive Oil: Slightly higher acidity than extra-virgin olive oil and judged to have a good taste, though not as superior tasting as extra-virgin.
  • Pure Olive Oil: Typically a blend of virgin olive oil and refined olive oil. The flavour will not be as good as virgin olive oils and will not be suitable for culinary uses where the flavour of the oil is intended to be the star. Olive oil connoisseurs do not think highly of any products using refined olive oils and as such, wouldn't recommend such an oil grade to be used for any culinary exploits unless using at higher temperatures (see more information about this in post below).
  • Olive Oil: Blend of virgin and refined oils. Acidity level is higher than that of it's primarily virgin counterparts and the oil is judged not to have a strong olive flavour. Also considered to be a sub-par option by olive oil connoisseurs. 
The remaining grades are non-food grades and as a result won't be discussed here. 

You may have noticed the terms virgin and refined and been wondering what they mean. I know I was! According to Wikipedia:
  • Virgin Oil indicates that the olives have been pressed to extract the oil and that no heat or chemicals have been applied in the process. No surprise that virgin processed olive oil contains the highest levels of polyphenols and antioxidants and therefore has more health benefits than its refined counterpart.
  • Refined oil means that the extraction process is controlled by chemicals which is typically done to improve the taste and smell of lower quality oil.  
Oils labelled cold-pressed retain the most nutrients and antioxidants because during the extraction process they are not heated above 27C. This ensures the nutrients degrade the least amount possible.

One other thing to be aware of is that bottles containing the labels Pure, Light and Extra-Light olive oil are all terms to describe refined oil types. The light and extra-light labelled oils do not have less calories or fat than regular olive oil contrary to popular belief. They are simply light on flavour due to a being chemically refined oil.

Moral of the story: Look for cold-pressed, extra-virgin olive oil. It is the best option for cooking because it tastes the best and doesn't contain chemicals or other processing techniques that cause the nutrients or quality of the oil to breakdown. It is also healthier because it retains the most antioxidants and nutrients despite the processing of the olives during the extraction process.


 Now that you know what type of olive oil is healthiest and best for cooking, here's the nitty gritty of how to cook with olive oil and what to use it for.

Olive oil is best used for applications that do not require much heat application such as salad dressings, drizzling on finished pasta dishes or for dipping fresh bread into. The taste of olive oil is impacted mainly by three things:
  1. Freshness of the oil - fresh oil tastes significantly better than older oil since the oil degrades over time. The best place to get fresh olive oil is from regions that produce the oil because the freshness can be guaranteed!
  2. Varietal of olives - selecting olive oil is like selecting wine - the taste varies greatly depending on the type of olives, the extraction process, ripeness when harvested etc. You may have to taste a few different olive oils before you find the one you love.
  3. Heat application - the higher the heat applied to olive oil, the more the taste breaks down or changes. The reason for this is that the application of heat to the oil actually burns the unrefined particles in extra-virgin oil and the result is a bitter, burned tasting oil or dish. Olive oil has one of the lowest smoke points.

So, how about some ideas for using olive oil in recipes! Here are some of my favorites:

Salad with Pears & Candied Pecans
Blackberry Avocado Salad
Spaghettini with Oil & Garlic (Lidia Bastianich)
Marinated Tomato Salad (Rebuild the Blog)
Classic Hummus (Queen Creek Olive Mill)
Sea Salt and Olive Oil Brownie Cookies (Something Swanky)

What is your favorite Olive Oil recipe? Feel free to share it in the comments section below.


Happy Cooking my Friends! I hope you found this pantry basics post informative and useful and if you've made it all the way to the bottom of my post, I'm assuming that you did. Thanks so much for stopping by - I hope you'll be back soon. If there are any pantry ingredients you would like to see featured in my pantry basics posts, just leave me a comment or send me an email and I will be sure to add it to the list of items I plan to feature.

12.8.13

Crazy Gourmet Hot Dogs!


Oh Monday... why do Monday's have to be so hard? Do you feel like you're seriously dragging your behind on Mondays? Because I sure do!!! So, to make myself feel better, I checked out some of my recent food photos and came across these babies! If these don't cheer you up on a blah Monday, I'm afraid nothing will!
 
I came across the idea for these in the magazine Everyday with Rachael Ray (July/August 2013 issue). Normally I'm not a fan of Rachael Ray or her recipes, but I'm glad I gave her another chance - this magazine was jam packed with great ideas and recipes. I will definitely be buying this magazine again. You should check it out!


 Be sure to start with some amazing, all natural hot dogs and some oversized, extra-fresh buns. Then you can go hog-wild with the toppings! Seriously! Go crazy! Some of the craziest sounding flavour combos are often the most delicious.

For our gourmet dog night, we picked two flavour combos to try out.

The Natcho Dog: Sprinkle with shredded cheddar cheese, top with guacamole, pickled jalepenos and crunched up tortilla chips.

Pimento Cheese Dog: Spread with store bought pimento cheese, then sprinkle with crushed ritz crackers, drizzle with some franks red hot. (Note-Pimento cheese wasn't available where I live, so I took a package of imperial cheddar and blended it with some cream cheese and some red jalepeno pepper - it did the trick!)

They were delish, but I think the Natcho dog was my favorite!


Some other flavour combos listed in the magazine that sounded soooo good to me were:
 
Deli Dog: Top with egg salad, fresh diced pickles and freshly cracked black pepper.
 
Hummus Deluxe Dog: Spread with hummus then top with sliced roasted red peppers, sprinkle with smoked paprika.
 

Yep, we'll probably be making these again soon - just an excuse to try out some more flavours. :) Hope this brightened your Monday night! You can do it!!!

Happy Cooking my Friends!

11.8.13

Nutella Banana Smoothie


Yesterday was such a beautiful and sunny day here in Southern British Columbia! We have been so blessed to have such a beautiful July and I hope this amazing weather continues through August as well! When the weather is this warm, we usually wait until later in the evening to walk the dog so he doesn't get overheated (and maybe so we don't get overheated too!!). After we went for our dog walk, I was craving something cold and creamy... something that was refreshing but could also substitute as dessert. After a quick check of what I had on hand, I came up with the idea for a Nutella Banana Smoothie! It is mostly dairy-free except for the small amount of dairy in the Nutella. You could substitute one of the dairy free nut butters or spreads for a truly dairy free beverage though (note I haven't tested this option though, so I'm not sure how it will taste).


Nutella Banana Smoothie
Recipe by A Tale of One Foodies Culinary Adventures

Ingredients:
  • 1 banana
  • 2 tbsp. Nutella
  • 6-8 ice cubes (add more if your smoothie isn't thick enough)
  • 1/4 cup coconut milk
  • 1/4 cup almond milk (or more if your smoothie is too thick)
Method:
  1. Combine banana, Nutella, coconut milk and almond milk in blender. Blend until smooth. Add ice cubes to blender a few cubes at a time blending until smoothie reaches desired thickness. Top with dairy free whipped topping if desired & enjoy!

I love how quickly this smoothie came together and it literally tasted like a decadent milkshake! I can tell this is going to become a regular beverage in our house. What is your favorite kind of smoothie to make? Feel free to share your favorite recipe or flavour in the comments below!

Cheers!

9.8.13

{Dairy Free} Chocolate Cappuccino Biscotti


Whew! What a week its been so far. Despite being a shorter week than usual, it seems like it was so much more exhausting than it usually is. Part of it is that two of my four days this week were attending training seminars all day and the fact that my car broke down on my way to said training seminar. I think I was also coming back to reality after such a fantastic yoga retreat last weekend which made this week seem even tougher! You know what you need on weeks like that? Delicious and flavourful biscotti. That's what will make it allllll better. Especially biscotti you can indulge in nearly guilt free - these have no added fat (some fat in the chocolate chips, but no oil or butter products added to this dough) and they have no dairy (I substituted almond milk for the milk).


Chocolate Cappuccino Biscotti
Recipe minimally adapted from Joy of Baking

Ingredients:
  • 2 cups all purpose flour (or you could substitute 1 cup whole wheat for one cup of white flour)
  • 1 cup granulated sugar
  • 1/2 tsp baking soda
  • 1/2 tsp baking powder
  • 1/2 tsp salt
  • 1/2 tsp cinnamon
  • 1/4 tsp cloves
  • 1/4 cup strong coffee
  • 1 tbsp finely ground coffee
  • 1 tbsp almond milk
  • 1 egg
  • 2 tsp vanilla extract
  • 3/4 cup semi sweet chocolate chips


Method:
  1. Preheat oven to 350F. Line two baking trays with parchment paper, set aside.
  2. In a small bowl, whisk coffee, ground coffee, almond milk, egg and vanilla.
  3. In the bowl of a stand mixer beat flour, sugar, soda, powder, salt and spices until combined. Gradually mix in coffee mixer until combined. Add chocolate chips and incorporate without overmixing.
  4. With floured hands, divide the dough in half. Roll each portion of dough into a log about 10 inches long and 2 inches wide. Transfer logs to prepared baking sheets (one on each sheet).
  5. Bake in preheated oven until firm to the touch. Remove from oven and cool on wire rack 10 minutes.
  6. Reduce oven temperature to 300F. On a cutting board, cut the logs lengthwise on a diagonal into 3/4 inch slices. Place cut side up on a baking tray. Bake five minutes, flip over and bake five minutes on the other side. Remove from heat, let cool. Store in an airtight container.
 
These were really yummy with all the spices and with the strong coffee flavour. We really enjoyed them dipped in coffee or tea or even just eaten as a snack. What is your favorite kind of biscotti?
 
Here are a few of my favorites:
 
Happy Baking my Friends!

7.8.13

Pantry Basics: What Makes a Well Stocked Pantry?

Hi Friends! This past weekend I went to a yoga retreat. At the retreat I had the opportunity to really ground myself and refocus. I have decided that I really need to spend more time nurturing the areas of my life that bring me joy. And you guessed it, my blog is one of those areas of my life that brings me joy. This year it has really fallen aside as I have spent time focusing on other areas of my life that don't make me as happy and as a result haven't been feeling as inspired or motivated in some really important areas of my life; my blog being one of those areas. So, I have made a plan to revamp my blog and refocus my efforts. The change will be gradual, but I plan to try to post more regularly on a variety of food and wine related topics.

One of my ideas was to have a post once a week on Pantry Basics. What those posts will be comprised of are information regarding how to stock your pantry (the topic of this post actually), ingredient studies where we look at one ingredient in particular and think about what it is, what nutritional benefits it may have and how you can use it in your day-to-day cooking and baking. If you have any items or ingredients you would like me to feature, please let me know!

For my first pantry basics post I thought a fitting topic would be a discussion on what constitutes a well stocked pantry! Here's my thoughts on what a well stocked pantry would include so that you're prepared for anything. If you have anything to add to my list, feel free to add it in the comments! I'm always curious what others keep on hand and consider to be essential. I've broken my list down into categories to make it more manageable.

Photo credit to Blisstree.com

Fats/ Oils:
Olive oil (preferably extra virgin), coconut oil, canola oil, sesame oil, butter

Vinegars:
Red and white wine vinegar, rice wine vinegar, balsamic vinegar, apple cider vinegar (organic tastes way better than regular - Braggs is my favorite brand so far)

Spices & Seasonings:
Sea salt, black peppercorns (none of the pre-ground nasty stuff), red chili flakes, dried basil, thyme leaves, cinnamon, mustard seeds, nutmeg, oregano, granulated garlic, chili powder, smoked paprika, regular paprika (aka sweet Hungarian paprika), cumin (whole seed and ground), ground coriander, turmeric, cloves, bay leaves, garam masala, curry powder

Bottles & Jars:
Dijon mustard (I like the really grainy stuff or the stuff with chardonnay in it), Asian chili paste (aka sambal oelek), mayonnaise, curry paste (thai and indian), barbecue sauce, pesto, apricot jam, maple syrup, soy sauce, ketchup, tabasco or other hot sauce, peanut butter, tahini, honey, vanilla

Canned Goods:
Chicken, beef and vegetable stock, canned tomatoes (preferably good quality, whole tomatoes), black, red and white beans, tomato paste, kernel corn, plain tomato sauce, chickpeas, chipotle chilies in adobo, sweetened condensed milk, light coconut milk, canned salmon and tuna

Frozen Goods:
Nuts (almonds, pecans and walnuts), peas, assorted fruits

Dry Goods and Other Miscellaneous Items:
Good coffee, loose-leaf teas, assortment of good quality dried pasta (fettuccini, penne, spaghetti, rice noodles), bittersweet chocolate, dried apricots, dried cranberries, flour (unbleached and whole wheat), sugar (granulated, brown and icing sugar), oats, cornmeal, rice (basmati, brown and Arborio), lentils, popping corn, tortilla chips, cornstarch, baking powder, baking soda, dried yeast, unsweetened cocoa powder, cous cous, quinoa


Photo credit above: coffeeproductionandstuff.blogspot.ca

Seems like a super long list doesn't it? But it really is amazing how far the above ingredients will go. Really all you need are your fresh ingredients to supplement those items and the odd specialty item and you're set! I hope you have found this post useful and informative. Let me know what you think about the pantry basics series I'm starting on and what you would like to see in the future.

Thanks for stopping by!

28.7.13

Blueberry Mint Sparklers

 
Hey Friends! How is your summer going so far? I can't believe we're already at the end of July! Time is flying faster than ever it seems. Summer here has been unusually hot, sunny and dry! Which has been an amazing change. In the midst of this unusual heat though, I along with many others I know have been searching for delicious, refreshing summer beverages to make that are easy and don't take too long to whip up! (because when you're thirsty and in need of a drink, you don't want to wait all day)
 
Last weekend my sister and I were browsing through the July/August 2013 issue of Everyday with Rachael Ray and we found Blueberry Tarragon Sparklers - they looked delicious and sounded super easy to whip up. So we decided to give them a try.
 
I headed off to the grocery store with a very short list of ingredients to purchase and when I got to the produce section to look for tarragon, the fellow working in the store politely informed me they hadn't carried fresh tarragon in oh, about ten years. Say what?? So quick thinking coupled with my strong desire not to have to try every grocery store in the area resulted in me picking up a container of fresh mint instead. What a success!! These drinks were lovely!
 
Without further delay, here's the yummy recipe.
 
Blueberry Mint Sparklers
minimally adapted from Everyday with Rachael Ray
 
Ingredients:
  • 1/2 cup fresh blueberries
  • 1/4 cup honey
  • 2 tbsp. fresh mint leaves
  • ice
  • 1 bottle sparkling white wine (I used Yellow Tail Bubbles)
Method:
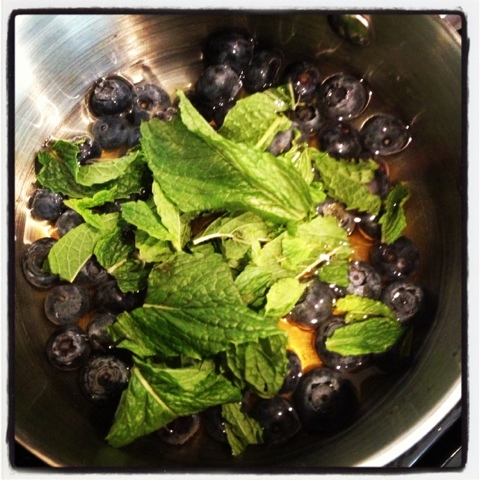
  1. In a small saucepan, bring blueberries, honey, mint and 1/4 cup water to a boil over medium-high heat. Stir until honey dissolves, about 3 minutes. Remove from heat and muddle blueberries and let stand for 20 minutes. Strain and place in refrigerator until chilled.
  2. To serve, spoon 1-2 tbsp. of blueberry syrup into 4 glasses. Add ice, then pour sparkling wine over top. Stir. Garnish with more fresh mint and blueberries.
Super easy, refreshing and delicious!
 
Cheers to the rest of our summer being just as fantastic as the first half.