Showing posts with label honey. Show all posts

28.7.13

Blueberry Mint Sparklers

 
Hey Friends! How is your summer going so far? I can't believe we're already at the end of July! Time is flying faster than ever it seems. Summer here has been unusually hot, sunny and dry! Which has been an amazing change. In the midst of this unusual heat though, I along with many others I know have been searching for delicious, refreshing summer beverages to make that are easy and don't take too long to whip up! (because when you're thirsty and in need of a drink, you don't want to wait all day)
 
Last weekend my sister and I were browsing through the July/August 2013 issue of Everyday with Rachael Ray and we found Blueberry Tarragon Sparklers - they looked delicious and sounded super easy to whip up. So we decided to give them a try.
 
I headed off to the grocery store with a very short list of ingredients to purchase and when I got to the produce section to look for tarragon, the fellow working in the store politely informed me they hadn't carried fresh tarragon in oh, about ten years. Say what?? So quick thinking coupled with my strong desire not to have to try every grocery store in the area resulted in me picking up a container of fresh mint instead. What a success!! These drinks were lovely!
 
Without further delay, here's the yummy recipe.
 
Blueberry Mint Sparklers
minimally adapted from Everyday with Rachael Ray
 
Ingredients:
  • 1/2 cup fresh blueberries
  • 1/4 cup honey
  • 2 tbsp. fresh mint leaves
  • ice
  • 1 bottle sparkling white wine (I used Yellow Tail Bubbles)
Method:
  1. In a small saucepan, bring blueberries, honey, mint and 1/4 cup water to a boil over medium-high heat. Stir until honey dissolves, about 3 minutes. Remove from heat and muddle blueberries and let stand for 20 minutes. Strain and place in refrigerator until chilled.
  2. To serve, spoon 1-2 tbsp. of blueberry syrup into 4 glasses. Add ice, then pour sparkling wine over top. Stir. Garnish with more fresh mint and blueberries.
Super easy, refreshing and delicious!
 
Cheers to the rest of our summer being just as fantastic as the first half.

9.6.13

Honey Roasted Carrots & Zucchini


This weekend has been a marathon of cooking and baking for my hubby's birthday party. Part of the menu was honey roasted carrots and zucchini. I wasn't going to blog these, but when I posted a picture on instagram, I received so many requests for the recipe, that I am posting now!

I don't have much to say about these other than that they are easy, taste delicious and are super healthy (as long as you keep the amount of oil at a reasonable amount). They're the perfect summer veggie to accompany your meal.

Honey Roasted Carrot and Zucchini
Minimally adapted from Meals in Heels

Ingredients:
  • 6 carrots, cut into 3/4 inch batons
  • 4 zucchini - I used 1 zucchini, 2 grey zucchini and one yellow zucchini, cut into 3/4 inch batons
  • 2 tbsp. olive oil
  • 1 tbsp. honey
  • 1 tsp cumin seeds
  • 2 tsp mustard seeds
  • salt and pepper to taste
Method:
  1. Preheat oven to 400F. Place carrot and zucchini in a bowl and toss with oil and honey. Sprinkle over the cumin and mustard seeds and season with salt and pepper. Roast for 20 minutes or until golden and tender.
Pretty simple and very delicious! Hope you enjoy these as much as we did. The cumin and mustard seeds really take this recipe up a notch!


Happy Cooking my Friends!

31.5.13

Honey Vanilla Beehive Cupcakes

 
Happy Friday! The weekend is finally here and with it some beautiful sunshine and blue skies. The bright cheeriness outside on my way home from work today reminded me of these bright cheery Honey Vanilla Beehive Cupcakes that I had promised to share with you ohhhh about a month ago! Bad me, but I'm doing it now, that's what counts right?
 
I made these for the Winnie the Pooh baby shower I threw for my sister and her new baby Preston. You can read more about the baby shower, the food and the decorations here if you're interested! People at the shower went nuts for these things! I received compliment after compliment about how good they were, so hopefully you like them too.
 
Before you ask, no I didn't make the cute little bees on top of them (though you could do it yourself if you have time, patience and are good with fondant) - I bought these little sugar bees from Scoop n' Save in Langley for a super reasonable price (that's also where I found the adorable cupcake wrappers and the food colouring to make my icing that bright!!!).


Honey Vanilla Cupcakes
Minimally adapted from Half Baked - the Cake Blog

Ingredients:
  • 1/2 cup salted butter, softened
  • 3/4 cup sugar
  • 2 eggs
  • 1 1/2 cups flour
  • 1 tsp baking powder
  • 1/2 tsp salt
  • 1/2 cup buttermilk
  • 1/4 cup honey
  • 2 tsp vanilla
For the frosting:
  • 3/4 cup salted butter
  • 4 oz island farms cream cheese (or other cream cheese, softened)
  • 3 cups icing sugar
  • 3 tbsp. honey
  • 1 tsp vanilla
  • yellow food colouring (if desired)
  • yellow sanding sugar
see below next picture for method

 
Method
  1. For the cupcakes. Preheat oven to 350F and line two baking trays with cupcake liners. In a medium bowl, mix together dry ingredients -  flour, baking powder and salt. In a small bowl, mix together wet ingredients - buttermilk, honey and vanilla. Set aside.  In the bowl of a stand mixer, cream butter and sugar. Add eggs one at a time mixing until well incorporated. Gradually add the wet and dry ingredients, alternating, starting with and ending with the dry ingredients. Mix until incorporated (don't overmix though).
  2. Using a medium sized scoop, scoop batter into cupcake liners until 2/3rds full. Bake in preheated oven for 18 minutes or until tops spring back lightly when pressed. Allow cupcakes to cool completely on a wire rack before frosting
  3. For the frosting - cream butter and cream cheese until combined and fluffy. Gradually add sugar and continue mixing until fluffy. Mix in honey. Gradually add a few drops of food colouring at a time until you achieve desired colour. Put icing in large piping bag fitted with a large round tip and pipe swirls of icing onto cooled cupcakes.
  4. Dust cupcakes with sanding sugar and place sugar bees on artistically right before serving.

And that's how you make these lovely cupcakes. One of the keys to making them taste delicious - not sickly sweet, is to use salted butter - the salt cuts the sweetness and balances the flavour perfectly!

Hope you enjoy these little beauties as much as we did! Happy Baking my Friends!

27.6.11

The Daring Bakers Challenge - June 2011 - from Phyllo to Baklava!!

Erica of Erica's Edibles was our host for the Daring Bakers' June Challenge. Erica challenged us to be truly DARING by making homemade phyllo dough and then to use that homemade dough to make baklava.

Baklava is a sweet, rich pastry made with layers of phyllo dough and nuts sweetened with simple syrup. Baklava is widely known as a Greek dessert, but its origin has never really been pinpointed as many Middle Eastern countries also name it as their own.

Wherever it came from, this stuff is freakin delicious and I would say it is at its peak taste quality around day 4 or 5 after being made. The longer it sits in the simple syrup, the more delectable it seems to taste. I learned a lot during this challenge and now I can say I've made homemade phyllo dough, but I can guarantee you, it is highly unlikely I will ever attempt it again. Don't get me wrong - its delicious and the dough is spectacular to work with, but it is A LOT of work. The baklava on the other hand, I will likely make over and over again! What a fantastic recipe. I would half the amount of syrup you pour over the dessert, but other than that, its perfect!


You can find the recipe at the Daring Kitchen website with instructions, photos and suggestions for success. You can also find photos of other members' completed challenges and information on joining if you so desire. So do stop by and check it out! I'm pretty crunched for time, so I will just be providing you with a few photos and some of my thoughts about the whole process.


Firstly, if you are looking for a fantastic upper body workout, do attempt rolling out the phyllo with your rolling pin like I did. I was sore for a couple days afterward. But it sure was delicious dough. My friend D did hers with pasta rollers and had great success, so if you don't feel like putting in as much effort, but would still like to try your hand at making homemade phyllo, maybe try it that way!!


The recipe says to pour the entire amount of the syrup over the baklava. Don't do it! Your baklava will be swimming in it and it likely won't all absorb. I would recommend half of the amount or if you're adventurous, maybe 2/3 of the syrup. Flavour is delicious! You'll love it honestly!!


Don't hold back on the butter when you're brushing the layers of phyllo - the butter is what makes the layers flakey and tender and delicious. So go ahead, be naughty and amp up your calorie and fat intake for a special occasion! Its not like you're going to eat the whole pan (I hope!)!!

One more thing not to hold back on: be sure to add lots and lots of the nut, spice and sugar mixture between the phyllo layers. This is the yummy part that gives the dessert flavour and texture. I just wanted to eat the sugar & nut mixture by itself because it has my favorite pistachios in it!!


Next time I make this, I'll likely use storebought phyllo - in my opinion it is not really worth the extra effort of making it... but at least I can say I've tried it! I was happy with the results, just not the amount of work!


Thanks Erica for a truly challenging DB challenge! I learned a lot and definitely got to cross two things off my to-bake before I die list!!


Happy Baking my Friends!


16.5.11

Not Just Any Old Garlic Bread

Let me just start this post off by saying this recipe is a secret... I was not supposed to share it with anyone. I learned this recipe from a friend of my husband's family a couple of years ago when we stopped by his place on our vacation. Every time I make it when guests come to our house I always get asked for the recipe... but I was sworn to secrecy. But I feel so bad because this recipe is SO worth sharing, so here I am, breaking my "vow" of secrecy so get the best ever recipe for garlic bread out there to you people who will love it!!


Its super easy. You will need a baguette, garlic butter (store bought will do, but homemade is better), mozzarella cheese (or whatever you have in your fridge), Club House Garlic Plus seasoning, and honey. If you want to try making your own garlic butter I would strongly encourage you to follow the guidelines below. You'll notice there are no measurements and that's because garlic butter is definitely a personal thing - just add ingredients until you like the taste.


To make the garlic butter: take some butter, add some finely grated garlic, finely chopped fresh basil & oregano, coarse salt, and some olive oil. Mix together and taste. Add more seasoning if necessary.


Now to make the bread:


  1. Slice the bread in half horizontally. Butter liberally with the garlic butter. Sprinkle with the mozzarella then sprinkle with the garlic plus seasoning mix. Now drizzle lightly with honey.

  2. Broil in oven until cheese is melted and edges of the bread are lightly toasted.

  3. Slice and enjoy. Prepare to make a few loaves because this stuff goes fast!!

I hope you enjoy this "secret" garlic bread recipe. The key is the honey! The little bit of sweetness really makes this garlic bread special.


Happy Cooking my Friends!

11.10.10

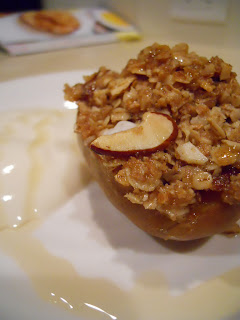
Honey Oat Roasted Pears


Ok, I confess, I'm back on my Anna Olson kick (again)!! I've been making so many of her recipes lately. :) Its just that every time I start making her recipes they turn out SO GOOD, every. single. time! Now that I've made my confession, I can start my post!


I'm sure you've eaten a lot of food this Thanksgiving weekend (I know I have). And I'm sure you've done some much needed reflection on all you have to be thankful for. I know I'm extremely thankful to have a job, supportive family, delicious and abundant food, and great friends (I could go on and on). We're just so fortunate and blessed to live where we do and we tend to take it forgranted so easily. So I love this time of year, because it tends to bring me back to reality and to realize how lucky I am. That being said, I'm sure most of you are (or soon will be) pretty sick of the rich, fat-laden foods that are traditional on Thanksgiving weekend! A dessert that is a little lighter and healthier may well be in order. Hence the Honey Oat Roasted Pear recipe I've chosen to share with you today. :) I hope this will be a welcome break for you from the rich and heavy food consumed this weekend.

Honey Oat Roasted Pears
Recipe from Anna Olson's cookbook Fresh, p 120

Ingredients:
  • 1 cup rolled oats
  • 1/3 cup packed light brown sugar
  • 1/4 cup sliced almonds
  • 1/2 tsp ground cinnamon
  • 1/4 cup butter, melted, plus extra for brushing
  • 4 bartlett or bosc pears
  • vanilla yogurt and honey for drizzling

Method:

  1. Preheat the oven to 375F. Toss the oats, brown sugar, almonds and cinnamon to combine. Stir in melted butter until everything is roughly combined.
  2. Cut the pears in half (don't peel them) and scoop out their cores. Lay the pear halves in a baking dish and brush their tops with more melted butter. Press some oat filling into the center of each pear. Bake, uncovered for 25 minutes, until pears are tender and the oat filling is lightly browned.
  3. Serve warm, drizzled with honey and a dallop of vanilla yogurt on the side.

I hope you enjoy this simple and delicious recipe. I know I definitely did! Once again - Happy Thanksgiving to all of you Canadians out there. I had a wonderful weekend spent with friends and family. Back to reality tomorrow!

Happy Baking my Friends!