26.4.13

Winnie the Pooh Baby Shower

 
This past weekend I had the honour of hosting a baby shower for my sister's first baby! As you can imagine, I wanted the shower to be something super special and something that everyone would enjoy. The pictures below chronicled some of the decorations, table layouts, and menu items that were part of the shower. The theme was classic Winnie the Pooh! Hope you enjoy!
 

Hundred Acre Wood Acorns
 We made some simple decorations that included:
  • Clouds made from white cardstock (large size) - hung from the ceiling around the gift/ refreshment table with fishing wire
  • Welcome banner made from cardstock, hung from twine (purchased from Michaels)
  • Silly Old Bear banner for front of food table (cardstock, hung from twine with wooden clothes pins)
  • Simple flower arrangements for the tables
  • Burlap table cloth (burlap purchased from local fabric store)
  • Framed pictures of the new baby and his family
  • Beehive drink dispenser (Homesense for $24)
  • Mason jar drinking glasses with yellow and grey striped straws
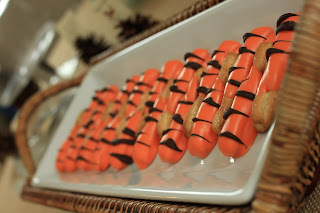
Tigger Tails
 The menu included:
  • Hundred acre wood acorns
  • Tigger tails
  • Piglets in blankets
  • Hunny Vanilla Beehive Cupcakes
  • Hunny roasted nuts
  • Rabbits garden with hummus & onion dip
  • Strawberry & Hunny Lemonade
  • Various tea sandwiches (cucumber, egg salad, cherry-cream cheese pinwheels)

 Inspiration for the menu and decorations came mainly from this lovely blog: Handmade by Meg
Hunny Vanilla Beehive Cupcakes
 How to make 100 acre wood acorns: take one Hershey kiss, glue to one side of a mini cookie (I used Mr. Christie) with melted chocolate, then glue a chocolate chip onto other side of mini cookie. Easy peasy!

How to make Tigger Tails: Take pretzel sticks (I couldn't find full size, so I used some half size pretzels I found at Super Store). Dip in melted orange wafers. Let set. Then drizzle "stripes" with melted semi-sweet chocolate chips mixed with 1 tbsp. shortening.

Piglets in blankets were simply hot dogs cut up into quarters and wrapped with pilsbury pastry then baked in the oven til browned.

 Strawberry Hunny Lemonade:
  • 1 lb strawberries, washed, hulled and quartered
  • 2 lemons, washed and quartered
  • 3/4 cup honey
  • 6 cups water
Combine strawberries, lemons and honey in food process and pulse until quite smooth. Strain mixture and discard solids. Add six cups cold water and taste. Add more honey or sugar if desired. Serve over ice!


 Thanks for stopping by! Check later this weekend for the cupcake recipe! They were absolutely delicious! :)


Have a great weekend my friends!

21.1.13

Parmesan Cornbread Mini Biscuits for SRC

Hi Friends! I know its been a while! I do have some cool things to share with you, but I am just trying to get motivated this new year to start sharing with you again. I just haven't been feeling that inspired... I think that's why I procrastinated so much this month before even looking at my assignment for SRC (which by the way, I had two months to work on, but no, I baked and blogged the night before it was due). I am now so sad that I procrastinated to much - the blog I was assigned is AWESOME!!! I was assigned the blog Mangia this month. It is a great blog written by a beautiful gal named Chelsy. Check out her blog - I'll still be here when you get back! I've flagged a couple more recipes to try from her blog this coming weekend because everything just looked so mouthwatering.


I decided to make Chelsy's Black Pepper Cornbread Biscuits (with a couple of my own twists!) and man were they delicious! Even hubby who swears he doesn't like anything with cornmeal loved them! If you click the link above you can find Chelsy's original recipe - its gluten free, so for any of you who like to cook/ bake gluten free or for those of you that must, do have a look! Otherwise, my non-gluten free take on the recipe can be found below.


Parmesan Cornbread Mini Biscuits
Recipe adapted from Mangia

Ingredients:
  • 1 cup cornmeal
  • 1 1/2 cups flour
  • 1/2 tsp baking soda
  • 1/2 tsp prosciutto and chipotle sea salt (or regular is fine too!)
  • 1/4 cup + 1 tbsp. vegetable oil
  • 1/3 cup warm water
  • 2 eggs
  • 1 tbsp. honey
  • 2-3 tbsp. finely grated parmesan

Method:
  1. Preheat oven to 350F. Spray a mini-muffin pan with non-stick cooking spray. Set aside.
  2. In a medium sized bowl, whisk together dry ingredients (except parmesan). In a separate bowl, whisk together oil, water, eggs and honey. Add wet ingredients to dry ingredients and stir until ingredients come together and are just moistened. Add a bit more water if necessary to get a muffin batter-like consistency.
  3. Spoon batter into prepared muffin tin filling about 3/4 full. Sprinkle each mini muffin with a bit of parmesan. Bake in preheated oven for 10-11 minutes or until just set and golden on the sides and bottom. Let cool slightly then enjoy on their own or with a bit of butter!


These little guys would be delicious with chili or stew - awesome for dipping! Or just delicious for a little afternoon snack. Either way, do try them out - they come together in under half an hour and make the house smell great! Thanks Chelsy for an awesome recipe - I look forward to trying several more. :)


19.11.12

Peanut Butter RIce Krispies for SRC

I had a crazy weekend with some very unexpected and exciting news! I can't share details with you yet, but this news totally threw off my plans to tackle my SRC assignment on Sunday as I had originally planned to. It completely slipped my mind and I'm so sorry because I was assigned such a fantastic blog this month!!!


I was assigned Cook with Sara. I chose to make the rice Krispy squares but opted to use a slightly different flavor profile with peanut butter and chocolate rather than the caramel chocolate combo she used. Both I'm sure would be fantastic! Check out the recipe here


I chopped up mini peanut butter cups (approx 1 cup chopped) and stirred them into the Rice Krispies. Then I drizzled the bars with melted peanut butter (1/4 cup) and chocolate (1/4 cup). They were soooo good!

Thanks Sara for the delicious recipe and the many more recipes that I can't wait to try (check out the Cappuccino Crinkles - they're next on my list!!). I apologize for the lateness of my post!


Happy Baking my Friends!


12.11.12

Mini Slider Buns


You know how some things are just better and cuter in miniature form? Burgers are totally one of those things for me. I'm not one to love burgers, but give them to me in a tiny version and I'll eat a plateful! The only annoying thing about making sliders is that it can be hard to find the mini buns you need to make them. Well, look no further, just make your own - they're easy, super cute and way better than store bought. {Hang in there for later this week - I'll post my slider burger patty recipe and the toppings I used when I served these at my friend's cocktail party} Plus, your guests will go crazy for them - so be sure to make lots!!


I found this recipe via a random google search for mini slider buns on a blog called Lauren's Latest. What a great find! She has some awesome recipes on there, so be sure to pop over there and have a look. :)

Mini Slider Buns
Recipe minimally adapted from Lauren's Latest

Ingredients:
  • 1/2 cup warm water
  • 2 1/4 teaspoons instant yeast
  • 1 tsp honey
  • 1/4 cup butter
  • 1/2 cup milk
  • 2 eggs, divided
  • 1 tsp kosher salt
  • 3 cups all purpose flour
  • sesame seeds for sprinkling
Method:
  1. Stir warm water with yeast and honey. Cover with plastic wrap and set aside to proof (about 5-10 minutes or until mixture is foamy).
  2. Place butter in microwave safe bowl and melt. Remove from microwave and stir in milk and 1 egg. Stir to incorporate. Pour into bowl of a stand mixer. Pour yeast mixture into bowl of stand mixer and sprinkle with salt and two cups of the flour. Knead with dough hook until all flour has been incorporated. With mixer on low, add remaining one cup of flour gradually (you may not need all of it). Knead on low until dough is smooth and slightly sticky. Place in well oiled bowl, turning dough to coat. Set aside to rise for one hour until doubled in bulk.
  3. Punch down dough and form into small balls the size of golf balls. Place on parchment lined baking tray. Cover and let rise another 30-60 minutes.
  4. In a small bowl, beat remaining egg with two tablespoons of water. Brush tops of buns and sprinkle with sesame seeds. Bake in 350F oven 12 - 15 minutes or until golden brown on top.


Happy Baking my Friends!

10.11.12

Chocolate Espresso Peanut Butter Chip Cookies

 
A couple weeks ago I was supposed to bake dessert for a cocktail party I was attending - I had planned a couple of delicious show stoppers. The were 1) Chocolate coconut rounds and 2) Marshmallow topped peanut butter pretzel squares. I baked them both the day of the party and as I was portioning them into mini cocktail sized portions, I decided I didn't like how either of them presented, or tasted. So, now with only 1 1/2 hours to finish getting myself ready and find another dessert option, I had to think and do quickly - off to pinterest I went. I found these chocolate espresso brownie cookies, but I didn't have time to get to the store to buy the ingredients I needed, so I made due. Lo and behold, they turned out amazing and were a total hit. Who knew such a simple and easy cookie could be such a superstar. Make these and be prepared to want to eat the whole batch!! They're that good!
 
 
 Chocolate Espresso Peanut Butter Chip Cookies
Recipe minimally adapted from Just a Taste

Ingredients:
  • 3 oz unsweetened chocolate
  • 1 cup semi sweet chocolate chips
  • 1 cup peanut butter chips
  • 8 tbsp butter
  • 3 large eggs
  • 1 cup plus 2 tbsp sugar
  • 2 tsp instant coffee granules
  • 1 cup flour
  • 1/3 tsp baking powder
  • 1/4 tsp salt
Method:
  1. Preheat oven to 350F.
  2. Combine unsweetened chocolate, semi sweet chocolate chips and butter in a microwave safe bowl. Microwave on low heat, stirring at 30 second intervals until melted and smooth. Set aside.
  3. In the bowl of a stand mixer combine the eggs, sugar and coffee granules on high speed until smooth and very thick - about 3 minutes. Slowly add the chocolate mixture to the bowl, whisking until just combined.
  4. Turn off stand mixer and add flour, baking powder and salt to the bowl. Stir until just combined. Add peanut butter chips and stir until just combined.
  5. Place scoopfuls of batter onto parchment lined baking sheets leaving approximately 2 inches in between them. Bake in preheated oven for 15 - 18 minutes or until cookies are puffed. Do not overbake - if in doubt, underbake. Let sit on baking sheet for 2 minutes before transferring to wire rack to cool completely.


Hope you are having a fantastic weekend! I know I am! The sun is shining, I've had a chance to do some baking and some shopping so life is good. To those of you Canadians reading this, be sure to take the time to pause and remember those soldiers who fought and lost their lives for our freedom tomorrow on Remembrance Day. They made it possible for us to have many freedoms not enjoyed by people in all areas of the world and as such, we owe them tribute for their selfless acts. Lest we forget.

Take care and enjoy the rest of your weekend.

Happy Baking my Friends!

22.10.12

No Bake White Chocolate Peanut Butter Cookies for SRC


Time for Secret Recipe Club again! This month seems to have been another busy month, even though I have been expecting life to just slow down a bit. No such luck though!! This is one of those months I wish I would have had more spare time because the blog I was assigned, Veronica's Cornucopia is such a great blog! There were so many great recipes and so many creative ideas. I will definitely be visiting again in a month I have more time to experiment, because there were a lot of great looking recipes to try. Go have a look around for yourself - I'll still be here when you come back. :)


I didn't really go too crazy due to my lack of time, but I was super impressed with how quick, easy and delicious the recipe I selected was! I made Veronica's Cow Pie Cookies - but changed them up to be made with white chocolate and peanut butter because that's what I had on hand!

White Chocolate Peanut Butter Cookies
Recipe adapted from Veronica's Cornucopia

Ingredients:
  • 12 oz white chocolate
  • 4 tbsp peanut butter
  • 2/3 cup rolled oats
  • 1/2 cup shredded coconut
  • chopped marshmallows (I used about 1/2 - 1 cup)
Method:
  1. Melt the white chocolate and peanut butter on low heat in the microwave. Stir until smooth. Stir in the oats, coconut and marshmallows. Drop by spoonfuls onto parchment paper. Let set at room temperature until firm - approximately 1 hour. Enjoy!
Yep! Thats it - easy, and delicious. Veronica says you can mix in whatever you want! I think next time I make these I'll mix in pretzels for that sweet and salty combo that I can't get enough of.


Thanks for stopping by - Happy Baking my Friends!

19.10.12

Bavarian Style Soft Pretzels!


 So the first thing you probably noticed is that my pretzels are ugly... like super ugly. But, what they lack in beauty, the made up for in taste! These guys were delicious. They're a little bit of work, but most of the work is down time waiting for them to rise, freeze, then rise again, then the worst part - waiting for them to bake - its so hard when they smell sooooo delicious!

If you have a rainy Saturday with not much planned, these are a perfect way to spend the day! You can make them at a leisurely pace and enjoy the process and the fruits of your labour!

 We'll get on to the recipe and th process ASAP since its a bit longer than most recipes I post on my blog. :)

Bavarian Style Soft Pretzels
Minimally adapted from Fine Cooking - Oct/Nov 2012 Issue

Ingredients:
  • 1 1/2 tsp active dry yeast
  • 19 1/2 oz (4 1/2 cups) flour
  • 2 tbsp packed light brown sugar
  • 2 1/4 tsp kosher salt
  • vegetable oil or cooking spray
  • 3 tbsp baking soda
  • 1 large egg, lightly beaten
  • 1 tbsp pretzel or coarse salt
Method:
  1. In a stand mixer fitted with the dough hook, combine the yeast and 1 1/2 cups lukewarm water and let stand until dissolved, about 5 minutes. Add the flour, sugar, oil and salt. Mix on low speed until the ingredients are hydrated and form a coarse ball of dough, 2-3 minutes. Add more water as needed, 1 tsp at a time, if all of the flour isn't incorporated into the dough.
  2. Increase the speed to medium low and mix until the dough becomes smooth, supple and elastic, about 3 minutes. The dough should be soft but only slightly tacky; if it seems sticky or very tacky, sprinkle in more flour, as needed.
  3. Form te doug into a ball, transfer to a large, lightly oiled bowl, cover with plastic wrap and let rise at room temperature until it is about 1 1/2 times its original size, 1 - 1 1/2 hours.
  4. Lightly mist a work surface with oil and transfer the dough to it. Divide the dough into 6 equal pieces (about 6 oz each). Form each piece into a smooth, round ball, lightly mist wit oil, and cover with plastic wrap. Let rest on the work surface at room temperature for 20-30 minutes to allow the gluten to relax.
  5. Line a large baking sheet with lightly oiled parchment paper and set aside (I needed two of them). Lightly mist a work surface and using your palms and fingers, roll each piece ofdough on the work surface into a rope that is about 30 inches long and 1/3 - 1/2 inch thick (note, this is why mine are ugly - I didn't roll my ropes long or thin enough). If the doug resists or shrinks back, let it rest for a few minutes while you work on other pieces; short rests will let the gluten relax enough to allow for the full rollout.
  6. Working with 1 dough rope at a time, shape it into a large U that is 5-7 inches across with the curved side closest to you. Take the two ends of the rope in your fingers and cross one over the other so ends overhang the cross by about 3 inches. Twist the ends of the rope, shortening the overhang to about 2 inches. Next, pull the twisted section toward you and fold it down over the bottom curve of the U so the ends are a couple inches apart and overhand the bottom by about 1/4 inch.
  7. Carefully transfer the partzels to the prepared baking sheet, spacing them evenly and reshaping as needed. Cover with plastic wrap and freeze til hard, at least 2 hours and up to three weeks.
  8. Bring 2 cups of water to a boil in a small saucepan. Remove from the heat and add the baking soda and stir til completely dissolved. Transfer to a bowl and let cool to lukewarm, about 30 minutes.
  9. Using stainless steel tongs, dip one pretzel into the baking soda bath at a time and soak for five seconds. If the liquid doesn't completely cover the pretzel, turn it over and submerge the other side for five seconds. Remove pretzel from liquid and allow excess to drip off. Return to baking sheet.
  10. Brush tops and sides of pretzels with some of the beaten egg. Let pretzels thaw and rise at room temperature until they are soft and puffy, 1 1/2 to 2 hours.
  11. Position a rack in the center of the oven and heat to 400F. Brush pretzels once more with egg. Lightly sprinkle with salt. Bake until dark golden-brown, approximately 20-22 minutes. Transfer to rack and cool for at least 15 minutes before serving.

So, like I said, a little labour intensive, but well worth the effort. Hope you enjoy!

Happy Baking my Friends!