Showing posts with label how to. Show all posts

23.6.13

How To Defrost Chicken Quickly & Safely

This might be a no-brainer for most people, but I didn't know about this method until my Mother-In-law introduced me to it a couple years ago. My Mom always used the countertop method of thawing meat, but it may not be the safest method available and it is also not quite as quick as the method I will describe below.
 
To thaw chicken safely and quickly follow the steps below:
  1. Run a sink full of cold water - you need to use cold water here to avoid potential bacteria growth associated with warm/ hot water. Place chicken in sink.
  2. Change water every 30 minutes and replace with fresh cold water until chicken is completely thawed.
Some important notes:
  • 1 lb of chicken will defrost in 1-2 hours using this method
  • Don't use the sink for any other purpose during this time - this will help avoid contamination
  • When chicken is done thawing rinse your sink out thoroughly with hot water and a good multi-purpose cleaner to kill any bacteria that may have accumulated
  • This method works for any type of frozen meat - defrost times may vary depending on type and amount of meat
 

This is a pretty straightforward and efficient option for thawing frozen meat. A lot of people use their microwaves to thaw meat when they're in a hurry, but doing so can actually be dangerous as heating the meat during the defrost process gives bacteria a chance to grow and accumulate. As a result I would encourage you to use this method of thawing meat quickly and safely!

How do you usually defrost your frozen meat? What do you do to ensure you do it safely?

15.2.12

How To... Dice an Onion


Woohoo! We are over halfway through this week!! It seems to have flown by for me... what about you guys? Is your week going by fast too? Hope so! Its always nice when the weekend sneaks up on you. :) This week's how to post is how to dice an onion. A lot of people don't really have much technique when they chop onions and the result is non-uniform pieces of onion that don't cook at the same pace because they're different sizes. This technique results in uniform dice and uses really basic knife skills to get it accomplished. Hope these step-by-step photos help you to visualize the technique and process so you can have perfect dice every time. Remember, knife skills take practice! So the more you do it, the better you'll get.

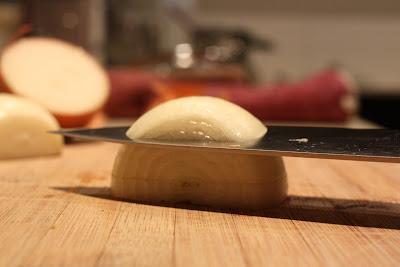
Step 1: Cut off ends of the onion
 Step 1: Cut off the ends of the onion - just the top 1/2 inch or so. Stand the onion up on one of the cut ends (as pictured above).

Step 2: Cut Onion in Half
 Step 2: Next, cut the onion in half (starting at a cut end and finishing at a cut end). This makes the onion really easy to peel. You should peel both halves if you are using the whole onion.

Step 3: Slice the onion horizontally
 Step 3: Now you need to slice the onion horizontally at even intervals without cutting all the way across the onion. I usually do 1/8 - 1/4 inch intervals which for a medium onion results in 4-6 slices, leaving about 1/4 - 1/2 inch of the onion in tact at the end so it doesn't fall apart on you.

Step 3: Slice the onion horizontally

End result of step 3 - onion should have even horizontal slices - leaving about 1/4 - 1/2 inch in tact at the end of the onion

Step 4: Slice the onion Vertically
 Step 4: Slice the onion vertically - similar to step three, but going the other direction! Slice at regular intervals (usually about 1/8 - 1/4 inch depending on the size of the dice you want) leaving the same 1/4 - 1/2 inch of the onion in tact at the end.

End result of step 4 - see how the onion is set up for perfect dice?! Cool eh?


Step 5: Lastly, just slice the onion as pictured above - again at about 1/8 - 1/4 inch intervals depending on the size of the dice you want. The end result is pictured below - uniform, perfect dice that will cook evenly.


Finally, a few words of wisdom for cutting, chopping, dicing and slicing:

Use a Sharp Knife - its way easier to dice an onion nicely when your knife cuts through it easily without much pressure being applied. And believe it or not, you have less chance of cutting yourself when your knife is sharp because again, you don't need to lean into it or apply much pressure to get the knife to move through the item you're chopping.

Use the Knuckle Trick - this doesn't work for everyone, but a good protective measure is to use the knuckle trick when cutting. Bend your fingers so your finger tips aren't exposed to the edge of the knife and use your knuckles as a guide for your knife - this way if the knife slips it will just rub along your knuckle instead of slicing into the tip of your finger.

Stabilize your Cutting Board - Place a slightly damp tea towel or dish cloth under your cutting board if it is sliding around on your surface. This will secure the board and ensure it doesn't slip while you're cutting.

Hope this post was helpful! If you have any other good tips and tricks for cutting, dicing, chopping and slicing, I would love it if you left a comment to share your knowledge!

Happy Cooking my Friends!

30.1.12

How to... Make Ricotta Cheese

I sometimes suck at taking pictures of the food I make. Sometimes out of laziness, sometimes out of lack of time and sometimes I just forget. This time I was lazy and I also forgot to take photos of my ricotta cheese until I was halfway through putting together a batch of scones (see my post tomorrow) that used up the rest of my homemade ricotta cheese. So I snapped a quick pic of the cheese, right before I put it into my scone dough. No effort = very bad results. But trust me, this stuff tastes about one million times better than this picture makes it look. SERIOUSLY.

I have never made cheese at home before. I've always seen other bloggers post about it and somehow thought it was out of my league. I don't know... I just always thought it was difficult and time consuming and that I'd have a bunch of batches that failed miserably (and wasted a lot of ingredients in the process). But after reading about Julia's experience on her blog Fat Girl Trapped in a Skinny Body, I HAD to try this stuff out. She raved about how good it was even just spread on toast or crackers and boy was she right! Its so amazing. I ate it on toasted english muffins with jam or honey every day for a week. Then used the rest to make the above mentioned batch of scones. Mmmmmm!!! Make it! Right now!!!


One other thing to note about this at home cheese making process - its pretty economical. Buy yourself a $3 package of cheesecloth. It is washable therefore you can use it a bunch of times. Also, you can use whatever fat content milk you like! I made my first batch using high fat milk products (see recipe below), but you can use a combination like Julia to come up with a better-for-you version that tastes just as good. Making a batch with lower fat content milk products results in making a far cheaper batch of ricotta than you could ever buy in the grocery store. So get on it now and you can have yummy ricotta in less than 3 hours! Woot!

Ricotta Cheese
Recipe slightly adapted from Fat Girl Trapped in a Skinny Body

Ingredients:
  • 4 cups whole milk
  • 1 cup whipping cream
  • 1/2 tsp salt
  • 3 tbsp lemon juice
Method:
  1. Pour milks and salt into saucepan. Attach a thermometer to the side of the pan. Heat gently, stirring often to avoid scorching the bottom of the pan, until temperature reaches 190 degrees.
  2. Remove from the heat and add the lemon juice. Stir very gently. Let mixture sit for five minutes - don't touch it for five whole minutes. Set the timer and just walk away.
  3. Double layer a cheesecloth and line a colander with it and place the lined colander over a large bowl to catch the whey. Pour the curds and whey into the colander and let strain for 2 hours.
  4. Scrape the ricotta from the cheesecloth into a small container. Chill the ricotta. It will firm as it cools, so the texture after it is finished straining will be completely different than the ricotta you scrape into your container.
Julia also notes that you can save the whey and use it by freezing into ice cube form and plunking a couple into your morning smoothie. Thats what I've been doing and it helps to keep you full longer because its a great source of protein.

Hope you enjoy this little tutorial! I will update my post with step by step photos next time I make this, because I will be making it again in the very near future!!

This post has been linked up with Fusion Fridays at Jennifer Cooks! Head over there to check out all the Superbowl yumminess that was whipped up this week in the blog-world. :)

Happy Cooking my Friends!

23.1.12

How to... Cut a Pineapple


Ever went to cut up a pineapple and found you weren't quite sure where to start? Or ever cut up a pineapple into perfect dice only to bite down into a hard piece because you didn't realize pineapples had cores? This how to post is for you! Even if you're just looking to fine tune your pineapple cutting skills to become more efficient, have a look at the step by step photos for some ideas on how to improve your chopping skills.

First off, be sure to pick out a ripe pineapple. Lots of the pineapples at the grocery store won't be ripe enough to be sweet and delicious for eating. So, be sure to choose your pineapple carefully. The best tip I ever received for picking out a ripe pineapple: choose a pineapple where the middle stalk pieces pull out very easily. If they do, its ripe and ready to eat!

Next: start out with your sharpest knife (make sure it's big enough) and a nice big cutting board. Slice off the top of your pineapple. Then flip it around and slice off the bottom as well so you have a nice flat surface to work with.

 Then stand the pineapple up on end and use your knife to slice off the skin, removing as little of the flesh as possible. Slice strips off all the way around the pineapple until it is completely peeled. You can use a melon baller or the end of a potato peeler to pick out the divets (the little brown spots) if they bother you!


 In the photo below, note the 1" circle in the middle of the pineapple. This is the core of the pineapple - it is hard and not very pleasant to eat. It runs all the way down the pineapple in the middle. In the next steps be sure to be mindful of where the core of the pineapple is.


Next, slice the flesh off the pineapple off on either side of the core. Set the two pieces of flesh aside for now.


Then with the remaining piece of pineapple, slice the flesh of the pineapple off, leaving the core behind. Discard the core. Take the pieces of flesh you've carefully carved away from the core and dice them into bite size pieces. Enjoy them on their own, put them in fruit salad, or make this healthy Pineapple "Ice Cream".


Hope you learned something during your visit today! If there's something you've been wanting to learn how to do in the kitchen, please leave me a comment and I will try to feature it in a future How to... post. :)

 Happy cooking my friends!

16.1.12

How To... Roast Peppers

 Once you're finished judging me for how dirty my oven is, take a look at my step-by-step photos to learn how to make roasted peppers. No more buying those expensive little jars at the grocery store (come on - $5 for the smallest jar?!). Roasted peppers are great to have on hand to top pizza, sandwiches & wraps or to blend up in pasta sauce or dipping sauces etc. They add a sort of gourmet flair that will always impress people and they're super easy to make yourself. I made mine indoors because its cold and snowy here, so no grilling for me, but you can definitely make these on the grill (in fact you should make them on the grill if you can!!).

So first step (pictured above) - place a couple of peppers in your oven (gas oven is best if doing this indoors). Set oven to broil. Close the oven door and check back every 5-10 minutes or so. Turn the peppers using tongs once each side starts to blacken (you don't want it to char - it should just start to go black). Once all sides have lightly coloured, remove from the oven and place in a heatproof bowl.


 Cover the bowl and let sit until cool enough to handle (I left mine about 20 - 30 minutes).


Remove the roasted peppers to a cutting board. Peel away the skin (it should come off super easy now that they've been steaming in your container for a little bit). Remove the stem and all seeds.


Then cut peppers into thin strips and refrigerate until you use them. They will keep for a week or so in the fridge. You can freeze them too and then you'll always have them on hand in case you need them in a pinch.

I bet you didn't know it was that easy did you?! Hope you learned something new today stopping by my blog. See you again soon.

Happy Cooking my Friends!

10.1.12

How To... Whip Cream in Under 60 Seconds!


Hello Friends! Hope your week is off to a fabulous start. I was out of town for work Sunday and Monday, but I'm back now (woot!) and also back to blogging. One of the things I'd like to blog more about in the coming year is how to do certain things in the kitchen - I'm not talking about certain recipes, I'm talking about skills we should all have so we don't have to buy the processed version or ideas for a better way to do something we might already do in our day to day culinary adventures. I posted a few how-to posts during 2011 (how to roast garlic, how to carmelize onions, etc), but I want to have more posts like that in addition to my usual recipes and wine suggestions.

So why not start the year off with something most of us love - home made whipped cream! Not that yucky processed stuff you spray out of a can. I'm talking creamy, decadent (and sinful) cream sweetened to taste with sugar and flavoured subtley with dreamy mexican vanilla. But sometimes we just don't have time to wait or maybe you don't want to listen to the stand mixer whip at full speed for 5 or so minutes while we wait for the cream to whip to the perfect consistency (if it even whips up properly on the first try).


Boy have I got a trick for you! If you're impatient like me, you'll love this one. Dump some cream in the small bowl of your food processor. Add some sugar and vanilla to taste (start with a couple tbsp sugar and a tsp or so of vanilla). Put the lid on and run the food processor until your cream whips to soft peaks. Check after 30 seconds to see how its doing - it will take just under a minute to be done perfectly every time. Just don't overwhip or you'll have butter. :)


Note that in my pictures, I'm whipping a very small quantity of cream (just enough for one mug of hot chocolate and then a couple extra spoonfuls for tasting - strictly quality control of course!!). This tastes perfect on a delicious mug of Peanut Butter Hot Chocolate.


Hope you find this useful! I know I was intrigued when I first saw this technique about a year ago (and yep, I'm just sharing it with you now!). Stay tuned for some great posts later this week.

Until then, Happy Baking my Friends!

15.11.11

How to... Make your own Pumpkin Puree!

 There are so many delicious recipes out there right now that call for pumpkin puree - not canned pumpkin pie filling, plain old pureed pumpkin. But given that I have four pumpkins sitting around my house from our pumpkin carving party that didn't get carved and I don't want them to go to waste... I didn't think it would be appropriate to head to the store and pick up cans of the processed stuff while I have the real thing at home! Surely there must be some way to turn those pumpkins into pumpkin puree that orignarily just comes out of a can? Google gave me a resounding YES, there is a way to make your own pumpkin puree and its *gasp* easy!! Do you have a sharp knife? An oven? A food processor? Then, you can make your own pumpkin puree - it will taste better than canned because it is fresh! Go ahead, give it a try!

(Note - using a jackolantern pumpkin that has been previously carved is dangerous - it has been exposed to all kinds of things, not to mention growth of bacteria from exposure to air, that can make you sick - use a whole pumpkin that has not been mutilated in any way!!).

 First off, use a sharp knife and chop that pumpkin in half - starting at the stem (see top picture). Then use a metal spoon and scrape out all the seeds and stringy insides until you're left with a nice, clean pumpkin. While you're cleaning out the pumpkin, preheat your oven to 350F.

Oil a shallow baking dish and then place the pumpkin halves, cut side down onto the well-oiled dish. Roast in your pre-heated oven for 45-60 minutes, or until tender when pierced with a knife. Note, that the baking time is for a pumpkin that weighs approximately 4lbs - if your pumpkin is larger, adjust the cooking time accordingly.

 One other thing to note - the larger the pumpkin, the more bitter the flesh - try to stick with smaller pumpkins for roasting - especially if you're going to use them in baked goods where their flavour will really shine!

Let your roasted pumpkins cool until they are cool enough to handle. Then scrape out the soft flesh into a bowl and cool completely. Whirl in your food processor for a couple of minutes until it is smooth and silky. Refrigerate until ready to use (you can make this up to two days in advance if keeping in the fridge, or you can freeze it for longer periods).

 Use your delicious pumpkin puree in any baked goods that call for canned pumpkin puree - here are a few ideas from my blog archives:

Pumpkin Pie with Streusel Topping
Four Layer Pumpkin Cake
Pumpkin Doughnuts

You could also substitute this pumpkin puree for any roasted squash in soup recipes! It would sub in great for butternut or acorn squash.

Happy Cooking my Friends!

22.10.11

How to... Carmelize Onions

 There are some skills that are really important to have! One of them is roasting garlic and another one is carmelized onions. Carmelized onions can take an okay dish and elevate it to a delicious and special dish that will impress your guests. Plus they taste amazing (and take this from someone who doesn't really care all that much for onions - these things are delicious when done like this)! You can make these carmelized onions and keep them in the fridge for up to a week or you can make them and freeze them for up to a couple of months. They are one of those things to make in a large batch and then freeze/ store them so you always have them on hand!

You can top off a great burger with carmelized onions, put them on baguette slices with yummy olives and goat cheese, use them on flatbreads or homemade pizzas, put them in omelets, or even with a simple pasta with olives and cherry tomatoes... the possibilities are endless! So what are you waiting for? Get chopping your onions and get started!

Caramelized Onions
Recipe adapted from the Guy Can't Cook

Ingredients:
  • 3 large onions, peeled and thinly sliced (can be white, red, yellow or a mix of all three)
  • a couple tablespoons of olive oil
  • a couple tablespoons of butter 
  • 1 tsp sugar
  • 1 tsp balsamic vinegar
Method:
  1. Heat the oil and butter in a saute pan over medium-low heat. Add the onions and stir until they are coated with the oil/ butter mixture. Cover the pan and sweat the onions for five minutes. Remove the cover and saute until the onions begin to turn golden (see photo above) - if they are browning or burning, the heat is too high.
  2. Continue to cook until the onions are very soft and jammy, with a nice golden colour. Stir in the sugar and the vinegar and cook until the liquid is gone. Pile into a bowl and serve warm with bread, or put them in a container and refrigerate until you're ready to use them.
And there you go! Delicious carmelized onions that will elevate any dish you put them in. Hope you have a fantastic weekend.

Happy Cooking my Friends!

28.7.11

How to... Roast Garlic

I share a lot of recipes with you on this blog... lots of them easy, some of them more involved, but I realized earlier this week, that sometimes I put ingredients in the recipes that I know how to make, but a lot of people would just go out and buy. So I decided I'm going to start doing some "How To" posts that discuss the techniques or methods for producing those ingredients at home. Usually those ingredients are far more delicious when you make them yourself, far more economical, and are often quite easy to make. So for my first "How To" post, I'm going to share with you how to make roasted garlic at home. Its super easy and you can do it while you're watching your favorite show on TV!

Slice the top 1/4 inch off a whole head of garlic, making sure the tops of all of the cloves on the head have been cut off so the garlic inside is exposed. This will make sure all of the cloves on the head roast evenly and carmelize nicely. Then cut out a square of aluminum foil that is large enough to wrap up the entire head of garlic in. Fold up the sides to envelop the head of garlic, leaving the top of the head exposed. Drizzle with a little extra-virgin olive oil and season with a tiny bit of kosher salt if desired. Then wrap the foil up over the whole head, closing up the package, but not sealing it tightly.

Roast the garlic in a 350F oven for approximately 50 minutes until your house smells delicious and the garlic has turned a lovely golden colour. Open up the garlic foil package to let the garlic cool until it is cool enough to handle and then squeeze out all the roasted garlic goodness for whatever you decide to use it for.

Now, you may notice that I have a whole tray full of roasted garlic... what am I going to do with all of it? Well, I'll tell you. I roast garlic in huge batches and then squeeze out two heads into freezer bags. Then I freeze the roasted garlic and use it whenever I feel like it. You can freeze roasted garlic for up to 6 months and it will still taste delicious. Or if you don't want to freeze it, it stays good in the fridge for about one week.


Happy Cooking my Friends!