Showing posts with label onion. Show all posts

15.2.12

How To... Dice an Onion


Woohoo! We are over halfway through this week!! It seems to have flown by for me... what about you guys? Is your week going by fast too? Hope so! Its always nice when the weekend sneaks up on you. :) This week's how to post is how to dice an onion. A lot of people don't really have much technique when they chop onions and the result is non-uniform pieces of onion that don't cook at the same pace because they're different sizes. This technique results in uniform dice and uses really basic knife skills to get it accomplished. Hope these step-by-step photos help you to visualize the technique and process so you can have perfect dice every time. Remember, knife skills take practice! So the more you do it, the better you'll get.

Step 1: Cut off ends of the onion
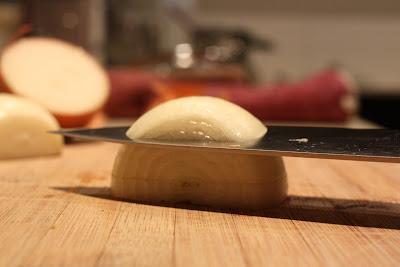
 Step 1: Cut off the ends of the onion - just the top 1/2 inch or so. Stand the onion up on one of the cut ends (as pictured above).

Step 2: Cut Onion in Half
 Step 2: Next, cut the onion in half (starting at a cut end and finishing at a cut end). This makes the onion really easy to peel. You should peel both halves if you are using the whole onion.

Step 3: Slice the onion horizontally
 Step 3: Now you need to slice the onion horizontally at even intervals without cutting all the way across the onion. I usually do 1/8 - 1/4 inch intervals which for a medium onion results in 4-6 slices, leaving about 1/4 - 1/2 inch of the onion in tact at the end so it doesn't fall apart on you.

Step 3: Slice the onion horizontally

End result of step 3 - onion should have even horizontal slices - leaving about 1/4 - 1/2 inch in tact at the end of the onion

Step 4: Slice the onion Vertically
 Step 4: Slice the onion vertically - similar to step three, but going the other direction! Slice at regular intervals (usually about 1/8 - 1/4 inch depending on the size of the dice you want) leaving the same 1/4 - 1/2 inch of the onion in tact at the end.

End result of step 4 - see how the onion is set up for perfect dice?! Cool eh?


Step 5: Lastly, just slice the onion as pictured above - again at about 1/8 - 1/4 inch intervals depending on the size of the dice you want. The end result is pictured below - uniform, perfect dice that will cook evenly.


Finally, a few words of wisdom for cutting, chopping, dicing and slicing:

Use a Sharp Knife - its way easier to dice an onion nicely when your knife cuts through it easily without much pressure being applied. And believe it or not, you have less chance of cutting yourself when your knife is sharp because again, you don't need to lean into it or apply much pressure to get the knife to move through the item you're chopping.

Use the Knuckle Trick - this doesn't work for everyone, but a good protective measure is to use the knuckle trick when cutting. Bend your fingers so your finger tips aren't exposed to the edge of the knife and use your knuckles as a guide for your knife - this way if the knife slips it will just rub along your knuckle instead of slicing into the tip of your finger.

Stabilize your Cutting Board - Place a slightly damp tea towel or dish cloth under your cutting board if it is sliding around on your surface. This will secure the board and ensure it doesn't slip while you're cutting.

Hope this post was helpful! If you have any other good tips and tricks for cutting, dicing, chopping and slicing, I would love it if you left a comment to share your knowledge!

Happy Cooking my Friends!

22.10.11

How to... Carmelize Onions

 There are some skills that are really important to have! One of them is roasting garlic and another one is carmelized onions. Carmelized onions can take an okay dish and elevate it to a delicious and special dish that will impress your guests. Plus they taste amazing (and take this from someone who doesn't really care all that much for onions - these things are delicious when done like this)! You can make these carmelized onions and keep them in the fridge for up to a week or you can make them and freeze them for up to a couple of months. They are one of those things to make in a large batch and then freeze/ store them so you always have them on hand!

You can top off a great burger with carmelized onions, put them on baguette slices with yummy olives and goat cheese, use them on flatbreads or homemade pizzas, put them in omelets, or even with a simple pasta with olives and cherry tomatoes... the possibilities are endless! So what are you waiting for? Get chopping your onions and get started!

Caramelized Onions
Recipe adapted from the Guy Can't Cook

Ingredients:
  • 3 large onions, peeled and thinly sliced (can be white, red, yellow or a mix of all three)
  • a couple tablespoons of olive oil
  • a couple tablespoons of butter 
  • 1 tsp sugar
  • 1 tsp balsamic vinegar
Method:
  1. Heat the oil and butter in a saute pan over medium-low heat. Add the onions and stir until they are coated with the oil/ butter mixture. Cover the pan and sweat the onions for five minutes. Remove the cover and saute until the onions begin to turn golden (see photo above) - if they are browning or burning, the heat is too high.
  2. Continue to cook until the onions are very soft and jammy, with a nice golden colour. Stir in the sugar and the vinegar and cook until the liquid is gone. Pile into a bowl and serve warm with bread, or put them in a container and refrigerate until you're ready to use them.
And there you go! Delicious carmelized onions that will elevate any dish you put them in. Hope you have a fantastic weekend.

Happy Cooking my Friends!

30.8.10

Pork Tenderloin with Maple Onion Cream

Looking for an easy yet impressive recipe for your next dinner party? Look no further! This recipe is always a hit. Its very rich, so definitely not something to eat all the time - break it out for special occasions! This pork tenderloin recipe is from one of my cookbooks by Anna Olson - In the Kitchen with Anna. Anna has a note regarding the technique for this recipe which I thought I would share with you:


"Dry rubs are a great way to add flavor to many cuts of meat at the last
minute. The spices toast and cook right into the meat, regardless of whether it
is prepared in a pan, on the grill or in the oven."


This recipe definitely imparts a lot of flavour with simple ingredients. Another key to successfully executing this recipe is making sure you are patient enough to carmelize your onions. Don't underestimate the time required for carmelizing onions because this develops the flavour base for your sauce and you don't want a harsh onion taste in the sauce - it needs to be the delicate, slightly sweet flavour of lightly carmelized onions. Do cook the onions for the full 20 minutes as stated in the recipe - its just the right amount of sweet.

Pork Tenderloin with Maple Onion Cream

Recipe from In the Kitchen with Anna by Anna Olson, p. 113

Ingredients:

  • 1 tbsp chopped fresh thyme
  • 1 tsp whole caraway seeds
  • 1/2 tsp fine salt, plus extra for seasoning
  • 1/4 tsp pepper, plus extra for seasoning
  • 3 tbsp olive oil, divided
  • 2 pork tenderloins, about 1 lb each
  • 1 tbsp butter
  • 2 cups sliced onion
  • 1/4 cup white wine
  • 3 tbsp maple syrup
  • 1 cup whipping cream

Method:

  1. Preheat the oven to 375F. In a small bowl stir the thyme, caraway seeds, salt, pepper and 1 tbsp olive oil to combine. Rub the spice mix all over the pork tenderloins. Place pork in an ungreased shallow baking dish and roast uncovered until it reaches an internal temperature of 165F (medium well). Remove pork from baking dish to rest for 10 minutes before slicing.
  2. While pork is roasting, prepare the sauce. Heat butter and remaining 2 tbsp of olive oil in a large saute pan over medium heat. Add the onions and cook, stirring often, until lightly carmelized, about 20 minutes. Add the wine and maple syrup and simmer until reduced by half - it will turn into a glaze. Add the cream and return to a simmer and season to taste.
  3. To serve, slice the pork tenderloin into 1/2 inch slices and spoon sauce over top. Enjoy!