Showing posts with label cream cheese. Show all posts

11.1.12

Creamy Spinach Dip


Alright folks - listen up: there is less than one month left until the Super Bowl!! Now, I am not really a huge football fan... I am more into the social aspects of the whole football thing, but the one thing I do know about football related events is my job at said events. My job when it comes to football and the Super Bowl is very important - I am the party planner, menu planner and chef extraordinaire!! So, my apologies to those of you who don't get caught up in the hype of the whole football thing, but leading up to the Super Bowl, there will likely be a lot of party dishes and appetizer ideas posted here... just sayin'!

But really, who can have enough appetizer recipes? I sure can't; I'm always bookmarking something for a later date or far off occasion. Sooo I'm sure you can put these recipes to good use regardless of whether you're into the Super Bowl hype or not.

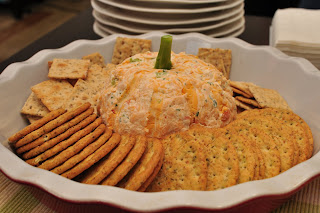
I made this spinach dip for Christmas eve this year and it was a hit. I've made it many times and someone always asks for the recipe. So I'm going to share it with you! A little secret - its dead easy. So here we go:

Creamy Spinach Dip
Recipe minimally adapted from Cooking Light

Ingredients:
  • 2 cups shredded mozzarella cheese, divided
  • 1/2 cup sour cream (recipe calls for fat free, but I always use full fat)
  • 1/4 cup fresh grated parmesan, divided
  • 1/4 tsp pepper
  • 3 cloves garlic, crushed
  • 1 (14 oz) can artichoke hearts, drained and chopped
  • 2 (8 oz) blocks cream cheese, at room temperature
  • 1 (10 oz) package frozen chopped spinach, thawed and thoroughly drained
Method:
  1. Preheat oven to 350F.
  2. In the bowl of your stand mixer, combine 1 1/2 cups mozza, sour cream, 2 tbsp parmesan, pepper, garlic, artichoke hearts, cream cheese and spinach. Mix until evenly blended. Turn mixture out into baking dish and level mixture into an even layer. Sprinkle with remaining 1/2 cup mozza and 2 tbsp parmesan.
  3. Bake in preheated oven for 30 minutes or until golden and bubbly. Serve with fresh bread, crostini or tortilla chips for dipping. Consume while hot.

Mmmmmm.... lets all pause while we drool over this picture of creamy, spinach goodness!! This recipe originally called for using low fat everything - feel free to do that when you make it, but I never use low fat ingredients when I'm entertaining and this is no exception. In my experience, the full fat version ALWAYS tastes better!! But I do realize that some of us have resolutions to keep, so don't worry, I won't judge and your guests likely won't notice the subtle difference.

This post has been linked up with Jane Deere's Fusion Fridays Link Party! Stop by to check out what other creations my fellow bloggers have posted in Fusion Fridays. You won't be disappointed. :)

Happy Baking my Friends! Thanks for stopping by. :)

25.6.11

Cheesecake Chocolate Chip Cookie Bars

So I'm pretty sure the first thing you're going to notice about this post is that I don't have any photos of the finished product... I'm pretty sure they disappeared too fast for me to take photos of! Thats my story and I'm sticking to it. For photos of how the dessert looks after its baked, head on over to Tracey's blog aptly named Tracey's Culinary Adventures. On her blog you'll find beautiful photos and all kinds of deliciously yummy recipes. I have a whole list of things bookmarked from her page to bake and cook, but its nearly impossible to get through that list because she keeps adding more and more delicious posts by the day. :)


Now that we've established that, I have to tell you - this recipe is delicious - I mean who wouldn't like a layer of cheesecake sandwiched between chocolate chip cookie goodness right?! Don't overbake these - they're meant to be a little chewy! Make these for that summer BBQ you have to attend or bake them and bring a plate to your neighbor... I promise you'll find yourself making all kinds of friends because of your baking "skills" (even though these bars are so dead easy that you could likely make them in your sleep!!). So? What are you waiting for? Go round up the ingredients and get started!!!


Cheesecake Chocolate Chip Cookie Bars

Recipe adapted from Tracey's Culinary Adventures


  • 1 cup butter

  • 1 cup light brown sugar

  • 1/2 cup granulated sugar

  • 1 tbsp vanilla extract

  • 1/2 tsp salt

  • 1 tbsp cider vinegar

  • 1 egg

  • 1 tsp baking soda

  • 2 cups all-purpose flour

  • 2 cups semi-sweet chocolate chips

  • 8 oz pkg cream cheese, softened

  • 1/2 cup granulated sugar

  • 1 egg

  • 1 tsp vanilla

Method:


  1. Preheat oven to 350F. Spray a 9x13 inch pan with nonstick spray.

  2. In the bowl of a stand mixer, fitted with the paddle attachment, cream the butter, brown sugar, the first amount of white sugar, vanilla and salt on medium speed until fluffy, about 3-4 minutes.

  3. Beat in the first egg until well combined. With the mixer on low speed, mix in the flour and the baking soda and mix until just incorporated. Stir in the chocolate chips. Divide the dough in half and press one half of the dough into the bottom of your prepared pan. Set aside the other half of the dough.

  4. In the bowl of a stand mixer fitted with the paddle attachment, beat the cream cheese until fluffy, about 2-3 minutes. Beat in the second amount of sugar, second egg, and the second amount of vanilla until just incorporated. Pour the cream cheese mixture over the cookie layer in the pan and spread to the edges of the dish so you have one smooth, even layer.

  5. Use the second half of the cookie dough (that you set aside earlier) and press in a layer over the cream cheese. The easiest way to do this is to take chunks of the dough, flatten into disks, and layer over the cream cheese mixture. It doesn't matter if the cream cheese part is completely covered, because the cookie dough will spread during baking. See below for a couple pictures of what mine looked like before I baked it.

  6. Bake in preheated oven for 35-40 minutes, or until the top is brown and cooked through (the bars will begin to pull away slightly from the sides of the pan). Transfer pan to a wire rack to cool completely. Store in the refrigerator.

Absolute deliciousness! My sister couldn't stop eating them. I think I'll likely make these for the next treat day I do for our office. :) Hope you are having a nice weekend and getting some nice weather.

Happy Baking my Friends!

5.5.11

Smoked Salmon Canapes

So, I just have to say - dry smoked salmon is where its at! So delicious. If you haven't tried it, now is the time. I can't stop eating it whenever we buy it, so you can imagine how excited I was to find this recipe by chef Michael Smith in his Chef at Home cookbook. I changed the recipe quite a bit, but his was my inspiration.

Try this recipe out this weekend if you're having company over. You can whip it up in no time so you can spend more time with your guests rather than in the kitchen. Unless of course they're not your favorite guests, in which case, find a more time consuming appetizer to make!! ;)


Smoked Salmon Canapes

Recipe adapted from Chef at Home


Ingredients:


  • a couple pieces of dry smoked pepper salmon (or whatever flavour you can find)

  • 1/2 cup softened cream cheese

  • 1 tbsp mustard

  • some chives finely chopped

  • fresh dill, finely chopped

  • crackers

Method:


  1. Mix together cream cheese, mustard, chives, dill. Place mixture into a piping bag. Pipe blobs onto your crackers and top with a small slice of the smoked salmon. Garnish with more dill or chives if desired.

  2. Be prepared to make a lot of these because your guests will eagerly gobble them up.

Pretty easy huh? I told you so! I hope you enjoy this recipe and get to give it a try this weekend.


Happy Cooking my Friends!

5.3.11

Ginger-Spice Sandwich Cookies with Lemon Cream Filling

I've been having a great weekend! My Dad is here visiting, so we went out for a great dinner last night and spent the day hanging out together. Plus, the weather is nicer than its been in quite some time here, so all in all its been a good weekend! Since I'm feeling pretty joyful, I thought I would share a recipe with you that brought me a lot of joy and satisfaction - ginger-spice sandwich cookies with lemon cream. Mmmmmmm!!! I had never tried sandwich cookies before, but decided plain old cookies weren't really special enough to make for my hubby's Superbowl party last month, so I decided on this recipe from the Best of Fine Cooking Magazine - Tailgating 2010. It was definitely a good call - all of the cookies were devoured during the party and people raved about them! They were so perfect - the right amount of spice in the cookies countered with the sweet lemon cream inside the cookies. Next time I make them I'll be sure to put even more filling in them.


The cookies weren't nearly as much work as I thought they would be which is always a plus. And if you put the filling into a piping bag and pipe the filling onto the cookies, filling them is a breeze - speedy with minimal cleanup. If you make them, put about double the filling you see piped on them in the picture below, and make them the night before that way the cookies can soak up some of the filling making them extra moist and delicious.

Ginger-Spice Sandwich Cookies with Lemon Cream
Recipe from the Best of Fine Cooking magazine - Tailgating 2010


Cookie Ingredients:


  • 9 oz (2 cups) unbleached all-purpose flour
  • 2 tsp ground ginger
  • 1 1/2 tsp. ground cinnamon
  • 1/2 tsp ground cardamom
  • 1/2 tsp baking soda
  • 1/2 tsp kosher salt
  • 6 oz (3/4 cup) unsalted butter, softened
  • 1/2 cup packed dark brown sugar
  • 1/2 cup granulated sugar, plus more for rolling
  • 1/4 cup unsulfured molasses
  • 1 large egg, at room temperature
  • 1/2 tsp pure vanilla extract

Lemon Cream Ingredients:

  • 4 oz cream cheese, at room temperature
  • 1 tbsp finely grated lemon zest
  • 6 oz (1 1/2 cups) confectioners sugar

Method:

  1. Position a rack in the center of the oven and heat the oven to 350F. Line 3 baking sheets with parchment paper.
  2. In a medium bowl, whisk the flour, ginger, cinnamon, cardamom, baking soda, and salt.
  3. In the bowl of a stand mixer fitted with the paddle attachment, beat the butter and both sugars on medium-high speed until light and fluffy, about 3 minutes. Add the molasses, egg and vanilla and continue to beat until incorporated, about 1 minute. Reduce the speed to low, slowly add the flour mixture and mix until just incorporated, about 1 minute. Shape the dough into a disk, wrap in plastic, and refrigerate until firm, about 1 hour.
  4. Put about 1/3 cup granulated sugar in a small bowl. Using your hands, roll about a tsp of dough into 1-inch ball. Roll each ball in sugar and arrange about 2 inches apare on the lined baking sheets. Use the bottom of a gladd to flatten the cookies slightly. Bake one sheet at a time until the cookies feel dry to the touch and are beginning to firm up (they'll still feel soft inside), 12-14 minutes. Cool completely on racks.
  5. Make the lemon cream: with a hand mixer, mix the cream cheese and lemon zest in a medium bowl until smooth. Slowly add the confectioners sugar and continue to mix until smooth.
  6. Assemble the cookies: pipe filling liberally onto the center of a cookie, top with another cookie, then gently press them. Repeat with the remaining cookies. Store in an airtight container for up to two days.


If you want to serve them up pretty, you can put them on a plate with some candied ginger. It adds a nice touch!


I hope you're having an exciting weekend! Filled with friends, family and fun times. I am heading out of town again for work (leaving tomorrow), out to the middle of no where... so blogging may be somewhat intermittent, so please bear with me. :) Hope you enjoyed this post and are inspired to try out these little bits of heaven!
Happy Baking my Friends!

26.10.10

Halloween Appetizers!


Can you believe that Halloween is this weekend already? Time just seems to be flying by. It seems like just yesterday it was a sunny summer afternoon. Now the temperatures have dropped, the mornings are frosty and the leaves are falling. A lot of families have really fun traditions for Halloween - some have a big halloween party and dress up in extravagent costumes, some carve pumpkins, and yet others set up a haunted house and hand out candy to neighborhood children. Growing up we didn't really celebrate Halloween and I always felt so left out. My favorite part of Halloween is the beautiful orange pumpkins so now that we are on our own, we have decided to start our own traditions! My hubby and I have started hosting an annual pumpkin carving party. We have our friends over, go to the pumpkin patch and pick our pumpkins, then come back to the house for carving and of course lots of food.

This year I made some really fun Halloween themed appetizers - Spider Web Dip and a "Pumpkin" Cheese Ball. They were so cute and deliciously festive. Since I'm posting a couple of recipes I'll keep my post short! Hopefully you are inspired to try these recipes out for your Halloween party this weekend! :D

Halloween Spider Web Dip

Ingredients:

  • 1 tbsp vegetable oil
  • 1 onion chopped
  • 4 cloves garlic, minced
  • 1/4 tsp each salt and pepper
  • 1 540mL pinto or white kidney beans, drained and rinsed
  • 2 avocados
  • 1/4 light mayonnaise
  • 2 tbsp lime juice
  • 2 cups salsa
  • 1/2 cup light sour cream
  • 2 black olives, halved and pitted

Method:

  1. In a skillet, heat oil over medium heat; fry onion, half of the garlic, the salt & pepper until softened, about 5 minutes. Add beans; cook over medium-low heat until hot, about 5 minutes. Using a potato masher or fork, mash until almost smooth; let cool.
  2. Meanwhile, cut each avocado in half and pit; using spoon, scoop flesh into bowl. Mash until smooth; stir in mayonnaise, lime juice and remaining garlic.
  3. Evenly spread bean mixture in 8-inch pie plate or serving dish. Spread salsa, then avocado mixture evenly over top.
  4. Spoon sour cream into plastic bag; cut off tip of 1 corner. Pipe in concentric circles over top. From centre to rim, pull knife through sour cream at even intervals to form web pattern. In center, place 2 olive halves end to end to form spider body. Cut out remaining olive halves into 8 slivers; arrange around body for legs.

"Pumpkin" Cheese Ball

Recipe from Everyday Favorites by Canadian Living


Ingredients:

  • 1 pkg cream cheese, softened (250g)
  • 2 cups shredded orange old cheddar cheese
  • 2 tbsp each diced onion, carrot and celery
  • 1 tbsp minced fresh parsley
  • 1 tsp prepared horseradish
  • 1 broccoli stem (3 inches), peeled

Method:

  1. In large bowl, beat cream cheese until smooth; stir in cheddar cheese, onion, carrot, celery, parsley and horseradish. Form into ball; wrap in plastic wrap. Refrigerate until firm, about 1 hour (or up to 3 days).
  2. Unwrap ball and flatten slightly; insert broccoli stem at top to resemble pumpkin stem. Using handle of wooden spoon, draw verticle ridges at even intervals to resemble pumpkin.
  3. Serve with crackers, and celery sticks.

Stay tuned tomorrow for my post about the October 2010 Daring Bakers Challenge! Its a good one.

Happy Cooking my Friends!

16.9.10

Red Velvet Cupcakes


I recently promised to make dessert and send it in for my old co-workers, but I was having trouble deciding what to make that would be easy to send in for them, easy to package and travel well... Plus, they wanted something chocolately with no fruit, so my choices were a bit limited. Then Anna Olson posted a new recipe on her Facebook page and it was perfect - red velvet cupcakes! Chocolately batter with a pretty pink colour and a rich cream cheese icing to top them off and make them look beautiful. These cupcakes are light, fluffy and moist and the icing compliments them really nicely. The recipe says it makes 15 cupcakes, but I got over 20 cupcakes, but I think I make mine smaller than Anna did. Remember to adjust your cooking time based on how many cupcakes you decide to make!
Red Velvet Cupcakes
Recipe from Anna Olson

Ingredients:
  • 6 tbsp butter, at room temperature
  • 6 tbsp packed dark brown sugar
  • 6 tbsp white sugar
  • 1 large egg at room temperature
  • 1/2 tsp vanilla extract
  • 1 1/4 cups all purpose flour
  • 2 tbsp cocoa powder
  • 1/2 tsp baking powder
  • 1/2 tsp baking soda
  • 1/4 tsp salt
  • 3/4 cup buttermilk
  • 3 tbsp finely grated raw beets
  • 2 tsp white vinegar


  • 1/2 cup unsalted butter, at room temperature
  • 3/4 cup cream cheese, at room temperature
  • 2 cups icing sugar
  • 1 tsp vanilla extract

Method:

  1. Preheat oven to 350F. Line muffin tins with paper liners.
  2. Beat butter, brown sugar, and white sugar together 1 minute or until fluffy. Add egg and vanilla and beat until smooth. In a separate bowl, sift flour, cocoa powder, baking powder, baking soda and salt together. In yet another bowl, stir buttermilk, grated beets, and vinegar together. Add the flour mixture alternatively with the buttermilk mixture, blending well after each addition. Spoon batter evenly between the cupcake liners. Bake in preheated oven for 18-20 minutes, until the top of the cupcakes spring back when pressed gently. Cool cupcakes 10 minutes in tins then remove to a rack and let cool completely.
  3. For the frosting, beat the butter and cream cheese 3 minutes until fluffy. Add the icing sugar and vanilla and beat gently until sugar is incorporated, then beat vigorously until icing is fluffy. Pipe or spread frosting onto each cupcake.
  4. Store cupcakes in fridge, but serve at room temperature. They will keep for 3 days in the fridge.

I hope you enjoy this recipe - I know all of my guinea pigs (whoops, I mean ex-co-workers) loved this recipe as did all of my friends I shared them with! Let me know what you think of this recipe. One thing to note about the recipe is that using beets will give the recipe a nice subtle pinky tone - if you are after the vivid red colour found in commercial bakeries and store bought products, you'll need to load this recipe up with red food colouring. Its completely up to you, but I prefer the natural way of colouring the batter... the colour is soft, subtle and pretty and you don't get that yucky processed taste that food colouring can add to your food. And you don't load up on the chemicals and artificial colouring agents that are in food colouring. :)

Let me know what you think of this recipe when you get the chance to try it out! Happy Baking my Friends!