2.1.11

Toblerone Cheesecake

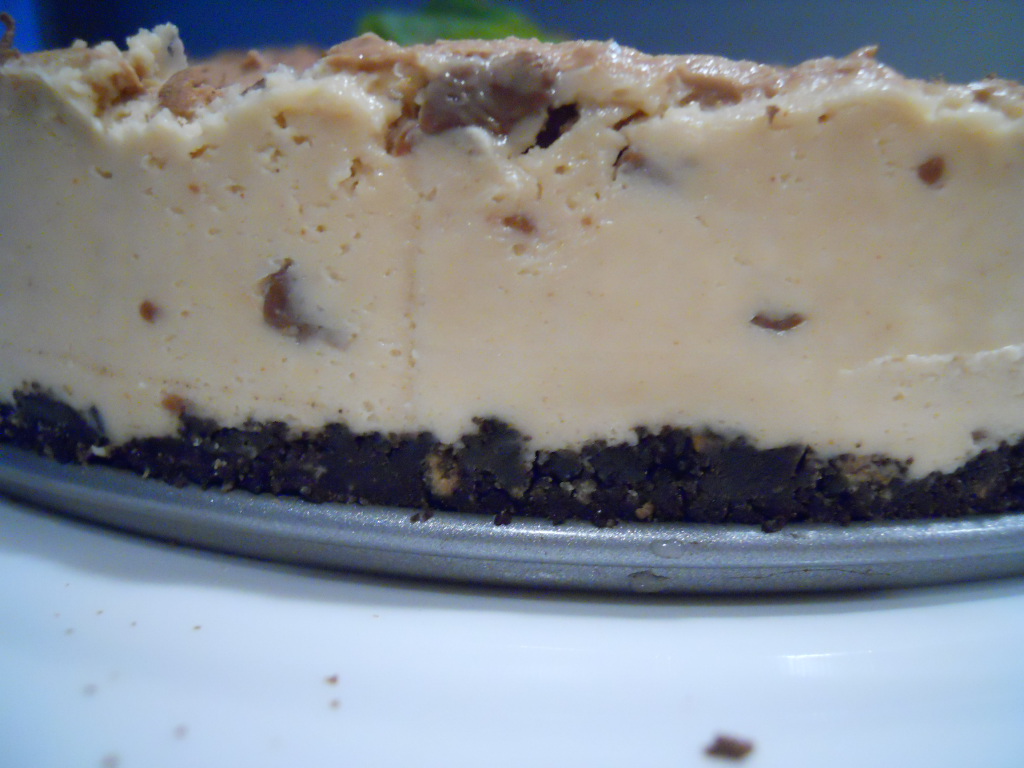
Got some leftover Toblerone? Almost sick of eating that leftover holiday chocolate? Well, use it for this delicious Toblerone cheesecake! Bring it to the office and be done with it. Your co-workers will eagerly gobble it up and you will have solved your I-don't-feel-like-eating-another-chocolate problem! Its that easy my friends!


And I guarantee you; this recipe is dead easy. It is one my sister found on the Kraft Canada website - minimal ingredients and minimal effort are required for this recipe! And it tastes sooooo good! I'm sure your co-workers (or your chocolate-loving family) will love it. Or you may decide it looks so good that you could probably consume more chocolate afterall.


Peanut Butter Toblerone Cheesecake
Recipe from KraftCanada.com

Ingredients:

  • 1 1/4 cups oreo baking crumbs
  • 1/4 cup butter, melted
  • 2 pkg (250 g each) cream cheese, softened
  • 1 cup smooth peanut butter
  • 1 cup sugar
  • 200 g toblerone swiss milk chocolate, chopped
  • 1 1/2 cups thawed cool whip topping

Method:

  1. Mix oreo crumbs and butter. Press into bottom of 9 inch springform pan. Refrigerate 10 minutes.
  2. Beat cream cheese, peanut butter, and sugar with a mixer until well blended. Add half the chocolate, mix well. Whisk in one cup of cool whip. Spoon over crust. Refrigerate 3 hours.
  3. Microwave remaining cool whip and chocolate in small bowl on high for one minute. Cool slightly. Pour over cheesecake. Refrigerate until firm.

Thats it! I hope this provides you with a great way to use up leftover chocolate after the holiday season. And if you do decide to make this for yourself, rest assured - its delicious!

Happy Baking my Friends!


Happy New Year & some Simple Comfort Food


Happy New Year to all of my awesome readers! Thanks for checking out my blog this year - I hope you've enjoyed the recipes and tips that I've posted for you. I have certainly enjoyed writing them! As I mentioned in my previous post, my goal this year is to blog more frequently and post recipes that my readers want to see! So if you have any suggestions for something you would like to see more of, please post a comment or send me an email. I will do my best to incorporate your suggestions into my writing, cooking and baking!

Now, if you're anything like me you've spent the holiday season eating rich food that you don't normally eat. All that food leaves me craving comfort food. So I thought I would post a simple mac & cheese recipe to satisfy that craving for comfort food. I've tried a lot of mac & cheese recipes and this one is by far the best. Kudos to Chef Michael Smith for the delicious recipe.

Macaroni & Cheese


Ingredients:

  • 1 one lb box of penne (454g)
  • 1/4 cup butter
  • 2 cloves of garlic, chopped
  • 2/3 cup all-purpose flour
  • big splash of white wine
  • 4 cups of milk
  • one 354 ml can of unsweetened evaporated milk
  • 1 lb of medium aged cheddar cheese, shredded (454 g)
  • 2 tbsp dijon mustard
  • 1 tbsp paprika
  • pinch of cayenne pepper
  • sprinkle or two of sea salt
  • 1/2 loaf of italian bread, torn into large pieces
  • a generous splash of olive oil

Method:

  1. Preheat your oven to 350F. Meanwhile, cook the pasta in lots of boiling salted water.
  2. To make the sauce, met the butter in a saucepan over medium heat. Add the garlic and stir for several minutes until it softens and flavours the butter. Add the flour and stir with a wooden spoon until a smooth paste forms. Combining the butter and flour in a roux first helps evenly distribute the flour throughout the sauce and prevents lumps.
  3. Continue cooking a few more minutes as the roux toasts and develops a bit of flavour. Slowly stir in the wine and continue stirring until the mixture is smooth again. Add both milks and switch to a whisk, mixing until the sauce is smooth again. Continue whisking until the mixture is very thick, a few minutes longer.
  4. Stir in the cheese, dijon mustard, paprika, cayenne pepper and salt. Stir the cooked pasta into the cheese mixture. Pour everything into a 9x13 inch ovenproof casserole or baking dish.
  5. Toss the bread with a splash or two of olive oil, then sprinkle it evenly over the top of the cheese mixture. Bake until it is heated through and the bread topping is golden brown, about 30 minutes.
Michael notes that you can substitute other semisoft cheeses such as Swiss, Jack or Emmenthal. He also says you can add any fresh herb you like, some ideas include dill, tarragon or thyme.


I hope you enjoy this recipe as much as our family did! My hubby loooovvvvveeeesss mac & cheese and tastes every recipe I make and he raved about this one. This recipe will definitely satisfy your comfort food craving and its great to eat on a cold evening because it feels like it warms you all the way through.


Best wishes in 2011 to all of my wonderful readers! Happy Cookingmy Friends!

28.12.10

The Daring Bakers' Challenge - December 2010 - Christmas Stollen!

Okay, Okay, I have been a very bad blogger. :( I didn't finish my 12 days of Christmas series and I have barely posted during the month of December. Thank you to all of you who still faithfully visit my blog when I do update it! My New Years' resolution is to be a better blogger - more consistent and lots of different types of recipes!

Now, on to the December Daring Bakers' challenge! The 2010 December Daring Bakers' challenge was hosted by Penny of Sweet Sadie's Baking. She chose to challenge Daring Bakers to make Stollen. She adapted a friend's family recipe and combined it with information from friends, techniques from Peter Reinhart's book.... and Martha Stewart's demonstration.

My stollen was not very traditional (at all!!). I was inspired to make a tropical stollen because my sister was going to Maui for Christmas, so I thought something tropical was in order. Yes, tropical stollen sounds a little, odd, but it was delicious. I made candied lime peel following the instructions here. And used the recipe Audax recommended for home-made marzipan. I made a macadamia marzipan using ground macadamia nuts and Captain Morgan's Spiced Rum (a couple of tsp). I only needed 1/2 of the marzipan recipe for the stollen. The stollen was wonderfully moist and flavourful. Please see below for the recipe I adapted.


Tropical Christmas Stollen

Ingredients:

  • ¼ cup (60ml) lukewarm water (110º F / 43º C)
  • 2 packages (4 1/2 teaspoons) (22 ml) (14 grams) (1/2 oz) active dry yeast
  • 1 cup (240 ml) coconut milk
  • 10 tablespoons (150 ml) (140 grams) unsalted butter (can use salted butter)
  • 5½ cups (1320 ml) (27 ozs) (770 grams) all-purpose (plain) flour (Measure flour first - then sift- plus extra for dusting)
  • ½ cup (120 ml) (115 gms) sugar
  • ¾ teaspoon (3 ¾ ml) (4 ½ grams) salt (if using salted butter there is no need to alter this salt measurement)
  • 1 teaspoon (5 ml) (6 grams) ground cardamom
  • 3 large eggs, lightly beaten
  • Grated zest of 2 limes
  • 2 teaspoons (10 ml) (very good) vanilla extract
  • 1 teaspoon (5 ml) coconut extract
  • ¾ cup (180 ml) (4 ¾ ozs) (135 grams) candied lime peel
  • 1 cup (240 ml) (6 ozs) (170 gms) firmly packed mixed, dried tropical fruit (I used pineapple, cantaloupe, crystallized ginger, and papaya)
  • 3 tablespoons (45ml) Captain Morgan's Spiced Rum
  • 1 cup (240 ml) (3 ½ ozs) (100 grams) chopped macadamia nuts
  • unsalted butter for coating the wreath
  • Confectioners’ (icing) (powdered) sugar for dusting wreath
  • 1/2 batch macadamia nut marzipan candy

Method:
  1. In a small bowl, soak the dried fruit in the spiced rum. Set aside.
  2. Pour 1/4 cup of water into small bowl. Sprinkle with yeast and let stand 5 minutes. Stir to dissolve yeast completely. In small saucepan, combine 1 cup coconut milk and 10 tbsp butter over medium heat until butter is melted. Remove from heat and let cool until lukewarm (about 5 minutes).
  3. Lightly beat eggs in separate bowl. Add vanilla and coconut extract. In a large mixing bowl, stir together flour, sugar, salt, cardamom, and lime zest. Then stir in the yeast/ water mixture, the coconut milk/ butter mixture. This should take about 2 minutes. The mixture should be soft but not sticky. When the dough comes together, cover the bowl with a tea towel and let rest for 10 minutes.
  4. Add the lime peel, mixed fruit, and macadamia nuts. Mix until incorporated.
  5. Turn dough out onto floured work surface. Knead dough, adding extra flour as necessary. Knead for approximately 8 minutes. When some dried fruit starts to fall out of the dough while it is being kneaded, you will know it has been kneaded enough. The dough will not be sticky enough to hold the outer dried fruit inside.
  6. Lightly oil a large bowl and place dough in bowl, turning to coat. Cover bowl with plastic wrap. Place in fridge overnight.
Making & Shaping the Dough
  1. Let the dough rest for 2 hours at room temperature after removing from the fridge. Line a sheet pan with parchment paper. Punch dough down, and roll into a rectangle about 16x24 inches, 1/4 inch thick. Roll your marzipan into 4 logs that cover the length of the rectangle (see above picture). And place logs evenly on the dough.
  2. Starting with a long side, roll up tightly, forming a long, thin cylinder. Transfer cylinder to sheet pan and join ends together, trying to overlap the layers to make the seam stronger. Pinch the seam to make it stick and form a large circle. You can form it around a bowl to keep the shape.
  3. Using kitchen shears, make cuts at 2 inch intervals around the circle, cutting 2/3 of the way through the dough. Twist each segment outward forming a wreath shape. Mist dough with spray oil and cover with a tea towel. Proof for approximately 2 hours at room temperature until dough has increased to about 1 1/2 times its original size.
  4. Preheat oven to 350F. Bake stollen in preheated over for 20 minutes, then rotate the pan 180 degrees and bake another 20 -30 minutes or until a thermometer registers 190F when placed into middle of bread.
  5. Transfer to cooling rack then brush with melted butter while it is still warm. Immediately tap a layer of powdered sugar onto bread. Wait one minute then tap another layer of sugar onto the first. Repeat layers of sugar until the butter no longer soaks through the sugar. Let cool at least one hour before serving.


This was a really great challenge and it made a whole lot of stollen! I think if I made it again I would make it into 4 smaller wreaths. The size would be far more manageable and would also make a great gift to give. Thank you Penny for encouraging us all to try something new and for providing us with such a delicious recipe. It was a lot of fun to try it and the taste and texture were very rewarding.

Happy Baking my Friends!


22.12.10

On the Ninth Day of Christmas... Gingerbread Biscotti!

I've mentioned her blog before and I'm going to mention it again because its pretty awesome. I came across this recipe for Gingerbread Biscotti on Jen's blog Food & Whine. It intrigued me right away and I knew I had to make it and soon! I whipped up a batch last night and in no time at all, my house smelled absolutely heavenly. The biscotti were delicious on their own, but I glazed them with an icing sugar glaze to give them a finished look. Boy was that a good call - as my sister put it, they taste like a gingerbread latte! So thanks Jen for sharing such a delicious recipe at the perfect time of year!

Gingerbread Biscotti
Recipe from Food & Whine


Ingredients:
  • 1/2 cup unsalted butter
  • 1/2 cup granulated sugar
  • 1/2 cup packed light brown sugar
  • 1/4 cup molasses
  • 2 eggs
  • 2 1/2 cups flour
  • 1 tsp baking powder
  • 1 tsp baking soda
  • 2 tsp ground ginger
  • 1 tsp cinnamon
  • 1/2 tsp nutmeg
  • 1/4 tsp ground cloves
  • 1/4 tsp salt

Method:

  1. Line two small baking sheets with parchment paper. Preheat oven to 350F.
  2. In bowl of your mixer, cream butter, sugars and molasses until smooth. Add eggs, one at a time, beating well after each addition.
  3. In a separate bowl, combine the remaining ingredients. Add to egg mixture and mix until blended. Spoon dough into two even piles - one on each prepared baking sheet. Shape into two 9 inch by 2 inch logs.
  4. Bake in 350F oven for 25-30 minutes until browned around edges and firm. Remove from oven and reduce heat to 300F.
  5. Let loaves stand on baking sheets for about 5 minutes until cool enough to handle. Remove to cutting board and slice into 1/2 inch to 3/4 inch thick biscotti. Place slices on baking sheets with cut side down. Return to oven at 300F and bake 2-3 minutes then flip and bake 2-3 minutes on the other side.
  6. Remove from oven and transfer biscotti to cooling rack.
  7. Mix 3/4 cup icing sugar with enough liquid (i.e. milk, whipping cream, lemon juice, etc) to make the icing the consistency you like. Dip tops of biscotti into the icing. Leave out on cooling trays until icing has set. Store biscotti in air tight containers for up to a month or freeze for longer.

This recipe is already on my list to make next year for my Christmas baking gifts. I can't get enough of them (I must confess, I ate three of them for breakfast with my coffee)... Perhaps I shouldn't make them... who am I kidding! Of course I'll make them again - strategy for next year - give them away as quickly as possible so my friends can enjoy them a much as I did this year!

Happy Baking my Friends & thanks Jen for sharing this delicious recipe!

On the Eighth Day of Christmas... Easy Oreo Truffles!

Alright, get ready for a show stopper recipe! These Oreo truffles look beautiful and they look impressive. People will think they took you a long time to make, when in reality they require minimal effort. The most difficult part of making them is dipping them in the chocolate and making sure they're evenly coated.

I brought a bunch to work for my co-workers to try today and the verdict was good! They eagerly devoured them and I received many compliments on the truffles. I also received many comments regarding how much time I must have spent in the kitchen to whip up all these beautiful baked goods. I'm not going to lie - they take a lot less time than you would think!


Easy Oreo Truffles
Recipe from Kraft Canada.ca

Ingredients:

  • 1 pkg cream cheese, softened
  • 1 pkg oreo cookies
  • 16 oz semi sweet chocolate
  • more oreo crumbs for sprinkling

Method:

  1. Get out your food processor! It is going to save you lots of time and effort. Throw the whole package of oreos into the processor and whirl until you have coarse crumbs. Toss in the cream cheese and whirl until just combined.
  2. Shape into 48 1-inch balls. Put the balls into the fridge for about 1/2 an hour to firm up (you don't have to do this, but it makes dipping them a lot easier and they will come out looking nicer).
  3. Melt the chocolate. Dip balls in chocolate, tossing to coat. Place on waxed paper covered baking sheet. Sprinkle with remaining oreo crumbs. Chill 1 hour or until firm. Store in tightly covered container in the fridge.

Thats it! Kraft is so great for providing quick and delicious recipes. I think this is one of my favorite recipes I've tried off their website. And with so few ingredients, whats not to love? Add these to your goodie list this Holiday Season and enjoy a little decadence.

Happy Baking my Friends!


21.12.10

On the Seventh Day of Christmas... Eggnog Pudding!


*Update: This post now contains my own photos! This was a delicious recipe that was so well received by my family and friends. Plus, you can make cute individual desserts that would be so perfect for a dinner party.

Despite the lack of photos, this recipe is a real winner and I would encourage you to try it out. I tested it out on my family and a couple of friends and it received very good feedback, do so give it a shot. It is festive and looks so pretty layered in nice glass dishes.

Eggnog Pudding
Minimally Adapted from Country Living Magazine, December 2009

Ingredients:

  • 1 14-oz can sweetened condensed milk (1 1/4 cups)
  • 1 1/2 cups half and half
  • 1 1/4 tsp freshly grated nutmeg
  • 3 tbsp molasses
  • 1/3 cup captain morgan's spiced rum
  • 1/8 tsp salt
  • 4 large egg yolks
  • 2 tbsp plus 1 tsp cornstarch
  • 25 small gingersnap cookies (about 1 1/2 inch diameter)
  • 3/4 cup heavy cream
  • 1 1/2 tsp confectioners' sugar

Method:

  1. Fill large bowl with ice water and set aside. Combine the sweetened condensed milk, 1 cup of the half-and-half, nutmeg, molasses, rum, and salt in a medium saucepan. Stirring occasionally to prevent burning, bring to a simmer over medium heat, then remove from stove.
  2. Whisk the egg yolks, 1/4 cup half and half in medium saucepan until combined. Slowly add in 1/4 cup of the hot mixture to the eggs while continuing to whisk. Set aside.
  3. Whisk the cornstarch and remaining half and half together in medium bowl. Quickly whisk the cornstarch mixture into the hot milk mixture. Place the pan back on the heat, increase to medium-high, and whisk constantly until it just boils. Remove from the heat and add the egg mixture to the hot milk mixture stirring vigorously.
  4. Place the pan over medium-high heat and cook, stirring constantly, until the liquid just begins to simmer. Immediately remove from the heat and strain into a medium bowl.
  5. Cover wth plastic wrap, placing the film directly on the hot pudding, and set in the ice bath to cool. Refrigerate.
  6. Crush one gingersnap and set aside. Combine the heavy cream and icing sugar in large bowl and beat to soft peaks. Alternate layers of cooled pudding, gingersnaps, and cream in six 6-oz individual custard cups. Chill for at least one hour. Top with crushed gingersnap and serve.

I hope you enjoy this recipe and can get past the serious lack of photos... I have one more place I can possibly look tomorrow while I'm at work, but my hopes are not high. Will keep you posted.

*UPDATE: I found my pictures! I've updated the post with my own photos. Hope you enjoy!!!

Only a few days til Christmas - hope you've just about finished your preparations. :) Happy Baking my Friends!

20.12.10

On the Sixth Day of Christmas... "the best stuffing recipe ever"


I have a bit of a problem with cooking stuffing inside of a turkey. I know it tastes good and I grew up with my mom doing it every single year, but I just can't bring myself to do it. All I can think of is I'm going to make my guests sick and someone is going to get food poisoning. Salmonella scares me... Irrational I know, but still.

I am also of the opinion that cooking a turkey with stuffing is a lot harder than cooking it without - you have to be very careful that the stuffing is cooked enough on the inside, but that the turkey meat is not overcooked. So I make my stuffing in a casserole dish every year and most years people have told me that it was good, but this year, this new recipe I used, I received rave reviews. In fact, I was told by my sister that she thinks it was the BEST stuffing she has EVER tasted. Period. So try it out for yourself - you won't be disappointed.

Herbed Stuffing
Recipe adapted from Canadian Living Everyday Favorites

Ingredients:
  • 3/4 cup butter
  • 2 1/2 cups finely chopped onions
  • 1 cup chopped celery
  • 4 tsp dried sage
  • 1 tsp each salt, dried savory, marjoram and pepper
  • 1 tsp fresh thyme
  • 14 cups cubed white bread
  • 1/2 package bacon, chopped

Method:

  1. Brown the bacon until crisp. Remove bacon from pan, but leave bacon fat in pan. Melt in the butter over medium heat. Fry onions, celery and seasonings until vegetables are tender. About 10 - 15 minutes. Transfer to a very large bowl. Add bread and bacon. Toss to combine.
  2. Spoon into a greased casserole dish. Cover and bake at about 350F to 375F for 20-40 minutes. Remove the cover for the last 10 minutes or so to let the outside crisp up a bit if you like that. Otherwise leave it covered til its nice and hot.


This is a truly delicious recipe. The herb combination is absolutely amazing - don't cut back because it sounds like a lot of herbs - the flavours combine so nicely and just give the stuffing the most amazing flavour.

Happy Cooking My Friends!