12.10.10

Pane Bianco - 3 Ways


Alright, get ready for a show stopper - literally! This bread is spectacular to look at and even more spectacular in your mouth. A good friend of mine who is definitely a culinary genius just celebrated a milestone birthday (something like 20 I think ;) ) and her hubby planned her a birthday party. He said we could feel free to bring a dish that we made... well of course I had to bring something, but could I decide what to bring? Of course not! It had to be something that travelled well, didn't take too long to make and tasted and looked amazing. Then I came across this blog post at Living in the Kitchen with Puppies for Tomato, Basil and Garlic Filled Pane Bianco. The photos were beautiful. So, about 3 hours before we were supposed to go to this birthday party, I started making this bread! Pulled it out of the oven and headed out the door. Any way, long story short, pretty much all conversation ceased when my friend pulled the bread out of the bag I had it wrapped in and everyone needed a rendition of how I made it and what was inside! It was an absolute hit.


I was so thrilled with the bread that I decided to play around with fillings. The three types I tried were:
  • Sundried tomato, roasted garlic, goat cheese, cheddar cheese, fresh rosemary and basil
  • Roasted garlic, goat cheese, and fig and walnut wine preserves
  • Cream cheese and jalepeno cranberry jelly

I would also like to try a cinnamon and brown sugar filling similar to cinnamon bun filling as I think it would bake up beautifully and taste absolutely divine!

Any way, on to what you came here for: the recipe!

Tomato, Basil & Garlic Pane Bianco

Recipe adapted from Living in the Kitchen with Puppies

Ingredients:

  • 1/2 cup warm water
  • 1/4 cup sugar
  • 4 teaspoons instant yeast
  • 1 cup warm low-fat milk
  • 1/3 cup extra-virgin olive oil
  • 2 large eggs
  • 2 teaspoons salt
  • 6 cups bread flour
  • 1 (8 1/2-ounce) jar oil-packed sun-dried tomatoes
  • 1 large head (or two small) roasted garlic
  • 1 1/2 cups shredded Italian blend cheese, divided (or any cheese you have on hand - I used cheddar, goat cheese and parmesan)
  • 2/3 cup chopped fresh basil (or any fresh mixed herbs - basically whatever you have on hand)

Method:

  1. Combine the water, sugar, yeast, milk, olive oil, eggs, salt, and flour, and mix and knead by hand, stand mixer, or bread machine until you've made a cohesive, soft dough. If you're kneading in a stand mixer, it should take 5 to 7 minutes at second speed, and the dough should barely clean the sides of the bowl, perhaps sticking a bit at the bottom. In a bread machine (or by hand), it should form a smooth ball. Place the dough in a greased bowl, and turn to grease the top. Cover and let rise in a warm place until double, about 45 minutes.
  2. Meanwhile, thoroughly drain the sun-dried tomatoes; lay them on a paper towel to absorb any excess oil. Using kitchen shears, finely chop the tomatoes.
  3. Line two baking sheets with parchment. Gently deflate the dough and divide it in half. Roll one piece into a 22" x 8 1/2" rectangle. Rub with half the garlic, cheese, basil, and tomatoes.
  4. Starting with one long edge, roll the dough into a log the long way. Pinch the edges to seal.
  5. Place the log seam-side down on a baking sheet. Using a small sharp knife, start 1/2" from one end and cut the log lengthwise down the center about 1" deep, to within 1/2" of the other end.
  6. Keeping the cut side up, form an "S" shape. Tuck both ends under the center of the "S" to form a "figure 8"; pinch the ends together to seal. Cover and let rise in a warm place until double, 45 to 60 minutes. Repeat with the remaining dough.
  7. While the loaves are rising, preheat the oven to 350°F.
  8. Bake the loaves for 35 to 40 minutes. Tent the loaf with foil after 15 to 20 minutes to prevent over-browning.
  9. Remove loaves from their baking trays; cool on racks. Store any leftovers well-wrapped, at room temperature.

Experiment with fillings and toppings - though in my experiments dry toppings seem to work better than wet! And colourful fillings look very nice when your bread puffs up and opens so beautifully to show off its fillings.:) I really enjoyed this recipe and despite how technical the rolling and shaping sounds, it is really easy. Just be patient and remember, practice makes perfect.

Happy Baking my Friends!

11.10.10

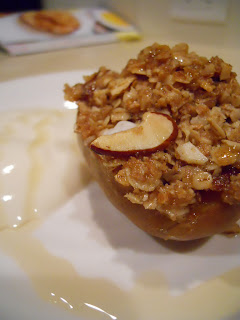
Honey Oat Roasted Pears


Ok, I confess, I'm back on my Anna Olson kick (again)!! I've been making so many of her recipes lately. :) Its just that every time I start making her recipes they turn out SO GOOD, every. single. time! Now that I've made my confession, I can start my post!


I'm sure you've eaten a lot of food this Thanksgiving weekend (I know I have). And I'm sure you've done some much needed reflection on all you have to be thankful for. I know I'm extremely thankful to have a job, supportive family, delicious and abundant food, and great friends (I could go on and on). We're just so fortunate and blessed to live where we do and we tend to take it forgranted so easily. So I love this time of year, because it tends to bring me back to reality and to realize how lucky I am. That being said, I'm sure most of you are (or soon will be) pretty sick of the rich, fat-laden foods that are traditional on Thanksgiving weekend! A dessert that is a little lighter and healthier may well be in order. Hence the Honey Oat Roasted Pear recipe I've chosen to share with you today. :) I hope this will be a welcome break for you from the rich and heavy food consumed this weekend.

Honey Oat Roasted Pears
Recipe from Anna Olson's cookbook Fresh, p 120

Ingredients:
  • 1 cup rolled oats
  • 1/3 cup packed light brown sugar
  • 1/4 cup sliced almonds
  • 1/2 tsp ground cinnamon
  • 1/4 cup butter, melted, plus extra for brushing
  • 4 bartlett or bosc pears
  • vanilla yogurt and honey for drizzling

Method:

  1. Preheat the oven to 375F. Toss the oats, brown sugar, almonds and cinnamon to combine. Stir in melted butter until everything is roughly combined.
  2. Cut the pears in half (don't peel them) and scoop out their cores. Lay the pear halves in a baking dish and brush their tops with more melted butter. Press some oat filling into the center of each pear. Bake, uncovered for 25 minutes, until pears are tender and the oat filling is lightly browned.
  3. Serve warm, drizzled with honey and a dallop of vanilla yogurt on the side.

I hope you enjoy this simple and delicious recipe. I know I definitely did! Once again - Happy Thanksgiving to all of you Canadians out there. I had a wonderful weekend spent with friends and family. Back to reality tomorrow!

Happy Baking my Friends!

10.10.10

Banana Biscuits


You know when you buy that big bunch of beautiful yellow bananas at the grocery store and you eat a few when you get home, but you don't get around to eating all of them before they turn brown? Then you make banana bread or banana muffins... I don't know about you, but I sometimes get a little sick of eating banana bread and banana muffins - they're a nice treat, but definitely not something I want to eat every day. Well, I found a recipe for banana biscuits - its a great way to use up your brown bananas and it tastes so different from the usual sweet banana bread or muffins. This biscuit recipe is delicately flavoured and not sweet at all. The biscuits are great served warm with butter and orange marmalade or with peanut butter.
This recipe is really quick to make - all you do is quickly whip up the batter, drop onto cookie sheets and bake in the oven long enough to cook them through! Easy peasy! ;)
Banana Biscuits
Company's Coming Muffins and More, p 82
Ingredients:
  • 2 cups all purpose flour
  • 1 tbsp sugar
  • 2 tsp baking powder
  • 1/2 tsp baking soda
  • 3/4 tsp salt
  • 1/4 cup butter, chilled
  • 3/4 cup milk, cold
  • 1/2 cup (or one large) banana, mashed

Method:

  1. In a large bowl combine flour, sugar, baking powder, soda and salt. Cut in butter until crumbly. Make a well in center.
  2. Pour milk and banana into well. Stir just until moistened. Drop by spoonfuls onto greased cookie sheet. Bake in 400F oven for 15-20 minutes (mine took far less time so keep an eye on them).

See what I mean? They're dead easy to make! What do you usually do with brown bananas? You can also freeze the bananas in case you don't have time to bake something right away. Whatever you do, don't throw them out! They're good for something. :)

Hope you all have a wonderful Thanksgiving weekend! I'm looking forward to a big turkey dinner tonight. Speaking of which, I need to go finish up some house work and get the turkey ready to go in the oven.

Happy Baking my Friends! Enjoy the long weekend (in Canada)!

8.10.10

Cuban Grilled Pork Loin with Mojo Mayo

I am always looking for something new to do with pork tenderloin. We seem to eat a lot of pork tenderloin in this house - I can only eat so much chicken in one week! When I came across this recipe for pork tenderloin I was excited. It is so different from any other recipe I've tried and the mojo mayo is incredible.

So, if you're looking for something different and impressive to serve to company this weekend try out this recipe! With the heavy emphasis on turkey this weekend, its sometimes nice to make something else. Serve this recipe with some roasted asparagus and potatoes and you've got yourself a delicious meal.

Cuban Grilled Pork Tenderloin with Mojo Mayo
Ingredients:
  • 3 tbsp olive oil
  • 2 cloves garlic, crushed
  • 1 boneless pork loin, about 2-3lb
  • 1/2 tsp ground cumin
  • 1/2 tsp dried oregano
  • 1/2 tsp paprika
  • 1/2 tsp salt
  • 1/2 tsp pepper
  • 1 tbsp brown sugar
  • 1 cup mayo
  • 8 cloves roasted garlic
  • 1/2 tsp ground cumin
  • 1 tbsp freshly squeezed lime juice
  • 2 tbsp frozen orange juice concentrate
  • 1/2 tsp ground pepper

Method:

  1. In a small bowl, combine the oil and garlic and let stand 5 minutes to infuse the flavours.
  2. To make the mojo mayo, in a blender or a food processor, combine the mayo, roasted garlic, 2nd ground cumin amount, lime & orange juices, and black pepper. Blend until smooth. Refrigerate until ready to use.
  3. Rub the pork on all sides with the garlic-infused oil. In a small bowl, combine the first cumin amount, oregano, paprika, salt, pepper and brown sugar. Rub this mixture over the pork, coating all sides.
  4. Heat the grill to medium high and sear the pork until browned on all sides, about 10 minutes in total. Turn off one burner and move the pork to the unlit side of the grill. Cover the bbq and cook the loin for 30-45 minutes longer, until the meat is cooked but still pink inside. Use an instant read thermometer - the internal temperature should be about 140F.
  5. Let the pork loin rest on the cutting board for 10 minutes before slicing. Drizzle with mojo mayo and serve alone or on sandwiches with sliced avocado, tomatoes and cilantro.

Hopefully you enjoy this recipe as much as I did! Try making the sandwiches as the recipe above suggests - they sound delightful. :)

Happy Cooking my Friends!

7.10.10

White Heather Tea Room - Victoria, BC


At the beginning of September my mom, sister and I went on a girls trip to Vancouver Island. It was a really fun trip during which we got in some great shopping, sightseeing and most important of all good food. It was relaxing and great to spend some time together. One of the days we were there, we met with our cousin who just moved to the Island for university and went for high tea at the White Heather Tea Room. It was absolutely incredible - I would highly recommend this place. Incredible food, great service and an amazing selection of tea. The decor is a little stodgy and old fashioned, but the food more than makes up for it. :)


We had the Big Muckle Giant Tea for Two - it was about $44 for two people and definitely not a bad deal when you see all the food you get! This selection provides each group of two with the following:


  • Selection of Tea Sandwiches
  • Freshly Baked Scone with Delicious Preserves,Lemon Curd and Cream
  • Mini Cheese Scone with Smoked Salmon
  • Cream Cheese and Red Pepper Jelly
  • Savoury Mini Quiche
  • Cheese Krispie with Cream Cheese
  • AppleSavoury Surprise of the Day
  • Wonderful Selection of Fresh Baking
  • Served with Tea or Coffee

They also have a number of other tea options to choose from if you're not up for such a feast! I would encourage you to check out their website and if you're ever in the neighborhood do stop in! You won't be sorry. :)


Thanks for stopping by! Stay tuned for some great posts this (Canadian) Thanksgiving weekend.

3.10.10

The Ultimate Chocolate Mousse - From Scratch!


I'd like to start this post off by saying - sometimes you just need a chocolate fix - pure, rich and decadent chocolate. You don't care how many calories or how much fat, you just need chocolate! If this sounds familiar, this recipe is for you - rich, decadent and cloudlike chocolate mousse to the rescue! Serve it out of a martini or margarita glass for a fun effect. One thing to note - the recipe I use states that it only makes 4 servings... WRONG! This recipe should make 6-8 servings (I will make 8 next time I make it) - using 4 servings makes for way too much rich chocolate mousse to consume in one sitting!

This recipe is from my new cookbook Tyler's Ultimate by Tyler Florence. This guy is pretty awesome - his cookbook is full of beautiful pictures, helpful hints and of course delicious recipes! Be forewarned, photo quality for this post is severely lacking - I was way too excited to eat this mousse to take the time to take high quality photos - so please bear with me! This one left me in awe the other week when I made it and I really feel like I need to share it with you! So here we go:

The Ultimate Chocolate Mousse
Recipe from Tyler's Ultimate, p. 230

Ingredients:

  • 6 ozs semisweet chocolate, chopped
  • 3 tbsp unsalted butter, softened
  • 3 large eggs, separated
  • 1/2 tsp cream of tartar
  • 1/4 cup plus 2 tbsp sugar
  • 1/2 cup chilled heavy cream
  • 1/2 tsp vanilla extract
  • whipped cream and chocolate shavings, for garnish (or whatever you have on hand - i used graham crumbs and fresh mint leaves)

Method:

  1. bring about 1 inch water just to a simmer in a saucepan; put the chocolate and butter in a heat proof bowl and set it over the pan, making sure it doesn't touch the water. Stir with a wooden spoon until the chocolate is melted and the mixture is smooth. Remove bowl from heat and let mixture cool slightly. Then grab a whisk and beat the egg yolks into the cocolate one at a time, beating until smooth after each addition. Set aside.
  2. In another bowl, beat egg whites until foamy. Add the cream of tartar and beat until soft peaks form. Gradually beat in 1/4 cup of the sugar and continue beating until stiff peaks form.
  3. In a chilled bowl, beat the heavy cream until it begins to chicken up. Add remaining 2 tbsp of sugar and the vanilla and continue beating until the cream holds soft peaks.
  4. Now you've got the elements prepared! Stir a spoonful of the egg whites into the chocolate mixture to lighten it, then fold in the rest. Fold in whipped cream, taking care not to overwork the mouse or it will be heavy. Divide the mousse among 6-8 glasses. Cover and chill for several hours. Garnish with whipped cream and chocolate shavings before serving.

Take the time to savour every delicious bite of this chocolate mousse! Its amazingly rich and will just blow you away. Honestly - its like the best chocolate dessert ever and satisfies even the most fierce chocolate craving. :)


Happy Baking my Friends!

2.10.10

Herb Buns


Hi Everyone! Its been a busy, busy week for me. But definitely a good week. :) I received a blog award from a fellow food-blogger this week - the One Lovely Blog Award! How nice is that? Merut of Eating with my Mouth Open gave me the award - check out Merut's blog if you have a minute - its fantastic!

Any way, on to the food! As most of you who follow my blog are aware, I've been on a bread baking kick - so to further that theme, I baked some delicious buns the other week that I've been meaning to blog about. They were delicious and tender and they made the house smell soooo good while they were baking! One tip I would give for making your own bread at home is to use a stand mixer with a dough hook to knead the dough - it works so well - give it a try!
Herb Buns
Recipe from the Joy of Cooking

Ingredients:
  • 3 tbsp warm water
  • 1 pkg (2 1/4 tsp) active dry yeast
  • 1 cup warm milk
  • 5 tbsp butter, melted
  • 3 tbsp sugar
  • 1 large egg
  • 1 tsp salt
  • 3 1/2 - 4 cups flour
  • 1 tsp celery seeds
  • 1 tsp caraway seeds
  • 1 tsp dried dill or dill seeds

Method:

  1. Combine the water and yeast in the bowl of a heavy-duty mixer and let stand until the yeast is dissolved, about 5 minutes.
  2. Add the milk, butter, sugar, egg, salt and herbs to the yeast mixture. Mix on low speed for 1 minute. Gradually stir in 2 cups of the flour until combined. Gradually add 1 1/2-2 cups more flour until the dough it moist and sticky. Knead for about 10 minutes with the dough hook on low to medium speed until the dough is smooth and elastic. Trasfer the dough to an oiled bowl and turn it once to coat with oil. Cover loosely with plastic wrap or a clean cloth and let rise in a warm place until doubled in bulk, about 1 hour.
  3. Grease a 9x13 inch pan. Form the dough into buns and place in the baking dish with the seam side of the bun faced down. Cover loosely with plastic wrap and let rise in a warm place until doubled in bulk, 1 to 1 -1/2 hours. Preheat the oven to 375F. Bake until the tops of the buns are deep golden brown and sound hollow when tapped. Remove the buns from the pan to a rack to let cool completely.

This is definitely a keeper recipe! They also had a few other combinations of herbs to try - so once you've tried this one, feel free to try out these combinations:

  1. 1/2 tsp marjoram or basil, 1/4 tsp dried thyme, 1 tbsp chopped parsley, 1/2 tsp oregano
  2. 1/4 tsp ground ginger, 1 tsp dried thyme, 1 tsp dried savory crumbled, 1 tsp dried rosemary, crumbled
  3. 1 tsp grated or ground nutmeg or ground cloves, 1 tsp dried rosemary crumbled, 1 tsp dried dill, 1 tbsp chopped sage

Or if fresh herbs are availabl, mince them up and triple the amounts suggested for the dried herbs! So go ahead - get creative and enjoy these buns!

Happy Baking my Friends!