16.8.10

Almost Black Forest Cake

Check out this recipe for an almost black forest cake! It's so yummy! I made this cake for my parents' 30th anniversary and it was a hit. I used the chocolate cake recipe from my post Decadent Chocolate Cake. Once the cake was baked and cooled, I sliced it in half to make 2 layers. Each layer was brushed with kirsch mixed with icing sugar until it tasted sweet and was a bit syrupy. Usually about 1/3 - 1/2 cup kirsch mixed with about 1/2-2/3 cup of icing sugar, but go by taste.

You will need to make a buttercream icing to act as a barrier between the chocolate cherry filling and the rest of the cake. This will avoid having soggy cake! I found my buttercream recipe on the Food Network webpage - I cheated and made a "quick" buttercream icing rather than going through the work and massive amounts of butter required by a true buttercream. This buttercream recipe was delicious tasting and had a lot of the characteristics of a true buttercream (only an expert would know that I "cheated"!!).

Quick Vanilla Buttercream Frosting
Recipe from the Food Network.com

Ingredients:
  • 3 cups icing sugar
  • 1 cup butter
  • 1 tsp vanilla extract
  • 1-2 tbsp whipping cream

Method:

  1. In a standing mixer fitted with a whisk, mix together sugar and butter. Mix on low speed until well blended and then increase speed to medium and beat for another 3 minutes.
  2. Add vanilla and cream and continue to beat on medium speed for 1 minute more, adding more cream if needed for spreading consistency.

*Note: Double this recipe if you are icing the entire cake!! You will need almost all of the icing.

Ice the top of the bottom layer and then fill a piping bag with some of the icing and pipe a "barrier" around the edge of the cake layer. This will hold in the filling so it doesn't ooze out of the cake when you top it with the next layer. See my photo below for an example:


To make the filling, combine any scraps trimmed off the cake (crumble them up) with cherry pie filling (about 1/2 of the recipe). Spoon this onto the bottom layer inside of the buttercream barrier. Then top with the top layer and ice the entire cake with a thin layer of the buttercream (Called a crumb layer). This will fill in any gaps and collect up any crumbs of chocolate cake so they don't get in your final layer of icing. Place in the fridge for about 20-30 minutes to firm up.


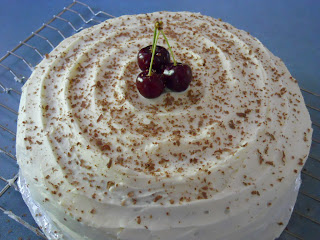
Then ice with a final layer of buttercream. Make sure this layer is nice and smooth! Garnish with fresh cherries and grated chocolate to give people and idea of what's in the cake. Enjoy!

15.8.10

Hungarian Chicken and Dumplings in Creamy Paprika Sauce

While I was up north visiting my parents, I tried to cook a few of the meals to lighten the load on my mom. I wanted to make something different from what they normally eat, so I chose to make Hungarian Chicken and Dumplings in a Creamy Paprika Sauce. I have never made dumplings, nor have I ever made hungarian food, so this was definitely something new for me! It was surprisingly delicious and surprisingly easy - if you need to get out of a rut and try something new in the kitchen, I would encourage you to try this recipe out.

Hungarian Chicken and Dumplings in Creamy Paprika Sauce
Recipe from Cinda Chavich, p 90 The Guy Can't Cook

Ingredients:

  • 8 skinless, boneless chicken breasts/ thighs
  • salt & freshly ground black pepper
  • 1 tbsp extra virgin olive oil
  • 1 large yelow onion, minced
  • 2 bell peppers, sliced (1 red & 1 yellow)
  • 1 tbsp sweet hungarian paprika
  • 1 tsp dried thyme
  • 1 tbsp apple cider vinegar
  • 1/2 cup dry white wine
  • 1 12 oz (385 ml) can chicken broth
  • 2 tbsp tomato paste
  • 1/2 cup sour cream or heavy cream
  • 2 tbsp dijon mustard

Dumpling Ingredients:

  • 1 cup cold mashed potatoes
  • 2 cups all-purpose flour
  • 1/2 tsp salt
  • 1 tbsp butter, melted
  • 1 egg
  • 3/4 to 1 cup warm water

Method:

  1. Cut the chicken into cubes and season with salt and pepper.
  2. Heat the oil in a large saute pan over medium-high heat and sear the chicken until it begins to brown. Remove from the pan and set aside.
  3. In the same pan, saute the onion and peppers over medium heat for 5 minutes or until they start to brown. Stir in the thyme and paprika and cook for one minute or until fragrant. Add the vinegar and wine and bring to a boil. Cook 5 minutes or until the liquid has reduced by 1/2. Whisk the broth and tomato paste and simmer for 2 minutes longer. Whick in the cream and mustard and continue to simmer for 10 minutes or until the sauce is reduced to about 1 cup, and is thick enough to coat the back of the spoon.
  4. To make the dumplings, in a large bowl use your hands to mix together the mashed potatoes, flour and salt until crumbly.
  5. In a separate bowl, whisk together the melted butter, egg, and water. Make a well in the center of the potato mixture and add the egg mixture, gradually incorporating with a fork to form a smooth, soft dough. Meanwhile, bring a large pot of salted water to a rolling boil. Press about 1/4 of the dough through a spaetzle maker or through a colander with big holes. Simmer until the noodles float. Drain well before tossig with butter, salt, and pepper. Set aside on a warm platter. Repeat with remaining dough until all the noodles are cooked.
  6. Return cooked chicken to sauce, cover, and simmer for 5 minutes to heat through. Spoon the paprika chicken over the noodles. Garnish with chopped parsley if desired.

*Note: Be sure to use a good quality spanish or hungarian paprika. It will likely be called smoked in the store, but make sure it says sweet and not hot. If you use hot paprika in this recipe, you will burn your mouth off!

**Another Note: if you don't have time to make the dumplings or just don't like them, you can serve this dish over wide egg noodles, gnocchi or even just mashed potatoes.

This recipe was creamy, flavorful and delicious! Bon apetit!

14.8.10

Tinhorn Creek Chardonnay

Since it's the weekend I thought it would be nice to blog about wine again! Lets ignore the fact that its 8 o'clock in the morning! I just want you to be prepared for the weekend with a great wine suggestion. :) I've been blogging about a lot of local British Columbia wines since I started this blog, and there's a reason for it - they're good! I like to support local wineries particularly when most of them produce such quality wines.
White wine is best to consume in the summer, particularly when its hot outside like it is right now. White wine has the ability to maintain its flavor characteristics despite the fact that it will likely warm up in your glass. With red wine, as soon as it warms beyond about 18 degrees celsius it begins to change flavour and lose its flavour characteristics, likely leaving you with something not very pleasant tasting in your glass. Thus it is best left to when you're sipping in an air conditioned restaurant or for consuming on cooler days! Since the weather is so hot, I'm going to share with you the 2008 Chardonnay from Tinhorn Creek in the South Okanagan. It was a really refreshing wine and really enjoyable to drink. Here are the tasting notes from the winemaker:

"There is something special about Chardonnay grown in the South Okanagan:
its buttery richness is beautifully counterbalanced by crisp, juicy green
apple acidity. Our 2008 is a super-refreshing take on Chardonnay, combining
classic Okanagan aromas of flowers and herbs, peaches, apples, and citrus
fruits. The complex flavours include vanilla and nutty, leesy, and mineral
notes."

The winemaker also notes that this wine is excellent paired with crab, halibut, chicken, turkey, and shellfish. But it's also great to drink on it's own. Have a great weekend and be sure to take some time to relax and enjoy a great glass of vino! Cheers!

13.8.10

Delicious Lemon Raspberry Cake

If you are looking for that "summery" cake for the next barbeque or dinner party you're invited to or hosting, look no further! This cake has a very summery taste and since the cake is a bit more dense - it is served in very small pieces - thus a little cake goes a long way! I made this cake for my parents 30th anniversary BBQ at the end of July and it was a great hit - I used fresh, handpicked raspberries between the layers and it tasted amazing! Unfortunately I didn't have time to get a photo of the finished product, but I did take pictures during the baking and assembly phases.

You can use any type of icing for the cake, but I chose to use a lighter tasting icing since the cake is rather dense. I used a Lemon Meringue Icing recipe from the Foodnetwork. It is a really fluffy icing and is so easy to work with!

Lemony Yellow Pound Cake
Recipe minimally adapted from Cinda Chavich, p 451 The Guy Can't Cook
Ingredients:
  • 3/4 cup cubed, unsalted butter
  • 1 cup sugar
  • 4 large eggs
  • 2 cups flour
  • 1 1/2 tsp baking powder
  • 1/4 tsp salt
  • 1/4 cup freshly squeezed lemon juice
  • 1 tbsp finely grated lemon zest

Method:

  1. Preheat the oven to 325F. Butter an 8-inch springform pan and cut parchment paper to fit into the bottom of the pan.
  2. In a mixing bowl, use an electric mixer to cream the butter and sugar together until light and fluffy. Add the eggs, one at a time, and beat until the mixture is silky smooth.
  3. In another bowl, combine the flour, baking powder, and salt. Add the dry mixture to the batter in small amounts, alternating with a bit of the lemon juice and zest, stirring with a whisk until smooth.
  4. Spoon the batter into the prepared pan. Bake 40-50 minutes in the preheated oven or until the top is golden and a skewer inserted into the center of the cake comes out clean. Cool in the pan before transferring to a plate.

**Note: for the cake in the photos - I doubled this recipe because I was feeding a large number of people! For an ordinary dinner party or just for your family, you will only need the recipe as listed above!


I cut this cake into three layers. Once the layers are cut (and the top of the cake has been leveled), brush both sides of the layers with a mixture of fresh lemon juice mixed with icing sugar until it tastes sweet, not tart. Be sure to brush generously - this intensifies the flavour and ensures your cake will be moist and decadent!

Since I used a fruit filling, I didn't want it to make the cake soggy, so I put down a thin layer of buttercream icing on each layer prior to laying out the raspberries. Once the layers have been assembled, make the icing and ice the cake.

Lemon Meringue Icing

Recipe from the Food Network

Ingredients:

4 large egg whites
2/3 cup sugar
1 teaspoon lemon
juice
1 teaspoon finely grated lemon zest
Pinch cream of tartar
Pinch fine salt

Method:

  1. Bring a few inches of water to a boil in a saucepan that can hold a mixer's bowl above the water. Whisk the egg whites, sugar, lemon juice and zest, cream of tarter and salt in the bowl by hand. Set the bowl above the boiling water and continue whisking until the mixture is hot to the touch and the sugar dissolves, about 1 to 2 minutes.
  2. Transfer the mixture to a standing mixer fitted with the whisk attachment and beat at medium-high speed until meringue is cool and holds a soft peak, about 5 minutes. Add a few drops of desired food coloring and continue beating until it holds stiff peaks.


Once I iced the cake, I garnished it with fresh raspberries and a little bit of lemon zest grated over the top of the cake! It looked beautiful and tasted awesome! Thanks for stopping by! See you again soon.

12.8.10

Nutty Chocolate Chip Biscotti

Biscotti originate from Italy where the name literally means "twice baked". Biscotti were baked twice to produce a very dry cookie that would keep for long periods of time. Today biscotti are just considered a decadent treat with many variations of the recipe. Many biscotti makers today tend not to bake their biscotti traditionally and produce a softer biscotti that many people seem to love. I also prefer my biscotti a little bit softer than is traditional, so please keep that in mind as I share baking times with you - if you prefer your biscotti more traditionally crunchy, feel free to bake a little bit longer during the second baking time!

The recipe I made is from my cookbook The Guy Can't Cook by Cinda Chavich. I seem to share a lot of recipes with you out of her cookbooks, but they're just so good that I can't resist sharing them! The recipe is quite easy and not overly technical, so beginners or people who don't like the kitchen much will have no problems making this recipe. Hope you enjoy it as much as I did!


Nutty Chocolate Chip Biscotti
Recipe adapted from Cinda Chavich, p. 467 The Guy Can't Cook

Ingredients:

  • 3/4 cup softened butter
  • 2 cups granulated sugar
  • 3 eggs
  • 3 1/2 cups flour
  • 2 tsp baking powder
  • 1 cup lightly toasted almond slices (or pistachios)
  • 1 cup chocolate chips

Method:

  1. Preheat oven to 350F.
  2. In a large mixing bowl, use an electric mixer to cream the butter and sugar together until fluffy. Add the eggs one at a time, beating after each addition.
  3. In a separate bowl, combine the flour and baking powder. Gradually add 1/2 the flour mixture to the batter, beating to incorporate. Stir in the nuts and chocolate. Stir in the remainder of the flour mixture and incorporate. Turn the dough onto a lightly floured surface and separate into three equal portions. Roll each portion into a rope about 12 to 14 inches long.

4. Line a baking sheet (or two) with parchment paper and place the ropes side-by-side, leaving at least 3 inches of space for the cookies to expand into slightly flattened logs as they bake.

5. Bake for 20-30 minutes in the preheated oven, or until logs are firm to the touch. Remove from oven and let cool for 20 minutes. With a serrated knife, cut each log on an angle into 1/2 inch thick biscotti. Lay biscotti on the baking sheet and return to oven for 5 minutes to crisp up a bit. If desired, drizle melted chocolate over the biscotti once they've cooled, or dip one end of each biscotto in melted chocolate and chill until chocolate sets. Makes 4-5 dozen biscotti.


This recipe makes some of the most delicious biscotti I have ever made at home! If you choose one recipe to make - choose this one - you will impress yourself, your friends and your family!


Thanks for taking the time to stop by and check out my blog! Have you ever made biscotti? If so, what type of biscotti did you make? Until next time - happy baking my friends!

10.8.10

Summerhill Pyramid Winery

While visiting the Okanagan, my cousin and I stopped in at two local vineyards. I'm going to tell you about Summerhill Pyramid Winery in Kelowna today. I'll save Cedar Creek for another day! Our experience at Summerhill was fantastic - the vineyard was beautiful, the tasting room was very busy yet people were still receiving top notch service and information about the wine they were interested in. The bistro looked lovely though we did not get a chance to try out the food.

The neat thing about Summerhill is that they follow organic practices - most of their vineyards are certified organic and those that aren't are in the process of being certified (it takes 3 full years to become certified!). The owner Stephen Cipes says "these grapes are happy guys, they're flourishing. Our wines are allowing nature to speak for herself." Sounds like a pretty neat philosophy for an industry so known for preservatives and chemicals!

While in the tasting room we tried a number of wines including some reds, whites and sparkling. Their sparkling wines have won international awards and they were up against some tough competition - including Champagne from France! My favorite wine was the 2006 Riesling. It was so unique tasting with notes of butter and coconut. The tasting notes on the website note the following:

"Features pronounced aromas of coconut, butter, and minerality. On the palate
citrus, star fruit, and crisp apple followed by a clean lingering finish."
I would definitely visit this winery again. I thought the prices were really reasonable when compared to the quality of the wine. If you get a chance to taste Summerhill wine, I would encourage you to do so - you won't be disappointed! If you're looking to purchase Summerhill wine, you can do so direct from the vineyard or in BC Liquor stores. Cheers!

9.8.10

Cherry Pie

I LOVE cherries! I think they're my favorite part of summer. But living in the city they can be a bit expensive to buy in large enough quantities to bake a pie. If you have a cherry tree in your backyard or know someone who does, consider yourself lucky and whatever you do, don't take it forgranted! You can imagine my excitement when my cousin who lives in the Okanagan, sent me home with a HUGE bowl of fresh cherries right off her tree. :) Of course I had to try making a cherry pie. I used a recipe from my Anna Olson cookbook - Fresh. Loved the recipe so much! Now I just need to perfect my pie making skills (I have only made one other pie before, so I have lots to learn!).


Cherry Pie

Recipe by Anna Olson, p. 86 in Fresh

Ingredients:

  • 2 1/2 cups all-purpose flour
  • 1/2 tsp fine salt
  • 1/2 cup cold, unsalted butter, cut into pieces
  • 1/2 cup cold vegetable shortening, cut into pieces
  • 2 tbsp lemon juice
  • 4-8 tbsp cold water

  • 6 cups pitted tart cherries, fresh or frozen
  • 1 1/2 cups sugar
  • pinch ground cinnamon
  • 1/4 cup cornstarch
  • 1 egg mixed with 2 tbsp cold water, for brushing
  • sugar and ground cinnamon for sprinkling

Method:

  1. For the crust, combine the flour with the salt. Cut in the butter and shortening until dough has rough, crumbly texture. Add lemon juice and 4 tbsp of the water and blend just until the dough comes together. If needed, add more water 1 tbsp at a time to bring the dough together. Divide the dough in half and shape into two disks. Wrap in plastic wrap and chill for 30 minutes.
  2. For the filling, bring cherries, sugar and cinnamon up to a simmer. Cook for 15 minutes, stirring often. Whisk cornstarch with 1/4 cup cold water and then stir it into the cherries. Cook until thickened, then remove from heat and let cool.
  3. Preheat oven to 400F.
  4. On a lightly floured surface, roll out one of the disks into a circle large enough to fit a 9-inch pie pan. Line the pan with pastry and trim th edges. Spoon cherry filling into the shell. Roll out the second piece of dough to fit on top and cut a 1-inch hole in its center. Brush pie with the egg wash and sprinkle with sugar and cinnamon. Place pie pan on a baking tray and bake 15 minutes. Reduce oven temperature to 375F and continue baking until the crust is a rich golden brown. Cool the pie for an hour before slicing.

The recipe turned out to be so delicious. I made it again a few weeks later, but I made a double batch of the filling. I made one pie with half of the filling and then used the other half of the filling to fill a chocolate cake! It was delicious. This pie filling would even be good to top vanilla icecream with. What are some of your favorite pie recipes? Would love to hear from you! In the meantime, happy baking!