Showing posts with label lime. Show all posts

13.8.12

Mango Lime Cheesecake

 I had originally planned to make this as part of the most recent Mom's Crazy Cooking Challenge, but didn't have time to get around to it in time for the posting date. My crazy study and exam schedule this summer has really been putting a damper on my blogging efforts! However, I finally got around to making this recipe and just had to share it with you! It's delicious, decadent and flavourful with such a lovely balance of flavours. You simply must try this cheesecake out. :)

I have heavily adapted the recipe from the cookbook No More Secrets - Recipes from the Cow Bay Cafe. Her recipe made a huge cheesecake and had a whole load of cream cheese in it. So I adapted it to be my version of her amazing recipe. The results were spectacular and you must try this recipe out and soon. You won't be sorry!


Mango Lime Cheesecake
Recipe heavily adapted from No More Secrets

Ingredients:

Crust:
  • 1 cup flour
  • 1/2 cup cold unsalted butter
  • 2 tbsp white sugar
  • 1 yolk from large egg
  • 1/2 tsp vanilla extract
Batter:
  • 3 x 250ml cream cheese (I used low fat)
  • heaped 1/2 cup white sugar
  • 3 large eggs
  • 1 can mango pieces, drained except for two tbsp of the juice
  • zest and juice from one lime
Topping:
  • 1 cup sour cream
  • 1/3 cup white sugar
  • zest and juice of 1 large lime
Method:
  1. Preheat oven to 350F. Line the bottom of a 9 inch springform pan with parchment paper.
  2. For the crust: place all crust ingredients in the food processor. Pulse until mixture comes together and is crumbly, but not clumping. Press the crust mixture into the bottom of the pan and a little way up the sides.
  3. For the batter: Place the cream cheese (cube it up) in the bowl of the food processor, add sugar, eggs, mango pieces and reserved juice, lime zest and juice. Pulse until the mixture is smooth. You may need to scrape down the sides a couple of times. Pour the batter over the crust, then put the pan on a cookie sheet and into the preheated oven. Bake for one hour. The cheesecake is done when it is light brownish around the edges, slightly puffed in the pan and a little wobbly when the pan is shaken gently. The top should be rather dull looking in the middle (if it's shiny, it is not done).
  4. For the topping, mix together sour cream, lime zest and juice until the sugar is well dissolved.
  5. Spread the topping mixture on the still-hot cheesecake and let cool to room temperature. Refrigerate for six hours.
This is one of the easiest cheesecakes ever! You don't have to fuss with a water bath because the topping hides cracks in the top and because you don't have to use a waterbath, you don't have to bake on such a low temperature (read - low temp takes forever to bake!!). Pretty rare to find a baked cheesecake that will be outta the oven in an hour! Try it out peeps, you'll love it.


What have you been up to lately? Anything exciting? Do share!! Until then, happy baking my friends!

19.12.11

SRC: Wives With Knives Lime Blueberry Scones

Hi All!  Hope your holiday preparations are going well. In addition to my usual holiday preparations, it is also time for December's Secret Recipe Club reveal for group C! Each month members are assigned another member's blog at random to choose a recipe from and make it and then on the reveal date, we reveal the recipe we selected and the blog we were assigned. It is a fun project, although, some months I feel more like stalker than blogger! All in good fun though. :)
Photo by Cathy at Wives with Knives (used with Cathy's permission)
This month I was assigned the blog Wives with Knives. And wow!! What a fabulous blog - so many beautiful pictures and delicious sounding recipes. My only regret is that December wasn't such a busy month for me - I would have loved to try a couple of recipes each week from this lovely blog. Cathy writes this lovely blog from Oregon (which also happens to be one of mine and my hubby's favorite vacation spots). She has lovely recipes - a good mix of sweet and savory, beautiful scenic adventure posts, and lots of interesting farmers market posts as well. It is a great mix that is sure to capitivate all readers who happen to drop by - if you haven't already happened upon her blog, do so ASAP! You are bound to find all kinds of inspiration there. :)


So - sad news - I took photos of these delicious scones that I made and my computer crashed and I lost my photos. I was near tears so hubby volunteered to do some recovery procedures with my dinosaur of a lap top tomorrow to see what he can rummage up. So, please keep your fingers crossed. I've shared a picture of my friend's lovely Christmas cards that she makes (see my previous post regarding Handmade by Sabana). I will update this post with food pics if hubby can recover, or when I have a chance to reperform the recipe later this week. Apologies to those of you visual foodies!!!  **UPDATE: I received a very kind email from Cathy at Wives with Knives with an offer that I could use one of her photos in order to get into the SRC list for the month. So, thanks Cathy for being so kind to me! :) :)

**UPDATE #2: I wasn't able to recover these photos, but I did rebake the recipe and get some of my own pictures. :) These scones were definitely appreciated a second time by my family! Mine aren't as pretty as Cathy's, but they definitely tasted delicious.

Here is the lovely recipe - I've only made some minor modifications to the recipe - mainly due to what I had on hand. :) This seems like a pretty versatile recipe, so feel free to play around with it.

Lime Blueberry Scones
Recipe minimally adapted from Wives with Knives

Ingredients:
  • 2 cups flour
  • 1 tbsp baking powder
  • 1/2 tsp salt
  • 2 tbsp sugar
  • 2 tsp lime zest
  • 5 tbsp butter, cold and cut into small cubes
  • 1 cup buttermilk
  • 1 1/2 cup frozen blueberries, thawed
Method:
  1. Preheat oven to 400 F. Sift dry ingredients into the bowl of a large food processor. Add lime zest and pulse to combine. Add butter and pulse until mixture resembles coarse crumbs. Pour in the buttermilk and pulse until mixture comes together. Pour mixture out onto counter and mix in the blueberries gently, folding and refolding the dough a couple of times to gently work the berries in without mashing them. Pat the dough into a square and cut into 12 squares.
  2. Place the scones on a baking tray lined with a piece of parchment paper. Brush with a bit of buttermilk and sprinkle with some sugar. Bake 15-20 minutes or until golden brown.

I hope you enjoy these scones, despite the lack of pictures. Please keep your fingers crossed for good ideas for recovery of lost pictures. Or if you have any suggestions, please feel free to pass them my way. Hoping for the best... or maybe this is just a hint telling me I need to make these again... they were pretty darn good.

Happy Reveal Day fellow group C'ers. Can't wait to check out your creations.

3.9.11

Lime & Blackberry Italian Meringue Pie


Always Competitive - I had to put my pie beside the picture on the magazine cover just to see how it compared!

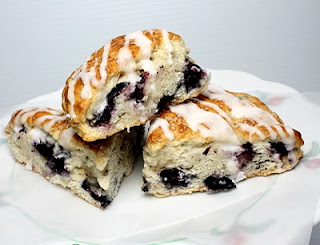
I'm so excited to share this pie with you! It tastes so amazing and just screams summer what with the beautiful fresh blackberries and the tart burst of lime that offsets the blackberries so nicely. This is like a traditional lemon meringue pie gone rogue! If you love summer desserts, you must try this one before the summer's beautiful bounty has disappeared from the market.

Blackberry compote placed in crust waiting to be covered over by creamy lime curd.
 This pie is a bit involved, but you can cut down on the effort by purchasing the pie crust if you want. I am a bit of a baking snob, so I wouldn't buy the crust, but don't worry, I won't judge if you decide to. :) There are four parts to this pie: the pastry crust, the lime curd, the blackberry compote and the italian meringue topping. In addition to being quite involved, you don't want to make this pie too long before you serve it - it is best served within three hours of making! But don't let that stop you - this pie is well worth the effort. It looks so impressive and artistic once it is put together and it tastes amazing!


The blackberry compote has been covered by delicious, creamy lime curd.

 So lets get started with the recipe. For the pastry I'm going to direct you to Anna Olson's pie crust recipe which I posted in my Cherry Pie blog post. This is my absolute favorite pie crust recipe and it is super easy to whip up in the food processor. Once you've whipped up your pastry - chill for one hour in the fridge, then roll out and fit into your pie dish and then chill for another half an hour. Next blind bake the crust. Here are the blind baking instructions:
  1. Preheat oven to 375F. Prick chilled pie crust in pie dish all over with a fork. Line crust with parchment paper and fill with dried beans or pie weights. Bake for 25 minutes. Remove from oven; lift out parchment and weights. Reduce oven temperature to 350F. Return to oven and bake, using fork to prick any bubbles that have formed and pressing down on them with back of fork, until crust is light golden brown, 20-25 minutes longer. Let crust cool completely. I made mine the night before and it worked out beautifully.
Artfully swirled italian meringue prior to browning to give it some colour.
The next component to make is the lime curd. This curd is so delicious you're just going to want to eat it by itself, but do try to save some because it does go really nicely with the blackberry compote!!

Lime Curd
Recipe from Bon Appetit Magazine - August 2011 Issue

Ingredients:
  • 1 cup fresh lime juice - juicing a bunch of limes can be a pain, but do use fresh lime juice because taste really matters here and bottled lime juice will not cut it.
  • 3 large eggs
  • 3 large egg yolks (save the whites - you can use them for the meringue)
  • 3/4 cup sugar
  • 1/2 cup unsalted butter, room temperature
  • 1/2 tsp unflavored gelatin
  • 3/4 cup chilled heavy cream
Method:
  1. Set a strainer over a medium bowl and set aside. Stir the lime juice, eggs, egg yolks, and sugar together in another medium bowl. Set bowl over a large saucepan of gently simmering water (do not allow bottom of bowl to touch water). Whisk until the mixture has thickened, the whisk will leave a path when lifted from curd, and thermometer will register 175F (approximately 15 minutes).
  2. Add butter to curd, one tbsp at a time, whisking to blend between additions. Strain curd into prepared bowl. Press plastic wrap directly onto surface of curd. Chill until cold, about 2 hours. This part can be done up to two days ahead. Refrigerate curd.
  3. Sprinkle gelatin over 2 tbsp water in a small bowl; let stand until gelatin is soft, about 10 minutes. Using an electric mixer, beat cream until soft peaks form. Add gelatin mixture; continue beating cream until just before firm peaks form. Fold whipped cream into lime curd. Cover and chill until ready to use.


Fresh blackberries nestled around creamy, light italian merinuge.

 Next up, make the blackberry compote. When I make this recipe again, I will likely reduce the amount of liquid in the compote - I found it to be quite runny in the bottom of the pie. The other option is to reduce the compote quite a lot until very syrupy  prior to folding in the blackberries. Either way, the taste is great, it just didn't set up as nicely as I had hoped.

Blackberry Compote
Recipe from Bon Appetit Magazine - August 2011 Issue

Ingredients:
  • 1 cup fruity red wine, such as Shiraz or Cabernet Sauvignon
  • 1/2 cup sugar
  • 3 cups blackberries (about 1 1/2 pints)
Method:
  1. Bring red wine, sugar, and 1/2 cup water to a simmer in a medium saucepan over high heat; reduce heat to medium and simmer until reduced to 1/2 cup, about 20-25 minutes (mine took considerably longer). Let cool.
  2. Add three cups berries; fold gently to coat.
  3. Spread compote in an even layer over baked crust. Spoon lime curd over berries, smooth top and chill for one hour.

Beautiful toastey meringue topping.
 Are you tired yet? You're in the home stretch - you just need to make the meringue and assemble the pie now. You can do it!! Its worth it. :)

Italian Meringue
Recipe from Bon Appetit Magazine, August 2011 Issue

Ingredients:
  • 3 large egg whites, room temperature
  • 1 cup sugar
  • 2 tbsp corn syrup
  • 1/8 tsp kosher salt
  • 1 cup blackberries (1/2 a pint)
Method:
  1. If toasting the meringue in the oven, preheat the oven to 450F (I toasted mine in the oven to get a beautiful light brown colour on the meringue, then removed from the meringue and torched areas of the meringue to give it additional colour and depth to the toastiness!!).
  2. Place egg whites in the bowl of a stand mixer fitted with a whisk attachment. Beat whites in mixer until soft peaks form. Set aside. Stir sugar, corn syrup and 1/4 cup water in a medium saucepan over medium-low heat until sugar has dissolved. Attach a candy thermometer to side of pan. Increase heat to medium-high and boil without stirring, occasionally swirling pan and brushing down sides of pan with a wet pastry brush, until thermometer registers 238F, 6-8 minutes. Remove pan from heat.
  3. Meanwhile, beat whites in mixer until soft peaks form. Beat in salt.
  4. Slowly pour hot sugar syrup down side of bowl into whites and beat until meringue is firm and glossy. Continue beating until cool, about 4 minutes. Spoon meringue over curd, leaving a 1" plain border, and sculpt/ swirl decoratively. Tuck 1 cup berries in and around meringue.
  5. Bake pie until meringue is toasted in spots, 3-5 minutes. Watch it carefully because it can burn very quickly. Chill for 30 minutes before serving.
 Whew! What a lot of work! I brought it to a summer bbq and it was very well received. I hope you enjoy it too. Do you have some exciting plans for the last weekend of summer? Hubby & I are heading kayaking tomorrow and keeping our fingers crossed for another beautiful day of sunshine.

 Happy Baking my Friends!

16.6.11

Vanilla Cake filled with Grapefruit & Lime Curd

Did I drown my sorrows in cake yesterday after our beloved Canucks got their butts kicked in the Stanley Cup final? Sadly no! I ate pizza and pouted on the couch while my team succumbed to Boston's superior play.

Any way... I'm done pouting now and thought I would share this delicious cake with you! I made it quite some time ago and have been meaning to post about it, but its a bit more involved post so I've been putting it off. Don't mind the awful photos... it was late at night when I finished this, so the lighting is terrible and I didn't get any photos the next day, so you'll have to bear with me!

First off, make the grapefruit & lime curd. Use this recipe and substitute fresly squeezed grapefruit juice and lime juice (3:1 proportions). Use the larger quantity of sugar because grapefruit is quite bitter. You may also want to double the recipe to ensure you have enough to fill the cake! Let the curd cool and set while you bake the cake.


Snow White Cake

Recipe Adapted from Mennonite Cookbook


Ingredients:


  • 1/2 cup butter

  • 2 cups sugar

  • 3 cups flour

  • 2 tsp baking powder

  • 1/2 tsp salt

  • 1 cup milk (plus extra to thin the batter to a reasonable consistency)

  • 1/2 tsp lemon extract

  • zest of one lemon

  • zest of one lime

  • 4 egg whites

Method:


  1. Lightly grease cake pans (makes 3 8" cakes) and line with parchment paper. Preheat oven to 350F.

  2. In a large bowl blend butter and sugar. Sift dry ingredients together in a separate bowl. Add alternately with the milk to the first mixture. Add milk as desired to thin out the batter (I added about an extra 3/4 of a cup). Add zest and lemon extract. In a separate bowl, beat egg whites to stiff peaks and fold into batter. Pour into prepared cake pans.

  3. Bake until a toothpick or cake tester comes out clean.

  4. Cool cakes completely.

  5. Fill with grapefruit-lime curd (recipe above).

  6. Ice with vanilla buttercream recipe found here.

I'm not going to lie... this is a fairly involved undertaking, but it sure is delicious! I received a lot of compliments from my co-workers and I really enjoyed the cake too. I wasn't entirely happy with the icing job... I tried out a new technique that I had seen over at I am Baker but mine sure didn't look as good as hers. She is the ultimate cake decorator. Check out her blog to see some of the most beautiful cakes and desserts you've ever seen. You'll be in awe... I swear!


You'll love this cake if you decide to try it... even just make the grapefruit-lime curd! Its delicious. You won't be disappointed, I promise.


Oh, and one other thing I wanted to say. For those of you who don't live in Canada or Vancouver, please know that we aren't all like those awful people last night who instigated that horrible riot over a hockey game. Most of us are normal people who love a good hockey game, but would never go to extremes like that to ruin such an exciting event for everyone else. I hope seeing those awful acts won't deter you from visiting or make you think bad things about us.


Happy Baking my Friends!

14.6.11

The Ultimate Chicken Wings with Curry-Lime Butter

Looking for a quick and easy appetizer recipe with a bit of gourmet flair? Try this recipe for Chicken Wings with Curry-Lime Butter! You could also serve the wings with some rice and salad and you'd have yourself a nice and easy week night dinner! This recipe makes a lot of chicken wings - like enough to feed an army, but the good news is that the recipe is easy to half so feel free to give that a try if you don't want to be eating a million and one chicken wings in one sitting.

This recipe is from Tyler Florence's book Tyler's Ultimate. He has so many delicious recipes... and one of the best parts is how he always opts to use really fresh, not-processed ingredients. It always makes me feel so great to know that the ingredients I'm putting in my food aren't full of processed chemicals and preservatives.

The Ultimate Chicken Wings with Curry-Lime Butter
Recipe from Tyler's Ultimate

Ingredients:


  • 4 lbs whole chicken wings

  • extra-virgin olive oil

  • kosher salt and freshly ground black pepper

  • 1/2 cup unsalted butter, softened

  • 2 tsp thai red curry paste

  • zest and juice of one lime

  • 1 tbsp honey

  • splash of soy sauce

  • cilantro leaves for garnish

Method:


  1. Preheat the oven to 425F.

  2. Rinse the wings under cool water and pat dry. Put the wings in a bowl, drizzle with olive oil, season well with salt and pepper, then toss to coat. Spread the wings out on a baking sheet and roast for 25-30 minutes, until the skin gets crisp and brown and the meat is tender.

  3. While you wait, throw the butter, curry paste, lime zest and juice, honey and soy sauce into a blender or food processor. Season with salt and blend to mix. Scrape the curry-lime butter into a big bowl. When the wings come out of the oven, slide them right into the bowl with the butter. Give them a toss to coat them evenly and you're done. Scatter the cilantro leaves on top and serve.
And its that easy to have deliciously flavoured chicken wings not from a box or a restaurant! These wings have such a unique and delicious flavour, I promise you won't be disappointed. I hope you enjoy this recipe as much as I did! I can't wait to make it again.

Happy Cooking my Friends!


15.5.11

Lemon Lime filled Coconut Cupcakes with Coconut Icing

Excuse me while I try to stop drooling over these cupcakes long enough to finish this post! These cupcakes were super delicious. Probably the best cupcakes I've ever made! The inspiration came from a friend's blog, Lizardbreath Creations , a month or so ago. She made lemon-lime curd and homemade coconut bread and served the two together! How brilliant! So I made the coconut bread recipe and instead of baking it in a loaf pan as directed, I baked it in cupcake pans. I filled the cupcakes with the lemon-lime curd and topped with a simple buttercream flavoured with coconut. You honestly can't go wrong with this one!


Make the lemon-lime curd first. You will have to cook it and let it cool and set before using it to fill the cupcakes. You can find the recipe here - I followed the recipe exactly using the smaller quantity of sugar. You don't want the curd to be too sweet because the cupcakes + the icing are sweet enough already. You want something a little bit tart to balance out the sweetness.


Next up bake the cupcakes. Let them cool completely before attempting to pipe the curd into the middle of them though. It will be tough to wait that long; trust me, I speak from experience.


Coconut Bread (in cupcake form)


Recipe adapted from Lizardbreath Creations


Ingredients:


  • 1 cup shredded coconut, sweetened

  • 2 cups all-purpose flour

  • 1/2 cup granulated sugar

  • 1/4 cup packed brown sugar

  • 1 tbsp baking powder

  • 1/4 cup vegetable oil

  • 1 cup unsweetened coconut milk

  • 1 egg

  • 1 tsp vanilla

Method:


  1. Preheat the oven to 350F. Prepare muffin tins by lining with paper liners.

  2. Sprinkle a little of the shredded coconut in the bottom of each cupcake liner.

  3. Mix the coconut, flour, sugars, and baking powder in a large bowl.

  4. In another bowl add the oil, coconut milk, egg and vanilla. Mix together well.

  5. Add the wet ingredients to the dry and mix until just incorporated. Pour into the prepared muffin tins. Bake until a toothpick inserted in the center comes out clean (start with about 12-15 minutes).

  6. Cool cupcakes for 10 minutes in the pan, then transfer to a wire rack until cooled completely.

  7. Once cooled completely, with a sharp knife cut a small tunnel into each cupcake and then pipe full with lemon curd. Pipe coconut icing liberally onto each cupcake in order to cover the hole where the curd was piped in.

For the icing I just dumped ingredients into my mixer bowl without measuring (bad me) and tasted until it was yummy. If you are one of those measuring types, feel free to use this vanilla icing and instead of the vanilla extract, add coconut extract.


Happy Baking my Friends! Hope you're ready for another busy week.

12.3.11

Blackberry Avocado Salad

This has been a really eventful week for most people around the world. Sad and scary with the earthquake and tsunami that hit Japan and the tsunami that hit other areas after rippling out from Japan. My heart goes out to the many people affected by this horrible tragedy - those living in Japan and those with family and friends in Japan. What a scary and stressful time for them. I am really touched the by the aid and fundraising efforts that started so quickly and will continue to provide support to Japan when they need it the most. The devastation and wreckage there is absolutely unreal, looking at photos and video footage makes it all the more real and all the more unnerving. My thoughts and prayers go out to those in need and those who are worried about their friends and family who may have been lost in the wreckage.


In light of the seriousness and stressfulness of the week, I thought sharing a simple and light salad with you would be fitting. As many of you are likely consumed with worry and sadness, this salad is quick to whip up, and will provide you with much needed nourishment to keep you strong and on top of things. This salad is delicious and definitely has a spring feel to it.
Blackberry Avocado Salad
Recipe from Anna Olson


Ingredients:
  • 8 cups arugula or other mixed baby greens
  • 1 ripe (but not too soft) avocado, sliced
  • 1 pint of fresh blackberries
  • 1/2 cup feta
  • juice of 1 lime
  • good quality extra virgin olive oil
  • kosher salt
  • fresh ground black pepper

Method:

  1. Wash and dry lettuce and place in a pretty bowl. Fan out the sliced avocado artfully on top of the greens and sprinkle with the blackberries and crumble the feta on top. Juice the lime over the salad, sprinkling evenly with the lime juice. Drizzle lightly with the olive oil and season to taste with salt and pepper.

I told you it was easy! And it tastes amazing - the fresh flavours really come out and the lime juice keeps the avocado from turning brown. You will love this salad and hopefully it's simplicity brings a little joy to your life in such a sad and trying time.


To all of you affected by this horrible tradgedy, my thoughts and prayers are with you. May you find your loved ones and feel a sense of peace in such a tough time.

Happy Cooking my Friends! Hugs to you all.