Showing posts with label easy. Show all posts

16.9.13

Chewy Brown Sugar Coconut Cookies


Summertime is all about desserts and treats that show off the beautiful bounty of produce we have available to us! Beautiful, juicy strawberries, raspberries, cherries, peaches, etc. But as the weather cools down and fall arrives, I crave something a little heavier and comforting. Enter freshly baked cookies! The oven warms your house a bit as you bake them and that homey, delicious smell is so comforting and satisfying. Today I have an awesome cookie recipe for you! Its a twist on the classic chewy gingersnap cookie - it is a brown sugar-molasses cookie made with coconut oil. I doubled the batch and it didn't even last the afternoon in our house. They're soooo yummy!

My sister found this recipe on Averie Cooks. She has a great website full of amazingly delicious sounding recipes. This is the first one I've tried, but it sure won't be the last. Pop over and check out her blog - I'll still be here when you get back!

Chewy Brown Sugar Coconut Cookies
Recipe minimally adapted from Averie Cooks

Ingredients:
  • 1/2 cup coconut oil
  • 1 cup dark brown sugar, packed
  • 1 large egg
  • 2 tbsp vanilla
  • 1 tbsp unsulphered mild molasses
  • 1 3/4 cup all-purpose flour
  • 2 tsp corn starch
  • 1 tsp baking soda
  • 1/4 tsp salt
Method:
  1. Place coconut oil and brown sugar in the bowl of a stand mixer. Beat on medium high til combined. Add egg and beat until light and fluffy - about 4-5 minutes. Scrape down sides of bowl, add vanilla and molasses. Beat to incorporate - 1-2 minutes. Add flour, cornstarch, baking soda and salt. Mix until just combined.
  2. Using a medium cookie scoop, form mounds that are approximately 2 heaping tbsp. Place dough mounds on a large plate and chill in fridge for 20 minutes - 2 hrs (the longer you chill, the less the cookies will spread. I chilled mine for 20 minutes).
  3. Preheat oven to 350F. Line baking sheet with parchment paper. Place dough on prepared cookie sheet leaving 2 inches in between. Bake for 8-10 minutes or until tops have just set. Even if the cookies are slightly undercooked, pale and glossy in the center - they will firm up as they cool.
  4. Allow cookies to cool on baking tray for 5-10 minutes before moving.


Yep, thats it! I love the short ingredient list for this cookie recipe! Majority of the items are pantry basics! Gotta love a recipe like that hey?!
Check out Averie's blog for many more versions of this recipe as well (note some involve nut butter, cookie butter, white chocolate etc). Be creative and mix it up! I love the coconut oil and heavy dose of vanilla in this recipe though!
Happy Baking my Friends!

26.8.13

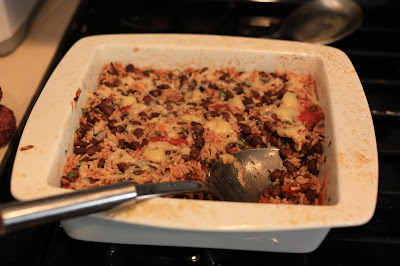
Black Bean and Brown Rice Casserole


Monday always seems to roll around far too quickly, but this week I'm happy to see it arrive - it means I'm that much closer to leaving on vacation on Friday! Woohoo! I seriously can't wait for a break from work and real-life responsibilities. Despite the anticipation I have for this week to begin and pass by, Monday still comes with the reality of needing a quick, nourishing meal to whip up for hubby and I after work. This Black Bean and Brown Rice Casserole is just thing! Comes together in under half an hour, its super healthy and oh so flavourful.

Black Bean and Brown Rice Casserole
Minimally adapted from Thrifty Veggie Mama

Ingredients:
  • 2 cups cooked brown rice (about 1 cup uncooked)
  • 2 cans black beans, rinsed and drained
  • 2 cloves garlic, minced
  • 1/4 cup cilantro, chopped
  • 1 can stewed tomatoes with basil (you may want to squish the tomatoes to break them up a bit)
  • 1/2 tsp salt
  • 1/2 tsp black pepper
  • 2 tsp chili powder
  • 2 tsp cumin
  • 1/4 cup applewood smoked cheddar, shredded
  • hot sauce to serve
Method:
  1. Combine all ingredients except the cheese and hot sauce and place in an 8x8 inch pan. Top with cheese.
  2. Bake at 400F for 15 minutes or until cheese is melted. Drizzle with hot sauce to serve if desired. Sour cream would also be delish!


A super simple recipe that comes together so quick on a rushed weeknight. Hope you enjoy this as much as we did... leftovers disappeared quickly in our house!

Happy Cooking my Friends!

11.8.13

Nutella Banana Smoothie


Yesterday was such a beautiful and sunny day here in Southern British Columbia! We have been so blessed to have such a beautiful July and I hope this amazing weather continues through August as well! When the weather is this warm, we usually wait until later in the evening to walk the dog so he doesn't get overheated (and maybe so we don't get overheated too!!). After we went for our dog walk, I was craving something cold and creamy... something that was refreshing but could also substitute as dessert. After a quick check of what I had on hand, I came up with the idea for a Nutella Banana Smoothie! It is mostly dairy-free except for the small amount of dairy in the Nutella. You could substitute one of the dairy free nut butters or spreads for a truly dairy free beverage though (note I haven't tested this option though, so I'm not sure how it will taste).


Nutella Banana Smoothie
Recipe by A Tale of One Foodies Culinary Adventures

Ingredients:
  • 1 banana
  • 2 tbsp. Nutella
  • 6-8 ice cubes (add more if your smoothie isn't thick enough)
  • 1/4 cup coconut milk
  • 1/4 cup almond milk (or more if your smoothie is too thick)
Method:
  1. Combine banana, Nutella, coconut milk and almond milk in blender. Blend until smooth. Add ice cubes to blender a few cubes at a time blending until smoothie reaches desired thickness. Top with dairy free whipped topping if desired & enjoy!

I love how quickly this smoothie came together and it literally tasted like a decadent milkshake! I can tell this is going to become a regular beverage in our house. What is your favorite kind of smoothie to make? Feel free to share your favorite recipe or flavour in the comments below!

Cheers!

28.7.13

Blueberry Mint Sparklers

 
Hey Friends! How is your summer going so far? I can't believe we're already at the end of July! Time is flying faster than ever it seems. Summer here has been unusually hot, sunny and dry! Which has been an amazing change. In the midst of this unusual heat though, I along with many others I know have been searching for delicious, refreshing summer beverages to make that are easy and don't take too long to whip up! (because when you're thirsty and in need of a drink, you don't want to wait all day)
 
Last weekend my sister and I were browsing through the July/August 2013 issue of Everyday with Rachael Ray and we found Blueberry Tarragon Sparklers - they looked delicious and sounded super easy to whip up. So we decided to give them a try.
 
I headed off to the grocery store with a very short list of ingredients to purchase and when I got to the produce section to look for tarragon, the fellow working in the store politely informed me they hadn't carried fresh tarragon in oh, about ten years. Say what?? So quick thinking coupled with my strong desire not to have to try every grocery store in the area resulted in me picking up a container of fresh mint instead. What a success!! These drinks were lovely!
 
Without further delay, here's the yummy recipe.
 
Blueberry Mint Sparklers
minimally adapted from Everyday with Rachael Ray
 
Ingredients:
  • 1/2 cup fresh blueberries
  • 1/4 cup honey
  • 2 tbsp. fresh mint leaves
  • ice
  • 1 bottle sparkling white wine (I used Yellow Tail Bubbles)
Method:
  1. In a small saucepan, bring blueberries, honey, mint and 1/4 cup water to a boil over medium-high heat. Stir until honey dissolves, about 3 minutes. Remove from heat and muddle blueberries and let stand for 20 minutes. Strain and place in refrigerator until chilled.
  2. To serve, spoon 1-2 tbsp. of blueberry syrup into 4 glasses. Add ice, then pour sparkling wine over top. Stir. Garnish with more fresh mint and blueberries.
Super easy, refreshing and delicious!
 
Cheers to the rest of our summer being just as fantastic as the first half.

15.7.13

Lentil & Chickpea Curry

 
Happy Monday friends! I hope you had a fantastic weekend. I sure did! It was filled with yoga, spa time, and relaxation in the sun with a great book. And lets not forget some awesome time spent with some really good friends. All in all such a great weekend.
 
Today I've got such a great recipe to share with you! It makes a huge batch (for super cheap) but its so good you won't mind eating it all week like I did last week. The leftovers are almost better than the night you make it.


I found the recipe for Lentil & Chickpea Curry on this great blog called Sweet Sugar Bean written by a sweet gal from Saskatchewan. Since Saskatchewan is one of the world's largest producers of lentils, I figured Renee must know a thing or two about how to prepare them in a delicious, healthful way. I made a couple modifications to the original recipe, but by and large I stayed pretty true to the original.

 Lentil & Chickpea Curry
Minimally adapted from Sweet Sugar Bean

Ingredients:
  • 3 tbsp. olive oil
  • 1 onion, diced
  • 3 cloves garlic, minced
  • 2 tbsp. fresh ginger, grated
  • 2 medium carrots, diced
  • 3 tbsp. medium indian curry paste
  • 1/2 tsp cayenne pepper
  • 2 tsp cumin
  • 1 tsp coriander
  • 1 1/2 tsp sea salt
  • 1 540ml can diced tomatoes
  • 1 540ml can coconut milk
  • 1 cup red lentils, rinsed thoroughly and picked through
  • 1 540ml can chickpeas, drained and rinsed
  • 3 tbsp. honey
  • 2 cups cauliflower florets
  • 1 cup frozen peas
  • vegetable stock
  • handful of cilantro, chopped
  • plain yogurt
  • hot sauce
(Seems like a long ingredient list right? I know, I know... but the great thing about this recipe is a) you likely have more than half of this on hand already and b) the above listed ingredients are super cheap to buy and this recipe makes about a billion servings...)

Method:
  1. In a large pot, heat the oil over medium heat. Add the onion and cook til soft, about 5-8 minutes. Add garlic and ginger and stir til fragrant. Add the curry paste, carrots, spices and salt. Stir well and cook for a couple of minutes.
  2. Stir in tomatoes, coconut milk, lentils, chickpeas and honey. Bring to a boil then reduce heat to medium-low to maintain an active simmer. Stir every ten minutes or so until lentils are cooked through (this takes approximately 40 minutes).
  3. Once lentils are cooked, stir in cauliflower and peas. Cook til cauliflower is tender. If curry is too thick, add some veggie stock or water to thin it out. Stir in cilantro and adjust seasonings if necessary.
  4. Serve topped with a dallop of yogurt and a few drops of hot sauce if you like it spicy. Some home made naan takes this meal over the top.


Happy Cooking my Friends! Hope you enjoy this one.

6.7.13

Pineapple Fried Quinoa


Okay, so maybe the above pictured dish doesn't look all that appetizing... I believe one of my FB friends exact words were "this looks like something my cat would throw up". Thanks for that my darling friend! But in all seriousness, this isn't a pretty, stunning dish to make for your dinner party guests, but its a quick delicious and healthy weeknight dinner that will leave you with leftovers to eat for lunch the next day.
 
This dish is like fried rice, but with quinoa! I've also lightened it up, so its miles healthier for you than your typical fried rice.
 
Pineapple Fried Quinoa
Recipe adapted from  Allrecipes.com
 
Ingredients:
 
  • 1 cup uncooked quinoa
  • 2 cups chicken broth
  • 1/2 cup water
  • 2 eggs, beaten lightly
  • 2 tsp sesame oil
  • 5 cloves garlic
  • 1 cup diced pineapple
  • 1/3 cup finely chopped fresh cilantro
  • 1/4 cup soy sauce
  • 1/2 tsp red pepper flakes (adjust depending on heat preferences)
Method
  1. Place quinoa, chicken broth and water in a medium sized saucepan and bring to a boil. Cover and reduce heat to low and simmer for 20-25 minutes or until quinoa is tender and liquid has been absorbed.
  2. In a large skillet over medium heat, add eggs and scramble til cooked through. Remove from pan and set aside.
  3. Add sesame oil to skillet then add minced garlic and cook til fragrant - this will only take about 30 seconds. Add pineapple and stir for a few minutes. Next stir in cooked quinoa, eggs, cilantro, soy sauce and red pepper flakes. Garnish with more cilantro and a drizzle of hot sauce if desired.
 
Quick and easy - you can have a week night dinner on the table in 30 minutes! A bonus is that is tastes delish and is super healthy for you too. For you meat lovers, add some cooked chicken or shrimp to this dish.
 
To make this dish vegan - omit the eggs and use tamari instead of soy sauce.
 
Happy Cooking my Friends!

15.6.13

Easy & Healthy Iced Tea


The weather is really starting to heat up around here - a sure sign summer is finally here! With the increase in the temperature, I've been on the lookout for some refreshing summer drinks that aren't full of calories. I noticed they're hard to find! So I decided to make my own iced tea!


I headed down to my local farmers market and found a booth selling some delicious tea and picked out cream of earl grey and cream of blueberry. Both sounded lovely to me, but you can really use any tea you want! Try to use high quality tea to avoid bitterness in your tea.


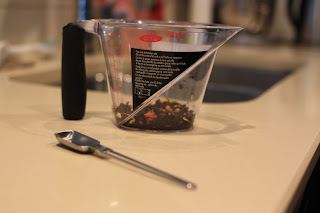
To make your iced tea - place 6 tsp of loose tea in a liquid measuring cup. Pour 1 1/2 cups boiling water over top and steep for five minutes. Don't steep for any longer or your tea will get bitter. Meanwhile, fill a pitcher 1/4 full with ice cold water.


 Once your tea is finished steeping, strain the mixture - putting the tea liquid into your prepared pitcher and discarding the tea. Fill the pitcher to the top with cold water. Serve tea over ice and garnish with slices of citrus fruits - I used lemons and oranges, but lime or grapefruit would be good too depending on the type of tea you're serving. I didn't need to sweeten mine, but if you must - sweeten it with honey!

This is such a simple, delicious and healthy alternative to other sugar-laden beverages we associate with summer. Give it a try - you might be surprised how delicious and refreshing it tastes!


 What's your favorite summer beverage that is easy on your waistline while still being refreshing?

Cheers!

19.11.12

Peanut Butter RIce Krispies for SRC

I had a crazy weekend with some very unexpected and exciting news! I can't share details with you yet, but this news totally threw off my plans to tackle my SRC assignment on Sunday as I had originally planned to. It completely slipped my mind and I'm so sorry because I was assigned such a fantastic blog this month!!!


I was assigned Cook with Sara. I chose to make the rice Krispy squares but opted to use a slightly different flavor profile with peanut butter and chocolate rather than the caramel chocolate combo she used. Both I'm sure would be fantastic! Check out the recipe here


I chopped up mini peanut butter cups (approx 1 cup chopped) and stirred them into the Rice Krispies. Then I drizzled the bars with melted peanut butter (1/4 cup) and chocolate (1/4 cup). They were soooo good!

Thanks Sara for the delicious recipe and the many more recipes that I can't wait to try (check out the Cappuccino Crinkles - they're next on my list!!). I apologize for the lateness of my post!


Happy Baking my Friends!


10.11.12

Chocolate Espresso Peanut Butter Chip Cookies

 
A couple weeks ago I was supposed to bake dessert for a cocktail party I was attending - I had planned a couple of delicious show stoppers. The were 1) Chocolate coconut rounds and 2) Marshmallow topped peanut butter pretzel squares. I baked them both the day of the party and as I was portioning them into mini cocktail sized portions, I decided I didn't like how either of them presented, or tasted. So, now with only 1 1/2 hours to finish getting myself ready and find another dessert option, I had to think and do quickly - off to pinterest I went. I found these chocolate espresso brownie cookies, but I didn't have time to get to the store to buy the ingredients I needed, so I made due. Lo and behold, they turned out amazing and were a total hit. Who knew such a simple and easy cookie could be such a superstar. Make these and be prepared to want to eat the whole batch!! They're that good!
 
 
 Chocolate Espresso Peanut Butter Chip Cookies
Recipe minimally adapted from Just a Taste

Ingredients:
  • 3 oz unsweetened chocolate
  • 1 cup semi sweet chocolate chips
  • 1 cup peanut butter chips
  • 8 tbsp butter
  • 3 large eggs
  • 1 cup plus 2 tbsp sugar
  • 2 tsp instant coffee granules
  • 1 cup flour
  • 1/3 tsp baking powder
  • 1/4 tsp salt
Method:
  1. Preheat oven to 350F.
  2. Combine unsweetened chocolate, semi sweet chocolate chips and butter in a microwave safe bowl. Microwave on low heat, stirring at 30 second intervals until melted and smooth. Set aside.
  3. In the bowl of a stand mixer combine the eggs, sugar and coffee granules on high speed until smooth and very thick - about 3 minutes. Slowly add the chocolate mixture to the bowl, whisking until just combined.
  4. Turn off stand mixer and add flour, baking powder and salt to the bowl. Stir until just combined. Add peanut butter chips and stir until just combined.
  5. Place scoopfuls of batter onto parchment lined baking sheets leaving approximately 2 inches in between them. Bake in preheated oven for 15 - 18 minutes or until cookies are puffed. Do not overbake - if in doubt, underbake. Let sit on baking sheet for 2 minutes before transferring to wire rack to cool completely.


Hope you are having a fantastic weekend! I know I am! The sun is shining, I've had a chance to do some baking and some shopping so life is good. To those of you Canadians reading this, be sure to take the time to pause and remember those soldiers who fought and lost their lives for our freedom tomorrow on Remembrance Day. They made it possible for us to have many freedoms not enjoyed by people in all areas of the world and as such, we owe them tribute for their selfless acts. Lest we forget.

Take care and enjoy the rest of your weekend.

Happy Baking my Friends!

20.8.12

Chocolate Peanut Butter Chip Cookies for SRC!


Hi Friends! Its time for Secret Recipe Club's Group C reveal again and you know what that means - I get to try out a new recipe from a new blog! This month I was assigned Erin's blog (yep, we have the same name) Making Memories with your Kids. I decided to make her Chocolate Pastel Mint cookies, but I didn't have mint chips, so I substituted peanut butter chips on top, plus I added some to the dough as well (because you can never have enough PB chips right?!). The cookies were a huge hit with my family!


Lets get right down to business, here's my version of the recipe (the only changes I made were to use PB chips instead and add some to the dough as well.

Chocolate Peanut Butter Chip Cookies
Recipe minimally adapted from Making Memories with your Kids

Ingredients:
  • 1 cup sugar
  • 1/2 cup butter, at room temperature
  • 1 egg
  • 2 tsp vanilla
  • 1 1/2 cups flour
  • 1/2 cup dutch process cocoa powder
  • 1/4 tsp baking soda
  • 1/4 tsp baking powder
  • 3/4 cup peanut butter chips + extra for topping the cookies with
Method:
  1. Preheat oven to 350F.
  2. In the bowl of the stand mixer, cream together butter and sugar until smooth and fluffy. Add egg and vanilla and mix until well combined.
  3. Add flour, cocoa powder, baking soda & baking powder. Mix until just combined. Add in peanut butter chips until just combined.
  4. Roll cookies into 1 inch balls and place on an ungreased cookie sheet. Bake in preheated oven for 12 minutes or until just set (don't over cook them or they will be dry). Remove from oven and immediately top with 5-6 more peanut butter chips, pressing into the soft cookies slightly.


Thats it! Easy to  make, basic ingredients and only dirties one bowl! Whats not to like? Thanks Erin for a fantastic recipe. :)

18.6.12

Pistachio Cranberry Icebox Cookies for SRC!


Hi Everyone! Thanks for stopping by to check out this month's Secret Recipe Club's Group C reveal. Its pretty much one of the best days ever - its when we get to reveal our top secret blog assignment for the month and our selected recipe from that blog. :) If you're interested in learning more about SRC or joining, check out what its all about here.


This month, my assignment was The World in my Kitchen written by Mindy. Mindy is from Kentucky, but she has lived and traveled to many different places over the years. Her blog is a great testament to the different places she has lived and she has so many cool recipes to share. You've got to stop by and check if out if you haven't been there before. I can't wait to pop back over there and make some more of Mindy's recipes given the wild success of the one I selected for SRC.


I made the Cranberry, Pistachio Icebox Cookies - they were so perfect because they're easy (and not at all finicky) and they used ingredients I already had in my pantry (woot!). Mindy had a really cute story about how these cookies pulled her out of a string of unsuccessful cookie baking attempts, so I knew the recipe must be a winner. And it was! You've got to try it out ASAP. :D


Cranberry, Pistachio Icebox Cookies
Minimally adapted from The World in my Kitchen

Ingredients:
  • 1 1/2 cups flour
  • 1 tsp vanilla extract
  • grated zest of one lemon
  • 1/4 tsp salt
  • 3/4 cup unsalted butter, softened
  • 1/4 cup sugar + 2 tbsp for sprinkling
  • 1/2 cup shelled pistachios, roughly chopped
  • 1/3 cup dried cranberries, roughly chopped
  • 1 egg, lightly beaten
Method:
  1. Stir together the flour and the salt in a small bowl.
  2. Beat together the butter, lemon zest, vanilla, and 1/4 cup of the sugar about 3 minutes (or until pale and fluffy). Reduce speed to low and add flour mixture in three separate additions, mixing well after each addition. Mix until dough starts to come together in clumps. Add pistachios and cranberries and stir til evenly distributed through dough (it will be very crumbly still).
  3. Gather and press dough together and divide into two equal portions. Using a piece of plastic wrap, gather and form each piece into a log (about 1 1/2 inches in diameter). Chill, wrapped tightly in plastic wrap until firm - minimum two hours, but up to three days.
  4. Once chilled, preheat oven to 350F and line two large baking trays with parchment paper.
  5. Brush egg over the log covering all surfaces except the two ends of the log. Sprinkle liberally with remaining two tbsp of sugar (or use turbinado sugar).
  6. Slice each log into 1/4 inch rounds and place on the prepared cookie sheets. Bake in preheated oven for about 15 minutes, or until edges are lightly browned. Cool completely on a cooling rack.
 And thats it! These are super easy and they taste delicious. They also look great because of the beautiful colours added by the pistachios and cranberrys. Thanks Mindy for such a lovely recipe. Can't wait to try out many more. :)

This post has been linked up with Whatcha Bakin Wednesdays over at Cajun Sugar Pie. Head over and check out what other mouthwatering desserts other bloggers have come up with this week.

15.5.12

Tiger Butter Fudge


If you stop by regularly, you may have noticed I haven't been blogging a whole lot. Well, thats because I haven't been baking or cooking much the last little while. I try to make a couple things on the weekend and make sure they hit the blog, but I'm definitely not posting as often as I would like to. But that being said, I'm trying to make sure the things I actually do post are special and extra delicious. This recipe, is extra special and extra delicious. Trust me. You've just gotta make it!


 I found inspiration for this recipe on Pinterest (surprise, surprise!!)!! Come follow me! I LOVE new followers. The original recipe came from Bakers' Royale who I've heard a lot about in the blogosphere, but never really stopped by to check out the recipes... well, that was a mistake! I will most definitely be frequenting Naomi's blog in the near future for other inspiration and recipes to try. Check it out if you get a chance - I guarantee you'll be drooling after only a couple minutes.


Tiger Butter Fudge
Recipe adapted from Bakers' Royale

Ingredients:
  • 1 can sweetened condensed milk, portioned in half
  • 10 peanut butter sandwich cookies (I used Pirate brand)
  • 1 cup white chocolate chips
  • 2 tbsp butter
  • 1 cup peanut butter chips
Method:
  1. Prepare a rectangle loaf pan by lining with tin foil. Divide the sweetened condensed milk between two microwave safe bowls. Set aside. Roughly chop up the peanut butter sandwich cookies and set aside.
  2. Add white chocolate to one of the bowls of sweetened condensed milk. Add butter. Melt in microwave at medium power stirring often until completely melted. Fold in the chopped cookies and stir gently to combine. Pour into prepared pan and smooth into an even layer.
  3. Add the peanut butter chips to the remaining bowl of sweetened condensed milk. Microwave at medium power stirring often until completely melted. Pour onto white chocolate layer in prepared pan. Refrigerate at least one hour or until set.

Then taste this delicious fudge!! I guarantee you won't be able to stop til the whole pan is gone. It is so delicious. I recommend sharing so you don't consume the whole pan (while it may sound like a good idea, you may regret it when a) you feel like you're in a sugar coma and/ or b) your favorite skinny jeans no longer zip up... just sayin!! Feel free to share with me! ;)


Happy Baking my Friends! Hope you're looking forward to a lovely long weekend coming up in just a few days. I know I am.

11.5.12

Mr. Big Brownies


My hubby was just in Winnipeg visiting his lovely Grandparents. They're the sweetest people and like his mom, they just love to give you little "gifties". Little gifts that don't really cost much and don't seem like much, but they're a little something to brighten your day, often for trivial occasions, or no occasion at all. This time Scott's Grandpa gave him a box of Mr. Big Snack Cakes that he had picked up last time he went to town. I laughed so hard when he brought them back home and thought, oh geez, what are we going to do with these? Well, inspiration struck! Might as well put them in a brownie. So that's what I did.

For this recipe, I adapted one of Anna Olson's recipes from her newest cookbook Back to Baking. Which is a pretty spectacular book (if you haven't already heard my praises for this cookbook, check out my post about me attending a cooking class hosted by Anna that demonstrated recipes from her book here)!!


Mr. Big Brownies
Recipe adapted from Anna Olson's Back to Baking

Ingredients

Brownies:
  • 1/2 cup butter
  • 4 oz semisweet chocolate chips
  • 3 oz unsweetened chocolate, chopped
  • 1 tbsp instant coffee granules
  • 1/2 cup granulated sugar
  • 1/2 cup packed brown sugar
  • 2 eggs
  • 2 tsp vanilla extract 
  • 2/3 cups all purpose flour
  • 1/4 tsp baking soda
  • 1/8 tsp salt
  • 4 Mr. Big Snack Cakes
Frosting:
  • 3 oz milk chocolate chips
  • 2 tbsp butter
  • 1 tsp instant coffee granules
  • 1/2 package cream cheese, softened
  • 1 cup icing sugar
Method:
  1. Preheat oven to 350F. Line an 8 inch square pan with parchment paper so it hangs over the edges slightly.
  2. Melt the butter, chocolates, and instant coffee in a medium saucepan over low heat, stirring constantly until melted. Remove the pot from the heat.
  3. Stir in the sugars, then add the eggs one at a time, stirring well after each addition. Stir in the vanilla.
  4. Stir the flour, baking soda, and salt into the chocolate mixture, mixing just until blended.
  5. Pour half the batter into the pan (just until the bottom of the pan is covered). Top with the Mr. Big Snack Cakes. Pour remaining batter to cover the snack cakes. Smooth top.
  6. Bake in preheated oven for about 35 minutes, until the top of the brownies take on a dull finish. Cool completely in the pan before frosting.
  7. To make the frosting, melt the chocolate, butter, and instant coffee in the microwave, being careful not to burn the chocolate. Beat the cream cheese to soften in the bowl of a stand mixer. Pour in the melted chocolate mixture and beat until blended. Add icing sugar and blend. Remove the brownies from the pan and ice the top of the entire brownie. Let set for an hour before slicing.

These are some seriously delicious brownies! You've got to try them. :) Would probably work well with Wagon Wheels too!! Yah, I'm a little weird, but it works. :D Hope you've got lots to look forward to this weekend. I know I do! Its my Birthday and Mothers' Day on Sunday. So its going to be a good weekend. Wish I lived closer to my Momma though.


Happy Baking my Friends! Enjoy the weekend.