Showing posts with label cheddar cheese. Show all posts

12.8.13

Crazy Gourmet Hot Dogs!


Oh Monday... why do Monday's have to be so hard? Do you feel like you're seriously dragging your behind on Mondays? Because I sure do!!! So, to make myself feel better, I checked out some of my recent food photos and came across these babies! If these don't cheer you up on a blah Monday, I'm afraid nothing will!
 
I came across the idea for these in the magazine Everyday with Rachael Ray (July/August 2013 issue). Normally I'm not a fan of Rachael Ray or her recipes, but I'm glad I gave her another chance - this magazine was jam packed with great ideas and recipes. I will definitely be buying this magazine again. You should check it out!


 Be sure to start with some amazing, all natural hot dogs and some oversized, extra-fresh buns. Then you can go hog-wild with the toppings! Seriously! Go crazy! Some of the craziest sounding flavour combos are often the most delicious.

For our gourmet dog night, we picked two flavour combos to try out.

The Natcho Dog: Sprinkle with shredded cheddar cheese, top with guacamole, pickled jalepenos and crunched up tortilla chips.

Pimento Cheese Dog: Spread with store bought pimento cheese, then sprinkle with crushed ritz crackers, drizzle with some franks red hot. (Note-Pimento cheese wasn't available where I live, so I took a package of imperial cheddar and blended it with some cream cheese and some red jalepeno pepper - it did the trick!)

They were delish, but I think the Natcho dog was my favorite!


Some other flavour combos listed in the magazine that sounded soooo good to me were:
 
Deli Dog: Top with egg salad, fresh diced pickles and freshly cracked black pepper.
 
Hummus Deluxe Dog: Spread with hummus then top with sliced roasted red peppers, sprinkle with smoked paprika.
 

Yep, we'll probably be making these again soon - just an excuse to try out some more flavours. :) Hope this brightened your Monday night! You can do it!!!

Happy Cooking my Friends!

6.2.12

Individual Seven Layer Dips with Homemade Salsa


During one of my tireless google searches for cute Superbowl appetizers, I came across these adorable individual seven layer dips on The Girl Who Ate Everything. These are perfect appetizers and party snacks for any kind of get together, especially a game day party or a summer BBQ. They're perfect because they prevent double dipping and you avoid that unappetizing mess that most seven layer dips turn into after a few people have dished themselves out a serving. These have a wow factor to them that make you look like you put a lot more work into them than you did!! So what are you waiting for? Plan on making these for your next party - you and your guests will love them. :)

I only made mine with five layers because I don't like veggies on top of my seven layer dip, but you can add green onions, tomatoes and olives if you want. My layers were as follows:

Refried beans - straight out of the can
Guacamole - this is a good recipe
Sour Cream - mix sour cream with some taco seasoning to taste
Salsa - recipe below
Cheddar Cheese - I used Tillamook Sharp Cheddar, but Pepper Jack would also be delicious
Garnish - I garnished with a tortilla chip

I piped in all of the layers except the salsa and the cheese using a freezer bag with the corner snipped off. Its far less messy and your layers will be prettier!

I am slightly concerned that this salsa recipe isn't going to get the attention it deserves because I've lumped it in with this seven layer dip recipe. But if you only try one thing from this post, try making the salsa - its quick - you can make it in under 5 minutes and it tastes soooo delicious. It is the closest to mexican restaurant salsa I've ever tasted and I LOOOOVVVVEEEEE that stuff. I found this recipe on Mountain Momma Cooks. I only changed the recipe a little because it was honestly such a delicious sounding recipe on its own!!

Speedy Salsa
Recipe minimally adapted from Mountain Momma Cooks

Ingredients:
  • 2 14-oz cans of fire roasted, diced tomatoes
  • 1/2 small onion, roughly chopped
  • 1 clove garlic, minced
  • 1 jalepeno, seeded and roughly chopped (leave the seeds in if you like additional heat)
  • 1 tsp honey
  • 1/2 tsp kosher salt
  • 1/2 tsp ground cumin
  • large handful cilantro leaves, roughly chopped
  • juice of 1 lime
Method:
  1. Combine all ingredients in the large bowl of a food processor and pulse until your salsa reaches the desired consistency. I like mine quite finely minced, but you could pulse it for a very short time for a chunkier salsa.
Yep, thats it!! So easy and flavourful. Do you have a favorite salsa recipe or do you put something unexpected in your seven layer dip? I'd love to hear what you do!

Happy Cooking my Friends!

21.1.12

Broccoli & Cheddar Soup

Ahhh Saturday morning! I love sitting and enjoying a nice cup of coffee on the one day of the week I don't have to do anything. A simple thing to take pleasure in, but sometimes its just so nice to sit down and take a little breather. I still have lots to do today and tomorrow in preparation for having some of the office ladies over to my place tomorrow evening, but those things can wait while I drink my coffee. :)

Last night I was feeling a little drained after a busy week at work, so I opted for an easy and healthy dinner that hubby and I could feel good about after eating. I made a Broccoli & Cheddar soup from my new cookbook The Looneyspoons Collection by Janet & Greta Podleski. I have one of their previously published cookbooks called Eat, Shrink and Be Merry and quite honestly, I love both cookbooks. Janet & Greta do a great job lightening up everyday recipes without using obscure or expensive ingredients and this soup was no exception. The short ingredient list, easy preparation instructions and quick cooking time made this soup really appealing (not to mention the fabulous end result).


Broccoli & Cheddar Soup
Recipe adapted from The LooneySpoons Collection

Ingredients:
  • 1 tbsp olive oil
  • 1 cup chopped onions
  • 1/4 cup chopped celery
  • 3 cloves minced garlic
  • 1/2 tsp  each dried tarragon and celery salt
  • 3 cups chicken broth (I used homemade turkey stock)
  • 1 large potato, peeled and diced
  • 3 cups small broccoli florets
  • 1 cup whole milk
  • 2 tbsp all purpose flour
  • 3/4 cup packed shredded old cheddar cheese
  • 1/4 cup freshly grated parmesan cheese
  • 1/2 tsp freshly ground black pepper
  • 1/2 tsp kosher salt
  • 1 tsp hot pepper sauce (or to taste)
Method:
  1. Heat olive oil in large pot over medium heat. Add onions and celery. Cook and stir until veggies begin to soften, about five minutes. Add garlic, tarragon and celery salt. Cook 30 more seconds until fragrant. Add broth and potatoes. Bring to a boil. Reduce heat to medium low. Cover and simmer for five minutes. Add broccoli and simmer for 7 more minutes, until broccoli and potatoes are tender.
  2. Carefully transfer soup to a blender. Puree until smooth and silky. Return pureed soup to pot over low heat. Whisk together milk and flour until smooth. Add to soup. Increase heat to medium and cook until mixture is bubbly and has thickened, stirring constantly. Add both cheeses, pepper, hot pepper sauce and salt. Stir until cheeses are melted. Taste and adjust seasonings if necessary.
Thats all there is to it. I'm pretty excited to enjoy a nice bowl of this leftover soup for lunch on this cold, rainy Saturday. Have a fantastic weekend peeps!

Happy Cooking my Friends!

8.2.11

Not-too-Special Grilled Cheese

Well folks, I have some earth-shattering news for you!!!!! I made it through cooking my entire Superbowl menu without some sort of accident (knock on wood that next year goes as smoothly). Some highlights from the menu include: slow cooker chicken wings, stuffed mushrooms, ginger sandwich cookies with lemon cream and drum-roll please..... Caramel Apple Cheesecake that some of you may have seen on an episode of Bobby Flay's Throwdown! It was a great night and recipes will most likely follow (although, no promises about how quickly they will be posted)! All in all it was a good time and definitely good food. But, after all that luck, of course everything can't be perfect right? I woke up sick, sick, sick on Monday morning and of course its busy at work so I have to drag myself in there and do my job. :( Poor me! haha

So I'm laying in bed "resting" right now while I post a short post to let you know I'm still alive after all the Superbowl cooking and definitely feeling a little sorry for myself (which I shouldn't be - there are people out there feeling a heck of a lot worse than me right now!!!).

When you're sick you want a little comfort and for me that came in the form of coming home to dinner being all ready for me - tomato soup (yes, from a can) and grilled cheese sandwich. Hubby felt bad that I had to go to work sick, so he made me my favorite "sick meal". :) What a nice guy!

So tonight, I made another grilled cheese - that of course I took a couple pictures of! Here is what is in my not-too-special grilled cheese (recipe by me!) haha if you can call it a recipe.

Take a couple pieces of bread, butter one side of each slice. Spread a thin layer of mayo on the other side of one of the slices of bread. Put a nice layer of shredded old cheddar cheese on top of the mayo, top with some crisp fried bacon, sprinkle with garlic powder and a few red chilli flakes then top with a bit of shredded parmesan cheese. Top with other slice of bread (buttered side out) and place in frying pan heated over medium heat. Fry until golden brown on one side, flip and fry until the other side is golden brown. Remove to plate, cut in half on the diagonal and serve with bucket-loads of ketchup (or not, but thats how I roll!). Enjoy while wallowing in your own self-pity.

Heres to feeling better tomorrow!!! Happy Cooking my Friends! More exciting posts to follow later in the week. :)

19.12.10

On the Fourth Day of Christmas... Two Fabulous Sides!!

For most people turkey is the focal point of Christmas dinner - they look forward to it all year and they are very excited to heap a bunch of turkey on their plate. I like turkey too, but my favorite part about Christmas dinner is the side dishes. These are two of my absolute favorite side dishes and they go so great with a perfectly roasted turkey. The first recipe I am going to share with you is one for a golden mashed potatoe casserole. It is a delicious spin on the traditional mashed potatoe side dish. Second I'm going to share a recipe for Vegetable Gratin which my mother in law shared with me. It is my husband's favorite side dish and this is the one time each year I see him heap his plate full of veggies (even though they're smothered in a delicious cheese sauce, they're still veggies!!!).


Golden Mashed Potatoe Casserole
Recipe from Everyday Favorites (Canadian Living) p. 156

Ingredients:
  • 10 yukon gold potatoes (about 3.5 lbs)
  • 1/2 cup choped fresh chives
  • 1/2 cup milk, heated
  • 1/2 cup herbed cream cheese
  • 2 tbsp butter
  • 1 egg
  • 1/2 tsp each salt and pepper
  • 1/2 cup shredded old cheddar cheese

Method:

  1. Peel and cut potatoes into chunks. In large pot of boiling salted water, cover and cook potatoes until tender, about 20 minutes; drain and return to pot. Add 1/3 cup of the chives, the milk, cream cheese, butter, egg, salt & pepper; mash together until smooth.
  2. Spoon into greased 8-inch square glass baking dish. Sprinkle with cheddar cheese for remaining chives. (You can also make this dish ahead at this point: let cool for 30 minutes. Refrigerate until cool. Cover and refrigerate for up to 24 hours. Uncover. Increased baking time to 55 minutes).
  3. Bake in 375F oven until knife inserted in centre comes out hot, about 40 minutes (mine took less than this).

This really was a delicious recipe and adds some great flavour to mashed potatoes. Mashed potatoe lovers will still love it and people who don't really like mashed potatoes will like it too!!


Vegetable Gratin
Recipe adapted from my mother in law's Cauliflower & Carrot Gratin

Ingredients:
  • 2.5 lbs mixed veggies (I do cauliflower, carrots and broccoli) (enough to fill a 9x13" pan)
  • 1/2 cup butter
  • 6 tbsp flour
  • 2.5 cups milk
  • 1/2 tsp salt, pepper to taste and pinch nutmeg
  • 1 cup shredded old cheddar
  • 1/2 cup chicken broth
  • 1/2 cup shredded old cheddar (for topping)
  • 1/2 cup fine bread crumbs (for topping)
  • 1/4 cup melted butter (for topping)

Method:

  1. Cook veggies in salt water until tender crisp (don't overcook them because they will cook more in the oven). Drain & set aside.
  2. For the sauce: Melt butter, stir in flour and cook stirring constantly a few minutes. Don't brown the mixture. Whisk in milk and broth, stirring until thickened and smooth. Stir in seasonings. Blend in cheese. Place veggies in greased 9x13" baking dish. Spoon sauce over veggies.
  3. For the topping: combine cheese, crumbs & butter. Sprinkle over casserole.
  4. Bake at 375F 15 minutes (if warm) 20-25 minutes if room temperature. Broil 2-3 minutes to crisp topping.

Both of these recipes will be a hit with your families and friends. I have been making the recipe for vegetable gratin since my husband and I got married and it never fails to impress everyone who eats it. :) I know you are all busy with your holiday preparations, so I won't ramble on and on... I am off to find a Christmas tree! Finally get to decorate my house for Christmas.

Happy Cooking my Friends!

26.10.10

Halloween Appetizers!


Can you believe that Halloween is this weekend already? Time just seems to be flying by. It seems like just yesterday it was a sunny summer afternoon. Now the temperatures have dropped, the mornings are frosty and the leaves are falling. A lot of families have really fun traditions for Halloween - some have a big halloween party and dress up in extravagent costumes, some carve pumpkins, and yet others set up a haunted house and hand out candy to neighborhood children. Growing up we didn't really celebrate Halloween and I always felt so left out. My favorite part of Halloween is the beautiful orange pumpkins so now that we are on our own, we have decided to start our own traditions! My hubby and I have started hosting an annual pumpkin carving party. We have our friends over, go to the pumpkin patch and pick our pumpkins, then come back to the house for carving and of course lots of food.

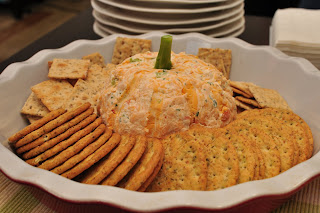
This year I made some really fun Halloween themed appetizers - Spider Web Dip and a "Pumpkin" Cheese Ball. They were so cute and deliciously festive. Since I'm posting a couple of recipes I'll keep my post short! Hopefully you are inspired to try these recipes out for your Halloween party this weekend! :D

Halloween Spider Web Dip

Ingredients:

  • 1 tbsp vegetable oil
  • 1 onion chopped
  • 4 cloves garlic, minced
  • 1/4 tsp each salt and pepper
  • 1 540mL pinto or white kidney beans, drained and rinsed
  • 2 avocados
  • 1/4 light mayonnaise
  • 2 tbsp lime juice
  • 2 cups salsa
  • 1/2 cup light sour cream
  • 2 black olives, halved and pitted

Method:

  1. In a skillet, heat oil over medium heat; fry onion, half of the garlic, the salt & pepper until softened, about 5 minutes. Add beans; cook over medium-low heat until hot, about 5 minutes. Using a potato masher or fork, mash until almost smooth; let cool.
  2. Meanwhile, cut each avocado in half and pit; using spoon, scoop flesh into bowl. Mash until smooth; stir in mayonnaise, lime juice and remaining garlic.
  3. Evenly spread bean mixture in 8-inch pie plate or serving dish. Spread salsa, then avocado mixture evenly over top.
  4. Spoon sour cream into plastic bag; cut off tip of 1 corner. Pipe in concentric circles over top. From centre to rim, pull knife through sour cream at even intervals to form web pattern. In center, place 2 olive halves end to end to form spider body. Cut out remaining olive halves into 8 slivers; arrange around body for legs.

"Pumpkin" Cheese Ball

Recipe from Everyday Favorites by Canadian Living


Ingredients:

  • 1 pkg cream cheese, softened (250g)
  • 2 cups shredded orange old cheddar cheese
  • 2 tbsp each diced onion, carrot and celery
  • 1 tbsp minced fresh parsley
  • 1 tsp prepared horseradish
  • 1 broccoli stem (3 inches), peeled

Method:

  1. In large bowl, beat cream cheese until smooth; stir in cheddar cheese, onion, carrot, celery, parsley and horseradish. Form into ball; wrap in plastic wrap. Refrigerate until firm, about 1 hour (or up to 3 days).
  2. Unwrap ball and flatten slightly; insert broccoli stem at top to resemble pumpkin stem. Using handle of wooden spoon, draw verticle ridges at even intervals to resemble pumpkin.
  3. Serve with crackers, and celery sticks.

Stay tuned tomorrow for my post about the October 2010 Daring Bakers Challenge! Its a good one.

Happy Cooking my Friends!

21.10.10

Potato Soup with Bacon and Cheddar


Well, I think fall is officially here! We've had our first couple of frosts here in the lower mainland and its definitely starting to cool off. I've taken my scarves out of my closet and been wearing them most mornings to keep warm. I really love this time of year when the temperatures just start to drop, the days are crisp and sunny, and you can see the beautiful orange pumpkins in the fields when you drive by. It is absolutely beautiful. With fall come changes in cusine type too - we shift from fresh and light to heavier and warm dishes to compliment the weather. Since we're starting to see fall, I thought I would share a recipe for a deliciously hearty potato soup topped with bacon and cheddar cheese. I also have a recipe for cheddar cheese biscuits to go with the soup that I'm going to share with you.


I like Anna Olson's heading for this recipe in her cookbook Fresh:


"A good potato soup can warm you even on the coldest day, especially when its
topped with bacon and cheddar, just like a baked potato."


Potato Soup with Bacon & Cheddar
Recipe from Fresh p. 136

Ingredients:

  • 4 strips bacon, diced
  • 1 1/2 cups chopped leeks, white and light green parts only
  • 1 1/2 lb yukon gold potatoes, peeled and diced
  • 5 cups chicken stock
  • 1 tbsp chopped fresh thyme
  • 1 cup full-fat sour cream
  • salt & pepper to taste
  • 1 cup grated old cheddar
  • 2 tbsp chopped fresh chives or finely chopped green onion, for serving

Method:

  1. In a large pot, cook the bacon over medium heat until crisp. Remove the bacon and set aside. Reduce the heat to medium-low and cook the leeks in the bacon fat until soft, about 5 minutes. Add the potatoes, chicken stock, and thyme. Cover the pot loosely, and simmer until the potatoes are tender, about 20 minutes. Remove from the heat and puree. Strain the soup through a sieve and return the pot to medium heat. Stir in the sour cream and season to taste.
  2. Serve the bowls of soup garnished with grated cheddar, the reserved bacon, and a sprinkle of chives or green onions.

This soup is absolutely divine and I love how simple the ingredients are! Try it with these cheddar cheese biscuits and you're set!

Cheddar Cheese Biscuits

Recipe adapted from Better Home & Gardens New Cook Book

Ingredients:

  • 2 cups all purpose flour
  • 4 tsp baking powder
  • 2 tsp sugar
  • 1/2 tsp cream of tartar
  • 1/2 teaspoon salt
  • 1/2 cup shortening
  • 2/3 cup milk
  • 1 cup grated old cheddar cheese (or whatever cheese you like)

Method:

  1. Stir together flour, baking powder, sugar, cream of tartar, and salt. Cut in shortening til mixture resembles coarse crumbs. Toss cheese with flour mixture. Make a well in the center, add milk all at once. Stir just until dough clings together.
  2. Turn dough out onto lightly floured counter and knead gently for 10-12 strokes. Roll or pat dough out to 1/2 inch thickness. Cut with a 2 1/2 inch biscuit cutter, dipping cutter into flour between cuts. Transfer to ungreased baking sheet. Bake in 450F oven for 10-12 minutes until golden. Serve warm.


This is a delicious and comforting meal that will take the edge off the cold fall days! It doesn't really get much better than home made soup and biscuits - definitely the ultimate comfort food.

Happy Cooking my Friends!

12.10.10

Pane Bianco - 3 Ways


Alright, get ready for a show stopper - literally! This bread is spectacular to look at and even more spectacular in your mouth. A good friend of mine who is definitely a culinary genius just celebrated a milestone birthday (something like 20 I think ;) ) and her hubby planned her a birthday party. He said we could feel free to bring a dish that we made... well of course I had to bring something, but could I decide what to bring? Of course not! It had to be something that travelled well, didn't take too long to make and tasted and looked amazing. Then I came across this blog post at Living in the Kitchen with Puppies for Tomato, Basil and Garlic Filled Pane Bianco. The photos were beautiful. So, about 3 hours before we were supposed to go to this birthday party, I started making this bread! Pulled it out of the oven and headed out the door. Any way, long story short, pretty much all conversation ceased when my friend pulled the bread out of the bag I had it wrapped in and everyone needed a rendition of how I made it and what was inside! It was an absolute hit.


I was so thrilled with the bread that I decided to play around with fillings. The three types I tried were:
  • Sundried tomato, roasted garlic, goat cheese, cheddar cheese, fresh rosemary and basil
  • Roasted garlic, goat cheese, and fig and walnut wine preserves
  • Cream cheese and jalepeno cranberry jelly

I would also like to try a cinnamon and brown sugar filling similar to cinnamon bun filling as I think it would bake up beautifully and taste absolutely divine!

Any way, on to what you came here for: the recipe!

Tomato, Basil & Garlic Pane Bianco

Recipe adapted from Living in the Kitchen with Puppies

Ingredients:

  • 1/2 cup warm water
  • 1/4 cup sugar
  • 4 teaspoons instant yeast
  • 1 cup warm low-fat milk
  • 1/3 cup extra-virgin olive oil
  • 2 large eggs
  • 2 teaspoons salt
  • 6 cups bread flour
  • 1 (8 1/2-ounce) jar oil-packed sun-dried tomatoes
  • 1 large head (or two small) roasted garlic
  • 1 1/2 cups shredded Italian blend cheese, divided (or any cheese you have on hand - I used cheddar, goat cheese and parmesan)
  • 2/3 cup chopped fresh basil (or any fresh mixed herbs - basically whatever you have on hand)

Method:

  1. Combine the water, sugar, yeast, milk, olive oil, eggs, salt, and flour, and mix and knead by hand, stand mixer, or bread machine until you've made a cohesive, soft dough. If you're kneading in a stand mixer, it should take 5 to 7 minutes at second speed, and the dough should barely clean the sides of the bowl, perhaps sticking a bit at the bottom. In a bread machine (or by hand), it should form a smooth ball. Place the dough in a greased bowl, and turn to grease the top. Cover and let rise in a warm place until double, about 45 minutes.
  2. Meanwhile, thoroughly drain the sun-dried tomatoes; lay them on a paper towel to absorb any excess oil. Using kitchen shears, finely chop the tomatoes.
  3. Line two baking sheets with parchment. Gently deflate the dough and divide it in half. Roll one piece into a 22" x 8 1/2" rectangle. Rub with half the garlic, cheese, basil, and tomatoes.
  4. Starting with one long edge, roll the dough into a log the long way. Pinch the edges to seal.
  5. Place the log seam-side down on a baking sheet. Using a small sharp knife, start 1/2" from one end and cut the log lengthwise down the center about 1" deep, to within 1/2" of the other end.
  6. Keeping the cut side up, form an "S" shape. Tuck both ends under the center of the "S" to form a "figure 8"; pinch the ends together to seal. Cover and let rise in a warm place until double, 45 to 60 minutes. Repeat with the remaining dough.
  7. While the loaves are rising, preheat the oven to 350°F.
  8. Bake the loaves for 35 to 40 minutes. Tent the loaf with foil after 15 to 20 minutes to prevent over-browning.
  9. Remove loaves from their baking trays; cool on racks. Store any leftovers well-wrapped, at room temperature.

Experiment with fillings and toppings - though in my experiments dry toppings seem to work better than wet! And colourful fillings look very nice when your bread puffs up and opens so beautifully to show off its fillings.:) I really enjoyed this recipe and despite how technical the rolling and shaping sounds, it is really easy. Just be patient and remember, practice makes perfect.

Happy Baking my Friends!

20.9.10

Savory Scones


This is a really fun scone recipe! You can toss in whatever you feel like or whatever you have on hand. You can make substitutions in the recipe if you want and just be creative! This recipe is out of one of my favorite cookbooks - The Guy Can't Cook by Cinda Chavich. In the cookbook, Cinda's comments regarding this recipe are as follows:


...scones are loaded with savory stuff, from roasted red peppers and
spinach to fresh herbs. The combinations are infinite - so get creative. They're
great split, toasted, and topped with poached eggs, or simply to grab for a
portable breakfast."

And the plus side of this recipe - you'll be noshing on delicious scones within 35-40 minutes! Doesn't get any better than that! :)


Savory Scones
Recipe from The Guy Can't Cook, p. 65

Ingredients:

  • 1 cup all-purpose flour
  • 1 cup whole wheat flour
  • 1 1/2 tsp salt (omit or decrease this if using salty ingredients like feta, bacon, proscuitto)
  • 2 tbsp baking powder
  • 1/2 cup unsalted butter, chilled and cut into cubes
  • 1/2 to 3/4 cup finely chopped savory stuff (roasted red peppers, carmelized onion, roasted garlic, finely chopped spinach, chopped steamed broccoli, crumbled bacon, slivered proscuitto, etc.)
  • 1 green onion minced
  • 1 tbsp chopped fresh herbs (dill, basil, oregano, or thyme)
  • 1 cup shredded or crumbled cheese (aged cheddar, feta, gruyere, gouda, or blue cheese)
  • 1/3 to 1/2 cup half-and-half cream or buttermilk (use plain yogurt in a pinch)
  • poppy seeds or sesame seeds

Method:

  1. Preheat the oven to 350F.
  2. In a food processor, combine the flours, salt, baking powder, and butter. Pulse until the mixture resembles coarse crumbs, then transfer to a bowl.
  3. Sitr in savory vegetables and/or meat into the dry ingredients along with the green onion, herbs, and cheese. Add just enough cream to make a soft dough (the amount you add will depend on how wet the vegetable mixture is), and stir with a fork until until the dough forms. Don't work the dough too much, the less you handle it, the flakier your scones will be. Turn the dough out onto a lightly floured surface and gently pat the dough onto and 8-inch square about 1 1/2 inches thick. Cut into four 4-inch squares. Slice each square crosswise to make 8 triangular scones. Set the scones on a baking sheet lined with parchment paper. Using a pastry brust, lightly brush the tops with extra cream and sprinkle with seeds.
  4. Bake for 20-25 minutes or until golden. Transfer to a cooling rack for a short time. Serve warm with butter or plain cream cheese. Makes 8 scones.
One more tip from Cinda:

"Think about complementary and classic combinations for the scones (red pepper
with oregano and cheddar cheese; spinach with dill and feta; proscuitto with
chopped olives, basil, and parmesan; cooked and crumbled italian sausage with
carmelized onions; or just get creative)."
I used bacon, cheddar cheese and chives. Hubby & sister loved these and eagerly devoured them. :) These are easy to whip up on a Sunday morning to go with your coffee instead of going to the coffee shop to buy them or as a snack to go in your lunch. Happy Baking my Friends!

31.8.10

Cheddar Crackers

I have always avoided baking crackers until a good friend told me how delicious they are to make. I always thought they would be far too much work to be worth the effort, but these beauties certainly are worth the (minimal) effort required! They are deliciously flavourful and highly addictive. When I make them now, I have to make a double batch and we still never have leftovers. They're great served with cream cheese and hot pepper jelly or even great to just eat on their own.

I seem to be posting a lot of Anna Olson recipes - guess it just goes to show that she writes great cookbooke with down to earth recipes! This recipe is from Anna Olson's cookbook Fresh. If you're looking for a great cookbook that uses local and fresh ingredients - this is the perfect cookbook for you. The book is broken down into seasonal sections based on what is in season locally. Deliciousness!

Enough about my hero Anna Olson's cookbooks - on to the recipe! :D

Cheddar Crackers
Recipe from Anna Olson - Fresh, p. 186
Ingredients:
  • 3/4 cup all-purpose flour
  • 1/4 cup cornmeal
  • 1 tbsp sesame seeds (more for sprinkling)
  • 1/4 tsp salt
  • 1/4 tsp baking powder
  • 1/4 cup unsalted butter, frozen
  • 1 cup coarsely grated old or extra-old cheddar
  • 1 egg whisked with 2 tbsp water, for brushing
  • coarse salt and sesame seeds for sprinkling

Method:

  1. In a food processor, pulse together the flour, cornmeal, sesame seeds, salt and baking powder. Use a box grater to grate in the butter and pulse until mixture is rough and crumbly. Add the cheddar cheese and 1/4 cup cold water and pulse until the water is incorporated, adding another 1 tbsp water if necessary to form a soft dough.
  2. On a lightly floured work surface, knead the dough 3 or 4 times to develop the gluten in the flour slightly and make the dough easier to work with. Form the dough into 2 balls and flatten them into disks and chill for at least an hour.
  3. Preheat the oven to 400F. Line baking tray with parchment paper.
  4. On a lightly floured surface, roll out the first piece of dough into a 12-inch square (about 2mm thick) and cut it into 2-inch squares. Place the squares on the prepared baking tray. Repeat with the 2nd piece of dough.
  5. Brush squares lightly with egg wash and prick them all over with a fork. Sprinkle them with salt and sesame seeds and bake until lightly browned, about 13 minutes. Cool before transferring them to a plate.
  6. Crackers can be stored for up to 5 days in an airtight container.


I'm not really very precise about size and shape of my crackers - however they turn out is just fine and they taste wonderful! If you want to be more precise, go right ahead - one of those culinary ruler/ straight edges works great and using a pizza cutter would be very quick and efficient for cutting the dough. The one important thing is to try to make sure they're approximately the same size so they cook evenly. Enjoy this recipe!


Happy Baking my Friends!