28.7.13

Blueberry Mint Sparklers

 
Hey Friends! How is your summer going so far? I can't believe we're already at the end of July! Time is flying faster than ever it seems. Summer here has been unusually hot, sunny and dry! Which has been an amazing change. In the midst of this unusual heat though, I along with many others I know have been searching for delicious, refreshing summer beverages to make that are easy and don't take too long to whip up! (because when you're thirsty and in need of a drink, you don't want to wait all day)
 
Last weekend my sister and I were browsing through the July/August 2013 issue of Everyday with Rachael Ray and we found Blueberry Tarragon Sparklers - they looked delicious and sounded super easy to whip up. So we decided to give them a try.
 
I headed off to the grocery store with a very short list of ingredients to purchase and when I got to the produce section to look for tarragon, the fellow working in the store politely informed me they hadn't carried fresh tarragon in oh, about ten years. Say what?? So quick thinking coupled with my strong desire not to have to try every grocery store in the area resulted in me picking up a container of fresh mint instead. What a success!! These drinks were lovely!
 
Without further delay, here's the yummy recipe.
 
Blueberry Mint Sparklers
minimally adapted from Everyday with Rachael Ray
 
Ingredients:
  • 1/2 cup fresh blueberries
  • 1/4 cup honey
  • 2 tbsp. fresh mint leaves
  • ice
  • 1 bottle sparkling white wine (I used Yellow Tail Bubbles)
Method:
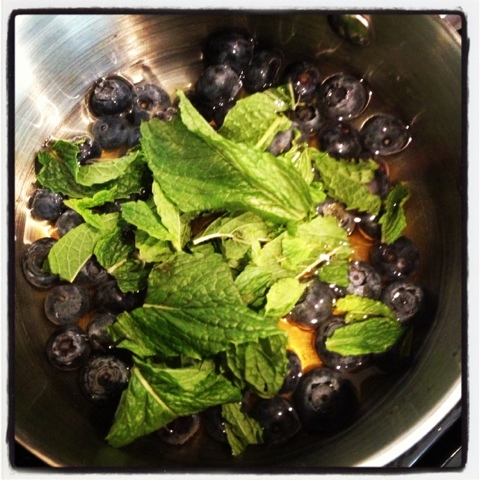
  1. In a small saucepan, bring blueberries, honey, mint and 1/4 cup water to a boil over medium-high heat. Stir until honey dissolves, about 3 minutes. Remove from heat and muddle blueberries and let stand for 20 minutes. Strain and place in refrigerator until chilled.
  2. To serve, spoon 1-2 tbsp. of blueberry syrup into 4 glasses. Add ice, then pour sparkling wine over top. Stir. Garnish with more fresh mint and blueberries.
Super easy, refreshing and delicious!
 
Cheers to the rest of our summer being just as fantastic as the first half.

15.7.13

Lentil & Chickpea Curry

 
Happy Monday friends! I hope you had a fantastic weekend. I sure did! It was filled with yoga, spa time, and relaxation in the sun with a great book. And lets not forget some awesome time spent with some really good friends. All in all such a great weekend.
 
Today I've got such a great recipe to share with you! It makes a huge batch (for super cheap) but its so good you won't mind eating it all week like I did last week. The leftovers are almost better than the night you make it.


I found the recipe for Lentil & Chickpea Curry on this great blog called Sweet Sugar Bean written by a sweet gal from Saskatchewan. Since Saskatchewan is one of the world's largest producers of lentils, I figured Renee must know a thing or two about how to prepare them in a delicious, healthful way. I made a couple modifications to the original recipe, but by and large I stayed pretty true to the original.

 Lentil & Chickpea Curry
Minimally adapted from Sweet Sugar Bean

Ingredients:
  • 3 tbsp. olive oil
  • 1 onion, diced
  • 3 cloves garlic, minced
  • 2 tbsp. fresh ginger, grated
  • 2 medium carrots, diced
  • 3 tbsp. medium indian curry paste
  • 1/2 tsp cayenne pepper
  • 2 tsp cumin
  • 1 tsp coriander
  • 1 1/2 tsp sea salt
  • 1 540ml can diced tomatoes
  • 1 540ml can coconut milk
  • 1 cup red lentils, rinsed thoroughly and picked through
  • 1 540ml can chickpeas, drained and rinsed
  • 3 tbsp. honey
  • 2 cups cauliflower florets
  • 1 cup frozen peas
  • vegetable stock
  • handful of cilantro, chopped
  • plain yogurt
  • hot sauce
(Seems like a long ingredient list right? I know, I know... but the great thing about this recipe is a) you likely have more than half of this on hand already and b) the above listed ingredients are super cheap to buy and this recipe makes about a billion servings...)

Method:
  1. In a large pot, heat the oil over medium heat. Add the onion and cook til soft, about 5-8 minutes. Add garlic and ginger and stir til fragrant. Add the curry paste, carrots, spices and salt. Stir well and cook for a couple of minutes.
  2. Stir in tomatoes, coconut milk, lentils, chickpeas and honey. Bring to a boil then reduce heat to medium-low to maintain an active simmer. Stir every ten minutes or so until lentils are cooked through (this takes approximately 40 minutes).
  3. Once lentils are cooked, stir in cauliflower and peas. Cook til cauliflower is tender. If curry is too thick, add some veggie stock or water to thin it out. Stir in cilantro and adjust seasonings if necessary.
  4. Serve topped with a dallop of yogurt and a few drops of hot sauce if you like it spicy. Some home made naan takes this meal over the top.


Happy Cooking my Friends! Hope you enjoy this one.

6.7.13

Pineapple Fried Quinoa


Okay, so maybe the above pictured dish doesn't look all that appetizing... I believe one of my FB friends exact words were "this looks like something my cat would throw up". Thanks for that my darling friend! But in all seriousness, this isn't a pretty, stunning dish to make for your dinner party guests, but its a quick delicious and healthy weeknight dinner that will leave you with leftovers to eat for lunch the next day.
 
This dish is like fried rice, but with quinoa! I've also lightened it up, so its miles healthier for you than your typical fried rice.
 
Pineapple Fried Quinoa
Recipe adapted from  Allrecipes.com
 
Ingredients:
 
  • 1 cup uncooked quinoa
  • 2 cups chicken broth
  • 1/2 cup water
  • 2 eggs, beaten lightly
  • 2 tsp sesame oil
  • 5 cloves garlic
  • 1 cup diced pineapple
  • 1/3 cup finely chopped fresh cilantro
  • 1/4 cup soy sauce
  • 1/2 tsp red pepper flakes (adjust depending on heat preferences)
Method
  1. Place quinoa, chicken broth and water in a medium sized saucepan and bring to a boil. Cover and reduce heat to low and simmer for 20-25 minutes or until quinoa is tender and liquid has been absorbed.
  2. In a large skillet over medium heat, add eggs and scramble til cooked through. Remove from pan and set aside.
  3. Add sesame oil to skillet then add minced garlic and cook til fragrant - this will only take about 30 seconds. Add pineapple and stir for a few minutes. Next stir in cooked quinoa, eggs, cilantro, soy sauce and red pepper flakes. Garnish with more cilantro and a drizzle of hot sauce if desired.
 
Quick and easy - you can have a week night dinner on the table in 30 minutes! A bonus is that is tastes delish and is super healthy for you too. For you meat lovers, add some cooked chicken or shrimp to this dish.
 
To make this dish vegan - omit the eggs and use tamari instead of soy sauce.
 
Happy Cooking my Friends!

23.6.13

How To Defrost Chicken Quickly & Safely

This might be a no-brainer for most people, but I didn't know about this method until my Mother-In-law introduced me to it a couple years ago. My Mom always used the countertop method of thawing meat, but it may not be the safest method available and it is also not quite as quick as the method I will describe below.
 
To thaw chicken safely and quickly follow the steps below:
  1. Run a sink full of cold water - you need to use cold water here to avoid potential bacteria growth associated with warm/ hot water. Place chicken in sink.
  2. Change water every 30 minutes and replace with fresh cold water until chicken is completely thawed.
Some important notes:
  • 1 lb of chicken will defrost in 1-2 hours using this method
  • Don't use the sink for any other purpose during this time - this will help avoid contamination
  • When chicken is done thawing rinse your sink out thoroughly with hot water and a good multi-purpose cleaner to kill any bacteria that may have accumulated
  • This method works for any type of frozen meat - defrost times may vary depending on type and amount of meat
 

This is a pretty straightforward and efficient option for thawing frozen meat. A lot of people use their microwaves to thaw meat when they're in a hurry, but doing so can actually be dangerous as heating the meat during the defrost process gives bacteria a chance to grow and accumulate. As a result I would encourage you to use this method of thawing meat quickly and safely!

How do you usually defrost your frozen meat? What do you do to ensure you do it safely?

22.6.13

Turkey Stuffed Zucchini Boats


I have been experimenting with healthier meals recently and this was one of my awesome recipe finds! I found it on Pinterest and it is from Recipe Girl which is written by Lorie Lane. Her website is full of amazing recipes and beautiful pictures! Hop on over and check it out - I'll still be here when you get back.

This recipe is great because you can really mix it up by varying the meat, the vessel, the cheese etc. Be creative and try different combinations!


Here is my version of the recipe - I stuck pretty close to Lorie's version and just changed a couple things based on personal preference and what I had on hand. You can check out the original recipe here.

Turkey Stuffed Zucchini Boats
Recipe minimally adapted from Recipe Girl

Ingredients:
  • Four medium zucchini, ends trimmed then cut in half lengthwise
  • 1 small onion, finely chopped
  • 3 medium garlic cloves, minced
  • 1 lb hot Italian turkey sausage
  • 1/2 cup tex mex shredded cheese blend
  • 3/4 cup roasted garlic marinara sauce
  • 3 tbsp. fresh basil, finely chopped
  • salt and pepper to taste
Method:
  1. Preheat oven to 350F. Spray a baking tray with non-stick cooking spray. Set aside.
  2. Use a small spoon to hollow out the zucchini halves - don't scrape all the way to the skin, just hollow out a nice spot to put your stuffing. Place pulp onto your cutting board, roughly chop it up and place it in a medium bowl.
  3. Place a medium skillet over medium heat. Add sausage, zucchini pulp, and onions. Sauté until onions are soft and sausage is cooked through and starting to brown. Add garlic and stir until fragrant. Pour mixture through fine mesh sieve to drain off excess moisture from zucchini and any oil from the sausage. Transfer meat mixture to a medium bowl. Add all but two tbsp. of the cheese to the meat mixture, along with the marinara sauce and the basil. Stir til combined adding salt and pepper to taste if desired.
  4. Divide meat mixture between hollowed out zucchini, mounding each one and pressing firmly into cavity. Set the filled zucchini halves on prepared baking dish and sprinkle with remaining two tbsp. of cheese - adding extra cheese if desired.
  5. Bake in preheated oven 30 minutes or until zucchini boats are tender.


 The original recipe called for one full cup of cheese, but since I'm trying to eat healthier and consume less fat, I cut that amount down. You can add the full amount of cheese if you're not as calorie conscious (seriously jealous right now if you're that person).


 Next time I make this recipe I am going to sauté some mushrooms as well and mix them in with the meat mixture to add a little extra bulk! But overall we really, really enjoyed this recipe and I will definitely be making it again in the near future.


Happy Cooking my Friends!

19.6.13

{Guest Post} Rainbow Cupcakes!

Hi Friends! Today I have a super special post for you! I'm so excited about it that I couldn't even wait til tonight to post it! I have a very special guest post for you today - let me introduce my lovely cousin Tracey. Tracey is an amazing mother of two kids who is a spectacular cook and baker! She has a heart of gold and is always there to help out her friends and family when they need it. I'm going to turn it over to Tracey to tell you all about how to make her super cool rainbow cupcakes!

Finding the perfect chocolate and vanilla cupcake recipe was starting to feel like a chore, until I looked in my Canadian living baking cookbook.  This is my go to recipe for a good tasting cupcake and it’s a big bonus that it is really moist as well.  These cupcakes freeze really well if you are in a big rush just put them in a good freezable container.  Take them out about 3-4 hours before you need them, that is plenty of time for them to thaw.

 Chocolate Cupcakes:


  • 1 cup butter, softened
  • 1 ½ cups white sugar
  • 2 eggs
  • 1 tsp vanilla
  • 2 cups all-purpose flour
  • ½ cup cocoa powder
  • 1 tsp each baking powder and baking soda
  • ¼ tsp salt
  • 1 ½ cups buttermilk
Prepare two 12 cup muffin pans by lining with paper liners or spraying with non-stick spray. In a large bowl, beat butter with sugar until light and fluffy; beat in eggs, 1 at a time, beating well after each. Beat in vanilla. In a separate bowl sift together flour, cocoa, baking powder, baking soda and salt. Stir into butter mixture alternately with the buttermilk. Make three additions of dry ingredients and two of buttermilk. Pour into prepared cupcake trays and bake in the centre of 350 degree oven for about 12 minutes or until cake tester inserted in the middle of a cupcake comes out clean.

Vanilla cupcakes:
  • 1 cup butter, softened
  • 1 2/3 cups white sugar
  • 4 eggs
  • 1 tsp vanilla
  • 3 cups all-purpose flour
  • 1 tbsp baking powder
  • ½ tsp baking soda
  • ¼ tsp salt
  • 1 ¼ cups buttermilk
Prepare two 12 cup muffin pans by lining with paper liners or spraying with non-stick spray. In a large bowl, beat butter with sugar until light and fluffy. Beat in eggs, 1 at a time, beating well after each; beat in vanilla. In a separate bowl, whisk together flour, baking powder, baking soda and salt. Stir into butter mixture alternately with buttermilk. Make three additions of dry and two of buttermilk. Pour into prepared cupcake trays and bake in the centre of 350 degree oven for about 12 minutes or until cake tester inserted in the middle of a cupcake comes out clean.


Vanilla buttercream icing:


I love this icing because it is easy to make but it is also tastes really good. Not too much butter and not too much sugar either. It is a very thick icing so it is a great one if you are going to do a lot of piping. If you are not wanting it as thick you can add a little more whipped cream, although I haven’t tried this.

  • 1 cup butter softened
  • 5 cups icing sugar
  • ½ cup whipping cream
  • ½ tsp vanilla
In a large bowl, beat butter until light and fluffy. Beat in sugar and cream, making 2 additions of sugar. Beat in vanilla. You can also make the icing the day before but take it out at least one hour before you want to use it and make sure you whip it up before using. To make the rainbow colors I used gel food coloring available at Walmart and most baking supply stores. I slowly added the color and kept mixing until I got the vibrant colors that I wanted. You can assemble them as pictured below to create a rainbow shape on a cake board, or just leave them as is.


Thanks so much for preparing this great post and sharing your recipes Tracey! I hope you all enjoyed this post as much as I did! Happy Baking my Friends!

15.6.13

Easy & Healthy Iced Tea


The weather is really starting to heat up around here - a sure sign summer is finally here! With the increase in the temperature, I've been on the lookout for some refreshing summer drinks that aren't full of calories. I noticed they're hard to find! So I decided to make my own iced tea!


I headed down to my local farmers market and found a booth selling some delicious tea and picked out cream of earl grey and cream of blueberry. Both sounded lovely to me, but you can really use any tea you want! Try to use high quality tea to avoid bitterness in your tea.


To make your iced tea - place 6 tsp of loose tea in a liquid measuring cup. Pour 1 1/2 cups boiling water over top and steep for five minutes. Don't steep for any longer or your tea will get bitter. Meanwhile, fill a pitcher 1/4 full with ice cold water.


 Once your tea is finished steeping, strain the mixture - putting the tea liquid into your prepared pitcher and discarding the tea. Fill the pitcher to the top with cold water. Serve tea over ice and garnish with slices of citrus fruits - I used lemons and oranges, but lime or grapefruit would be good too depending on the type of tea you're serving. I didn't need to sweeten mine, but if you must - sweeten it with honey!

This is such a simple, delicious and healthy alternative to other sugar-laden beverages we associate with summer. Give it a try - you might be surprised how delicious and refreshing it tastes!


 What's your favorite summer beverage that is easy on your waistline while still being refreshing?

Cheers!