6.9.10

Lemon Pound Cake

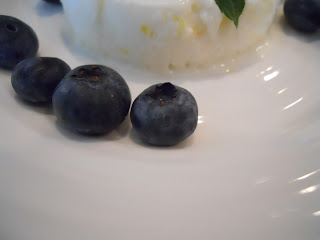
I needed a quick and easy dessert for an informal dinner party two weeks ago and came across a recipe from - you guessed it - Anna Olson! Her Lovely Lemon Pound Cake recipe is easy to make and requires minimal ingredients. Garnish with some fresh blueberries and a lemon glaze and you're set with a dessert that looks like it was a lot more work than it really was.

Lovely Lemon Pound Cake
From AnnaOlson.ca
Ingredients:
  • 1 cup unsalted butter, at room temperature
  • 1 cup sugar
  • 1 tbsp finely grated lemon zest
  • 4 large eggs, at room temperature
  • 2 tsp pure vanilla extract
  • 2 cups all purpose flour
  • 1 tsp baking powder
  • 1/4 tsp fine salt
  • 2 tbsp lemon juice
  • 3/4 cup icing sugar, sifted
  • blueberries

Method:

  1. Preheat oven to 275F and grease and flour a loaf or bundt pan.
  2. Using an electric mixer, beat butter, sugar and zest until fluffy. Add eggs one at a time, beating well after each addition. Beat in vanilla. Sift dry ingredients together and add to butter mixture in two additions, mixing on low speed. Scrape batter into prepared pan and bake for 20 minutes. Increase oven temperature to 325F and bake for another 40-50 minutes (check regularly to ensure cake isn't overdone) until a skewer inserted in the centre of the cake comes out clean. Cool for 30 minutes in the pan, then turn the cake out to cool completely.
  3. Fill center of cake with blueberries and garnish the plate with any additional blueberries. For the glaze, whisk together the lemon juice and icing sugar until smooth. Pour or drizzle over the cake and blueberries. Let the glaze set.

**Note: this cake also freezes well - you can freeze it for up to 3 months if it is wrapped properly.


This cake was really flavourful and easy to prepare. What better combination than lemon and blueberry right?! Pretty much any type of berry would work with this cake, so feel free to be creative. You could even omit the glaze and just dust with icing sugar. I hope you enjoy this recipe and get the chance to try it out! What kind of desserts do you like to use for informal dinner parties?

Happy Baking my Friends!

5.9.10

Baked Alaska, Astoria Oregon

While my hubby & I were away in Oregon we went to a fantastic restaurant in Astoria for dinner. The place was called Baked Alaska Fine Dining & Public House. Our experience got off to a bit of a rough start, but they definintely won me over by the end of our visit. I have to apologize for the quality of my photos... hubby was a little embarassed at me taking "obsessive" photos of our plates and people were looking at me, so I had to be quick about it to minimize his embarassment. ;)

When we first walked into the restaurant, it initially took a while for someone to come and seat us. We almost left... but the fellow who finally came was so nice and convinced us to sit on the patio - something we definitely didn't regret! The view was fantastic - right on the Columbia River where all the big barges dock and the little boats zip by. Lots of little seals playing in the water etc.
We both had a drink - hubby had a beer & I had a lovely blueberry mojito.

Next up our server came around with a tray of assorted fresh breads - foccacia, sourdough, and some kind of whole grain. She also brought a tray with four little dishes - garlic butter, olive oil, balsamic vinnegar, and their signature seasoned sea salt (seasoned with fresh choppped herbs). All for dipping the bread in - it was all great and so beautifully presented.

We each ordered an entree. I ordered a "small" sized dinner (which wasn't actually all that small)! I ordered the Campfire Salmon which was "an alaskan amber barbeque marinated Alaskan Coho Salmon filet, pan seared and flambeed campfire style". It was served with mashed potatoes and green beans and an amazing citrussy sauce that complimented the bbq sauce amazingly well.

Hubby ordered the Natural Ale Braised Baby Back Ribs which were "glazed with an alaskan amber bbq sauce and frizzled sweet onions. His was also served with mashed potatoes and green beans. Everything was cooked to perfection and the ribs were fall-off-the-bone tender.

Now by this point we were both soooo stuffed from all this delicious food, but we had to find room to order the restaurant's signature dessert - the Half Baked Alaska. It looks so simple in the photo, but sometimes the simplest things are the best. The most exciting thing for me was the way it arrived at our table - flaming! The half baked alaska consists of "a double chocolate chip cookie baked fresh in a cast iron skillet. Topped with vanilla bean ice cream, walnuts and chocolate sauce. Arrives at your table flaming with brandy." It was so fun. Unfortunately it was too bright outside to get any photos of the flames. :(

This was definitely a place I'll be returning to. If you're ever in the area, definitely stop by and get "half-baked". Its well worth it!

4.9.10

Pan Roasted Pork Chops with Rosemary Applesauce

You've probably noticed I'm late posting today! My excuse is that I've been in the kitchen literally ALL day - it all started with making cinnamon rolls for hubby's breakfast, meringues for my daring bakers challenge and for dessert, then I had to make some lemon curd to use up the egg yolks left from making the meringues. Next up - slave away working on the rest of the daring bakers' challenge (with still a few more hours of work to finish up tomorrow), then had to cook dinner for the boys. Whew! Sounds so exhausting, but I honestly just love puttering away in the kitchen, trying out new things and challenging myself to become a better cook. :) So tonight I'm just going to share a quick dinner recipe with you for those days when you don't want to spend the whole day in the kitchen.

This pork recipe is from The Best of Chef at Home by Michael Smith. It is quick and delicious and uses very basic and healthy ingredients. Michael notes that you can jazz up the applesauce by adding a spoonful of grainy mustard or horseradish. I just jazzed up the sauce by adding garlic.

Pan Roasted Pork Chops with Rosemary Applesauce
Adapted from Chef at Home p. 108

Ingredients:
  • 1/4 cup olive oil
  • 4 onions, peeled and thinly sliced
  • 4 apples, cored and cut into chunks
  • 1/4 cup apple cider vinegar
  • 1 tbsp fresh rosemary, chopped
  • 1 clove garlic, minced
  • a sprinkle or two of sea salt and freshly ground pepper
  • 4 thick centre-loin pork chops
  • 2 tbsp butter
  • 1 tbsp any vegetable oil

Method:

  1. For the applesauce, heat the oil in a small saucepan. Add the onions and patiently cook them, stirring occasionally, until they're carmelized and turn golden brown then add the garlic clove and saute another minute. Add the apple chunks, apple cider vinegar, rosemary and salt and pepper. Stir well and simmer until the apples are tender. Serve warm, or refrigerate and serve chilled.
  2. For pork chops, preheat a large saute pan over medium-high heat. Splash in the oil and toss the butter into the centre of the oil. This will help keep the butter from burning. Pause until the butter begins to brown.
  3. Pat the chops dry using paper towels, then season them with salt and pepper and carefully place them into the hot pan. Sear for 2 minutes or so on each side. Reduce heat to medium-low, cover and cook for another 10 minutes.


Bon Apetit! Enjoy your long weekend and Happy Cooking my Friends. :)

3.9.10

Weekend Wines III


Well, its Friday again (woot!)! And to top it all off, for most of us, its going to be a long weekend (double woot!). So with that in mind, here are a few great wine suggestions for your LONG weekend during which you will likely be getting together with friends and family.
I have a lovely white wine and a delicious red wine to tell you about today. Both of them are local Okanagan wines, so for those of you who love to buy local, these are definitely great wines to try out.
First up is a 2008 Chardonnay from Cedar Creek Estate Winery in Kelowna. It is a beautiful vineyard with a fantastic view of the lake. Check out a few photos on their website and you'll believe me about the amazing view. They also have a cute bistro there, called Terrace Bistro. The menu looks great and can be found on their website as well. The wine shop was a little snooty compared to other vineyards my cousin and I visited that day, but the wine was delicious, so I can't really complain too much. ;)

The chardonnay was very dry, so for those of you who prefer a dry wine, this would be a fantastic wine to try. The tasting notes from the wine maker are as follows:

Aromas of vanilla, almonds and lemon citrus. Flavours of spiced baked apple,
banana, toffee and butterscotch blend nicely with subtle hints of vanilla and
toasty French oak on the palate. The creamy, complexity of this wine is due to
partial malolactic fermentation with minimum oak aging.

They also had some culinary notes regarding food pairings that I thought would also be helpful for you:

A great reception wine paired with smoked salmon, oysters and a variety of
soft to medium cheeses. Try with linguini and roasted red peppers in a cream
sauce or baked salmon.

Next up is a 2007 Syrah from the Burrowing Owl Estate Winery. This is a very full-bodied red. The complexity of the flavours and the nice fruit and spice notes will draw in most any wine drinker.

The wine maker's tasting notes are as follows:

This wine shows a dark plum core with a black cherry rim. It contains aromas
of ripe black berries, along with plum and black pepper notes and a slight hint
of vanilla and spice. The palate continues to show the plum and blackberry
flavours along with smooth, elegant tannins and lively acidity. The wine has
great length and balance and decanting would only increase your enjoyment. Drink
now through 2015.

Hope this gives you some ideas for wine selections this weekend! Enjoy your long weekend and remember to take time to relax and enjoy the last bit of summer. Next week fall starts and many people are headed back to school or back to work after vacation... back to real life. So here's to enjoying a fantastic long weekend with friends and family! Cheers!

2.9.10

Vindaloo

Since you're probably getting a little creeped out by my excessive Anna Olson recipe use, I'll switch it up today - today we'll check out a recipe from Jamie Oliver's cookbook Jamie's Food Revolution. A few weeks ago I made Jamie's Pork Vindaloo from the "Easy Curries" section of the cookbook. It was definitely easy and very delicious. It is a spicier curry that can be made with chicken, lamb, beef or pork, depending on your preferences. If you want a milder curry, simply omit the chiles.


Vindaloo

Adapted from Jamie's Food Revolution, p. 87

Ingredients:

  • 2 medium onions
  • 4 cloves garlic
  • 1 jalepeno pepper
  • thumb-sized piece of fresh ginger root
  • small bunch of fresh cilantro
  • 4 ripe tomatoes
  • peanut or vegetable oil
  • a pat of butter
  • 1 3/4 pounds diced pork shoulder
  • 1/2 cup vindaloo or hot curry paste
  • sea salt and freshly ground black pepper
  • 1/3 cup balsamic vinegar
  • 1 tbsp honey
  • 1 cup natural yogurt
  • 1 lemon

Method:

  1. Peel, halve and finely slice your onions. Peel and finely slice the garlic. Finely slice the chile. Peel and finely slice the ginger. Pick cilantro leaves and finely chop the stalks. Cut the tomatoes into quarters.
  2. Set a large pan over medium high heat and add a couple lugs of oil and the butter. Add onions, garlic, chile, ginger, and cilantro stalks and cook for 10 minutes, until softened and golden. Add the pork and curry paste. Stir well to coat everything with the paste and season with salt and pepper. Add the tomatoes, balsamic vinegar, honey and about 1 2/3 cups water (enough to cover everything), and stir again. Bring to a boil, then turn the heat down and simmer for 30 minutes with the lid on. Remove the lid, stir and simmer another 15-25 minutes. When meat is tender and cooked, taste and season with salt and pepper.
  3. Serve with rice and a few spoonfuls of natural yogurt dolloped on top. Sprinkle with cilantro leaves and serve with lemon wedges for squeezing over.

This curry is so easy and delicious - if you've always been a bit nervous about trying curry, this is a great recipe to start with. It uses down to earth, easy to find ingredients and requires minimal prep work. I hope you enjoy this recipe! It makes a nice big pot of curry with lots of leftovers, but they never last long in our house. Happy Cooking my Friends! Check back tomorrow for my weekend wine suggestions.

1.9.10

Frozen Lemon Mousse


I promised a few of you a while ago that I would blog about my frozen lemon mousse recipe and I'm finally getting around to it now. Just in time for summer to be over. :( Hopefully you can forgive me (I know you will once you taste it - its that good!).

Being a crazy Anna Olson fan like myself has its perks - if you become a fan on her facebook page, she posts test recipes once a month for fans such as myself to try out and provide feedback on. This Frozen Lemon Mousse was one of those test recipes. After reading other fans' feedback regarding the recipe, it seems it wasn't lemony enough. I wasn't going to have any of that - hubby LOVES lemon, so this had to be lemony! So I changed the recipe up a bit... the recipe below includes my changes. Hopefully you enjoy this recipe - everyone who tried them at my house adored them. :)


Frozen Lemon Mousse
Adapted from Anna Olson's Test Recipe - August 2010

Ingredients:

  • 4 large egg whites
  • 1 cup icing sugar
  • 1/2 cup milk
  • 1 pkg dream whip (alternatively omit the milk and dream whip and just use 1 1/2 cups whipping cream)
  • 1/2 cup Source Lemon Meringue Parfait yogurt
  • 2 tbsp fresh grated lemon juice
  • zest of two lemons
  • fresh berries for garnish

Method:

  1. Whip egg whites until foamy. Add 1/4 cup icing sugar and whip til whites hold a stiff peak. In another bowl whip milk and dream whip mix according to package directions. Reduce speed and add remaining 3/4 cup icing sugar, yogurt, lemon juice and zest. Add large spoonful of cream mixture to egg whites and gently fold in. Fold whites into cream in two additions.
  2. Pour mixture into 8 6-oz ramekins or other freezer safe containers. Cover and freeze at least 4 hours.
  3. To serve - turn out onto dessert plates and top with fresh berries.
This recipe is so creamy and decadent tasting and if you use yogurt and dream whip, it is actually quite low in fat! Healthy and delicious?! Yes indeed. Hopefully you have the chance to enjoy this summery recipe before the fall hits in full force and it is too cold to enjoy frozen desserts. Happy Baking my Friends!


31.8.10

Cheddar Crackers

I have always avoided baking crackers until a good friend told me how delicious they are to make. I always thought they would be far too much work to be worth the effort, but these beauties certainly are worth the (minimal) effort required! They are deliciously flavourful and highly addictive. When I make them now, I have to make a double batch and we still never have leftovers. They're great served with cream cheese and hot pepper jelly or even great to just eat on their own.

I seem to be posting a lot of Anna Olson recipes - guess it just goes to show that she writes great cookbooke with down to earth recipes! This recipe is from Anna Olson's cookbook Fresh. If you're looking for a great cookbook that uses local and fresh ingredients - this is the perfect cookbook for you. The book is broken down into seasonal sections based on what is in season locally. Deliciousness!

Enough about my hero Anna Olson's cookbooks - on to the recipe! :D

Cheddar Crackers
Recipe from Anna Olson - Fresh, p. 186
Ingredients:
  • 3/4 cup all-purpose flour
  • 1/4 cup cornmeal
  • 1 tbsp sesame seeds (more for sprinkling)
  • 1/4 tsp salt
  • 1/4 tsp baking powder
  • 1/4 cup unsalted butter, frozen
  • 1 cup coarsely grated old or extra-old cheddar
  • 1 egg whisked with 2 tbsp water, for brushing
  • coarse salt and sesame seeds for sprinkling

Method:

  1. In a food processor, pulse together the flour, cornmeal, sesame seeds, salt and baking powder. Use a box grater to grate in the butter and pulse until mixture is rough and crumbly. Add the cheddar cheese and 1/4 cup cold water and pulse until the water is incorporated, adding another 1 tbsp water if necessary to form a soft dough.
  2. On a lightly floured work surface, knead the dough 3 or 4 times to develop the gluten in the flour slightly and make the dough easier to work with. Form the dough into 2 balls and flatten them into disks and chill for at least an hour.
  3. Preheat the oven to 400F. Line baking tray with parchment paper.
  4. On a lightly floured surface, roll out the first piece of dough into a 12-inch square (about 2mm thick) and cut it into 2-inch squares. Place the squares on the prepared baking tray. Repeat with the 2nd piece of dough.
  5. Brush squares lightly with egg wash and prick them all over with a fork. Sprinkle them with salt and sesame seeds and bake until lightly browned, about 13 minutes. Cool before transferring them to a plate.
  6. Crackers can be stored for up to 5 days in an airtight container.


I'm not really very precise about size and shape of my crackers - however they turn out is just fine and they taste wonderful! If you want to be more precise, go right ahead - one of those culinary ruler/ straight edges works great and using a pizza cutter would be very quick and efficient for cutting the dough. The one important thing is to try to make sure they're approximately the same size so they cook evenly. Enjoy this recipe!


Happy Baking my Friends!