19.2.12

Truffle Filled Chocolate Cupcakes


These cupcakes are obscenely good... like unbelievably good. I will pause to let you drool over the pictures for a moment. Honestly, these pictures make these cupcakes look good, but they taste even better than they look!!! You must try them. Do it on a weekend or a day off when you have a bit of time, but make them! They're soooo good. Your peeps will be impressed that you even made the truffle thats all melty and delicious in the middle of the cupcake!


 The reason I ended up making this recipe is because my friend D who has the same Anna Olson cookbook as I do, made these a while back and raved about how good they were. Well, I was flipping through my cookbook this weekend and saw this recipe and was reminded that I needed to try this recipe out. So, I went out to the store and bought the chocolate and cream I would need for this recipe. Everything else was already in my baking cupboard! Can you tell I like recipes with basic ingredients?!


Truffle Filled Chocolate Cupcakes
Recipe minimally adapted from Back to Baking by Anna Olson

Ingredients:

Truffles:
  • 6 tbsp whipping cream
  • 3 oz bittersweet chocolate, finely chopped
Cupcakes:
  • 2 oz unsweetened chocolate
  • 1/2 cup butter
  • 1 1/3 cups packed dark brown sugar
  • 1/3 cup + 1/2 cup milk
  • 2 eggs
  • 1 tbsp vanilla extract
  • 1 1/3 cups flour
  • 1 tsp baking soda
  • 1/2 tsp salt
Frosting:
  • 3 oz unsweetened chocolate
  • 3 tbsp butter
  • 1/2 cup sour cream
  • 2 tsp vanilla extract
  • 2 cups icing sugar


Method:
  1. To prepare the truffles, heat the cream to a simmer and pour it over the chopped chocolate. Let it sit for a minute, then gently whisk to blend. Chill this mixture until set, about 2 hours. Spoon this ganache into 20 truffles, shaping them between your hands into 3/4 inch balls. Chill the truffles until ready to use.
  2. Preheat the oven to 375F and line 20 muffin cups with paper liners.
  3. For the cupcakes, melt the chocolate and butter together in a medium saucepan, stirring over low heat. Then stir in 2/3 cup of the brown sugar and 1/3 cup of the milk. Stir over medium heat until the sugar has dissolved. Pour this mixture into a bowl, whisk in remaining 2/3 cup of brown sugar, and cool to room temperature. Whisk in the eggs one at a time, blending well after each addition. Whisk in the vanilla.
  4. In a separate bowl, stir the flour, baking soda, and salt. Add this to the chocolate mixture in 3 additions, alternating with the remaining 1/2 cup of milk, starting and ending with the four, and whisking well after each addition (the batter will be quite fluid). Pour the batter into the prepared muffin tins, filling to halfway.
  5. Gently place a truffle in the centre of each cupcake - do not press it in, as it will settle and become completely enveloped by the batter as it bakes. Bake the cupcakes for 20 minutes, until the cake springs back when gently pressed. Cool the cupcakes completely before frosting.
  6. For the frosting, stir the chocolate and butter in a saucepan over low heat until melted. Transfer this to the bowl of a stand mixer and using the whisk attachment, mix in the sour cream and the vanilla. Beat in the icing sugar until mixture is smooth and spreadable. Spread or pipe the frosting onto each cupcake. The cupcakes should be stored at room temperature in an airtight container and will keep for up to two days. Do not refrigerate.

So, these are a little bit of work, but they are so totally worth the effort. They are decadent and delicious. And if you wish to skip a step, these cupcakes are also delicious with just a fine dusting of powdered sugar instead. The truffle in the middle makes them rich enough and moist enough on their own. :)


This post has been linked up with Fusion Fridays over at Jennifer Cooks. Head on over there to check out some of the great things other bloggers have made this week. :)

This post has also been linked up with the Recipe Party over at the Sweet Spot! Check it out for some great recipes bloggers have posted this week.
Happy Baking my Friends! Here is to having something sweet to start the week. :)

16.2.12

Guest Post: Monster Burgers, the Man Way


Happy Thursday folks! Today is a special day - I've got a guest blogger filling in for me and he's a really special guy. My hubby asked if he could do a guest post on my blog, so of course I took him up on the offer. :) So today, you'll get a touch of manly along with some great food. Without further delay, I'll turn it over to my hubby Scott.

Erin was away this past weekend and so I was forced to fend for myself. Now man cannot live on takeout alone, so I decided to make at least one meal for myself. It was an easy decision what to make because I’m a man who likes his meat. So it’s only fitting I would make a big man sized burger. These are great for a summer BBQ or a case of the meat shakes.

1 lb Beef Patties - Man sized :)
What you will need:
  • 1 ½ lbs ground beef
  • Small yellow onion diced (you may want less in your burgers)
  • 1 Tbsp Worcestershire Sauce
  • 1 Tbsp Soy Sauce
  • Salt and Freshly Ground Pepper
  • Big Buns of your choice
  • Montreal Steak Spice
  • BBQ sauce
  • Olive Oil to drizzle
  • 5 medium sized yellow fleshed potatoes
  • 1 lb Bacon
  • Lettuce
  • Red onion, sliced
  • Condiments of your wildest burger desires. Eg. Cheese, mayo, mustard etc.
Potatoes - tossed in olive oil, seasoned and ready to go in the oven

Bacony goodness crisping up to go on the burgers
Making the Magic Happen:
  1. Mix the beef, onion, Worcestershire sauce, and soy sauce in a large bowl. Add a dash of  steak spice and lots of pepper. Now as I mentioned, I like meat so all that beef made three patties (1 lb patties), but you could reasonably make 6- 8 patties out of all this meat if you're not the meat lovin' type.
  2. Fire up the oven to 400F. While the oven is firing up, make your bacon. I like crispy bacon. A lot. Bacon!
  3. While the bacon is crisping, slice potatoes into 1/8 - 1/4 inch slices and toss with olive oil in bowl. Season with steak spice. 
  4. Lay out potato slices on cookie sheet and bake. I like mine crispy so they stayed in for as long as it took to prep and make burgers, flipping once in between. About 25-30 min.
  5. Oh yeah. Now its time to cook those burgers! I slathered some BBQ sauce on them as I flipped. Cook til done in the middle.
  6. Slice some fresh Tillamook Sharp Cheddar and melt it on to the patties. as they're finishing on the grill. While the cheese is melting toast the buns on the bbq.
  7. Finally assemble the little masterpieces as desired. I garnished mine with lettuce and sliced red onions and of course more bacon. Serve with a pile of potatoe rounds. 
Little old grill, but it does the trick
 Burger patties are based on a recipe from Erin's Chef at Home Cookbook by Chef Michael Smith and the potato rounds are right outta my head. Hows that for fending for myself?


Thanks for stopping by to read my debut guest post! I'm pretty stoked with how these burgers turned out. I hope if you readers like my post enough, maybe Erin will have me back for another post... maybe to share my fabulous Fettuccine Alfredo?!

This post has been linked up with Fusion Fridays over at Jennifer Cooks! Check it out for some weekly inspiration in the form of baking, cooking, crafts and other cool stuff.

15.2.12

How To... Dice an Onion


Woohoo! We are over halfway through this week!! It seems to have flown by for me... what about you guys? Is your week going by fast too? Hope so! Its always nice when the weekend sneaks up on you. :) This week's how to post is how to dice an onion. A lot of people don't really have much technique when they chop onions and the result is non-uniform pieces of onion that don't cook at the same pace because they're different sizes. This technique results in uniform dice and uses really basic knife skills to get it accomplished. Hope these step-by-step photos help you to visualize the technique and process so you can have perfect dice every time. Remember, knife skills take practice! So the more you do it, the better you'll get.

Step 1: Cut off ends of the onion
 Step 1: Cut off the ends of the onion - just the top 1/2 inch or so. Stand the onion up on one of the cut ends (as pictured above).

Step 2: Cut Onion in Half
 Step 2: Next, cut the onion in half (starting at a cut end and finishing at a cut end). This makes the onion really easy to peel. You should peel both halves if you are using the whole onion.

Step 3: Slice the onion horizontally
 Step 3: Now you need to slice the onion horizontally at even intervals without cutting all the way across the onion. I usually do 1/8 - 1/4 inch intervals which for a medium onion results in 4-6 slices, leaving about 1/4 - 1/2 inch of the onion in tact at the end so it doesn't fall apart on you.

Step 3: Slice the onion horizontally

End result of step 3 - onion should have even horizontal slices - leaving about 1/4 - 1/2 inch in tact at the end of the onion

Step 4: Slice the onion Vertically
 Step 4: Slice the onion vertically - similar to step three, but going the other direction! Slice at regular intervals (usually about 1/8 - 1/4 inch depending on the size of the dice you want) leaving the same 1/4 - 1/2 inch of the onion in tact at the end.

End result of step 4 - see how the onion is set up for perfect dice?! Cool eh?


Step 5: Lastly, just slice the onion as pictured above - again at about 1/8 - 1/4 inch intervals depending on the size of the dice you want. The end result is pictured below - uniform, perfect dice that will cook evenly.


Finally, a few words of wisdom for cutting, chopping, dicing and slicing:

Use a Sharp Knife - its way easier to dice an onion nicely when your knife cuts through it easily without much pressure being applied. And believe it or not, you have less chance of cutting yourself when your knife is sharp because again, you don't need to lean into it or apply much pressure to get the knife to move through the item you're chopping.

Use the Knuckle Trick - this doesn't work for everyone, but a good protective measure is to use the knuckle trick when cutting. Bend your fingers so your finger tips aren't exposed to the edge of the knife and use your knuckles as a guide for your knife - this way if the knife slips it will just rub along your knuckle instead of slicing into the tip of your finger.

Stabilize your Cutting Board - Place a slightly damp tea towel or dish cloth under your cutting board if it is sliding around on your surface. This will secure the board and ensure it doesn't slip while you're cutting.

Hope this post was helpful! If you have any other good tips and tricks for cutting, dicing, chopping and slicing, I would love it if you left a comment to share your knowledge!

Happy Cooking my Friends!

13.2.12

Currant Scones


Scones again?!! Yep. I can't get enough of these things lately. Hope you're not sick of them yet!! These are pretty darn good scones from Anna Olson's new cookbook Back to Baking. Anna's got a great dough folding technique that lets you work the dry ingredients into the dough without overworking it. The folding technique makes sure you have scones that rise up nice and high with flakey, buttery layers. 

Currant Scones
Recipe minimally adapted from Back to Baking

Ingredients:
  • 3 cups all purpose flour
  • 1/4 cup sugar
  • 4 tsp baking powder
  • 1/2 tsp salt
  • zest of one lemon, finely grated
  • 1/8 tsp freshly ground nutmeg
  • 3/4 cup unsalted butter, cut into pieces and chilled
  • 1 egg
  • 1 egg yolk
  • 1 cup cold milk, plus extra for brushing scones
  • 1/2 cup dried currants
Method:
  1. Preheat the oven to 400F and line a baking tray with parchment paper.
  2. Place the flour, sugar, baking powder, salt, zest and nutmeg in the bowl of a food processor. Pulse to combine.
  3. Add the chilled butter pieces to the food processor bowl. Pulse until mixture is crumbly, but pieces of butter are still visible.
  4. In a separate bowl, whisk the whole egg and egg yolk, then whick in 1 cup of milk. Add to the flour mixture and pulse until dough comes together (do not over work).
  5. Turn dough out onto lightly floured surface and pat into a rough square. Sprinkle currants over the dough, then work them in by pressing them into the dough with your hands, then folding in half, pressing the currants in at the same time (it takes about 4 or 5 folds).
  6. Shape the dough into a square and gently roll out into an 8 inch square. Cut the dough into 16 square scones, then place them onto the prepared baking tray, leaving one inch between them.
  7. Brush the scones with milk and bake for about 15 minutes, until they are an even golden brown. The scones are best served the day they are baked, but can be reheated the second day for 5 minutes in a 300F oven to refresh them.


I brought these to my friends house in exchange for her sewing me some plastic bag organizers (they're cute btw, I will post the link up here when she gets around to posting about them on her blog). She thought it was more than sufficient payment for her services!! I love how little sugar is in these scones - you can sweeten them up with a touch of jam when serving if they're not quite sweet enough for you. :)

This post has been linked up with Mouth Watering Mondays over at The Sweet Spot. Check it out for some great recipes and inspiration.

This post has also been linked up with Fusion Fridays over at Jennifer Cooks! Head on over there for some weekly inspiration in the form of baking, cooking, crafts and other cool things.
Happy Baking my Friends!

12.2.12

Mini Meatloaf Bites

Hey Peeps! I know, I know, its been a couple days since I last posted! Today I'm blogging from my little ol' home town in Northern British Columbia. I'm up for a quick weekend visit and managed to find some time to get this post together. :)

I made these cute little mini meatloaf bites for our Super Bowl party last weekend, but they would be cute to make for any gathering you're having at your place. You could even make these in regular sized muffin tins for a cute dinner party main as well. Use a mini muffin pan for appetizer size though so people can eat them in a bite or two! I found the inspiration for these on the blog First Look Then Cook but I used my own recipes for meatloaf and mashed potatoes. Have a look at her photos because hers are far prettier than mine - my photos snapped from my iPhone just don't do these justice (it also doesn't help that I had probably consumed more than my fair share of super bowl beverages before attempting to put these together..!!). But they were delish! And super cute.

Meatloaf Bites
Recipe minimally adapted from the Girl Can't Cook

Ingredients:
  •  3/4 lb lean ground beef
  • 3/4 lb ground pork
  • 1 onion, diced
  • 2 loves garlic, minced
  • 3/4 cup bread crumbs
  • 1/2 up hickory bbq sauce (plus extra for brushing after wards)
  • 1 tbsp worcestershire
  • 1 tbsp olive oil
  • 1 egg, lightly beaten
  • 1 tsp basil
  • 1/2 tsp salt
  • 1/2 tsp pepper
  • 1 cup parmesan
  • mashed potatoes
  • bacon bits
Method:

  1. Preheat oven to 350.
  2. In a medium sautee pan, sautee onion and garlic with olive oil until softened, about 5 minutes. Set aside to cool.
  3. In a large bowl mix together beef, pork and bread crumbs with your hands. Mix in sauteed vegetables, BBQ sauce, worcestershire, egg, basil, salt, peper and parmesan until uniformly mixed. Press scoopfulls of meat mixture into a mini muffin pan. Bake in preheated oven for 15 minutes or until cooked through.
  4. Prepare mashed potatoes (I make mine with butter, whipping cream, salt and pepper. Make them wetter than you normally do, so you can easily pipe them onto the meatloaves).
  5. Brush each mini meatloaf with BBQ sauce. Pipe mashed potatoes on top of each mini meatloaf, then sprinkle with bacon bits.
Hope you enjoy this one! We didn't have many leftovers because these were eaten so quickly when I put them out. Enjoy the last day of the weekend!

This post was linked up with Mouth Watering Mondays over at the Sweet Spot. Head over there ASAP to check out all the linky deliciousness going on this week. :)

Happy Cooking my Friends!

8.2.12

Frozen Reese's Peanut Butter & Oreo Pie


Yeah, thats right, I put Oreos and Reese's in the same delicious frozen dessert! Annndddd it was flippin amazing! I found this recipe over at Baker's Royale, made a couple slight changes and BAM - this was the grande finale to our Super Bowl party. It was a total hit. This dessert is one of the easiest and quickest desserts you'll ever make. You can put it together in under 1/2 an hour (that includes time to bake the crust) and then all you have to do it let it set up in the freezer for a couple of hours and you're set with a wayyyyyy better than storebought dessert to serve to your hungry peeps!

 You may have noticed that my posts have been a little unhealthy this week... so, with the most ridiculous statement I've made in a while, I'll tell you, you could lighten this up by using low fat cool whip instead of the whipping cream. LOL, but chances are if you're already piling in the Oreos, peanut butter, and the Reese's PB cups, whats a few more grams of fat with the addition of whipping cream?! And it honestly tastes way better and you're not eating edible oil products! Woot!


Did you notice I tried to give my pictures a little valentines day theme with the heart shaped chocolates?! Did you also notice that the hearts don't match this pie one little bit?! Well, I tried... I am working on this food styling thing, sooooo I'm not perfect, but at least I'm putting in some effort right?!

Alright, recipe time!

Frozen Reese's Peanut Butter & Oreo Pie
Recipe adapted from Baker's Royale

Ingredients:
  • 30 double stuff oreo cookies
  • 4 tbsp unsalted butter, melted
  • 2 1/2 cups whipping cream
  • 1/4 cup creamy peanut butter
  • 1/2 cup chunky peanut butter
  • 1/2 cup icing sugar
  • 1/4 cup heavy cream
  • 1/2 cup Reese's Peanut Butter Cups, chopped
Method:
  1. For the crust: Place 24 of the oreos in the bowl of your food processor. Pulse until cookies are finely crumbled. Pour in the melted butter and mix until well combined. Press into 9" springform pan to form crust. Bake 350F 7-10 minutes.
  2. Place peanut butter, icing sugar and heavy cream in a small saucepan. Heat over medium heat until melted and smooth (stir carefully, because peanut butter will burn easily). Set mixture aside for 5-10 minutes to cool to room temperature. While mixture is cooling, whip the 2 1/2 cups of whipping cream. Then gently fold the peanut butter mixture into the whipped cream.
  3. Chop up the remaining 6 oreos and toss with the chopped Reese's. Gently fold through the peanut butter, whipped cream mixture. Pour mixture into oreo crust and freeze for 3 hours. Garnish with caramel and white chocolate drizzle.
Sound good? This has got me wanting more... the last quarter of the pie is in my freezer calling out to me. Guess you know where I'm headed after I get this post up right? Better go whip up your own to indulge in! Catch ya later.

This post has been linked up with Fusion Fridays over at Jennifer Cooks! Head on over to check out Jennifer's favorite submissions from last week and to check out what new goodies fellow bloggers are deaming up this week.

This post has also been linked up with Mouth Watering Mondays over at the Sweet Spot! Head over there ASAP to check out all the delicious creations fellow bloggers have come up with this week. :)

Happy Baking my Friends!

7.2.12

Crazy Cooking Challenge: The Ultimate Chocolate Cake!


Surpise!! I've joined yet another cooking and baking challenge group. I love these things!! You get to try new things with a supportive and encouraging group of fellow bloggers. You learn new things and get to have fun doing it. This time the challenge is the Crazy Cooking Challenge hosted by Tina of Mom's Crazy Cooking. She posts some amazing things on her blog, so I knew the challenges would be great too.
Photobucket

The Crazy Cooking Challenge is a new dish each month of which each participant can make their own rendition of for the challenge. For example, some of the past challenges have been Macaroni & Cheese, Fudge, Mashed Potatoes and Chocolate Chip Cookies. YUM!! This month the challenge was to make the ultimate chocolate cake. It didn't matter what we did to the cake (i.e. icing, decorating, filling, recipe), but it had to be chocolate and it had to be cake. How fun right?!

I was on Pinterest (I love followers, so feel free to follow the link and follow me on Pinterest) the other day and I saw this cake - Mint Chocolate Chip Cake. Ummmmmm thats so my favorite kind of ice cream!!! So, it was settled, I was totally making that for the Crazy Cooking Challenge. I found this recipe on Raspberri Cupcakes (along with dozens of other amazing looking recipes). She had adapted the chocolate cake recipe from David Lebovitz's Devil's Food Cake, so I knew it was going to be delicious.
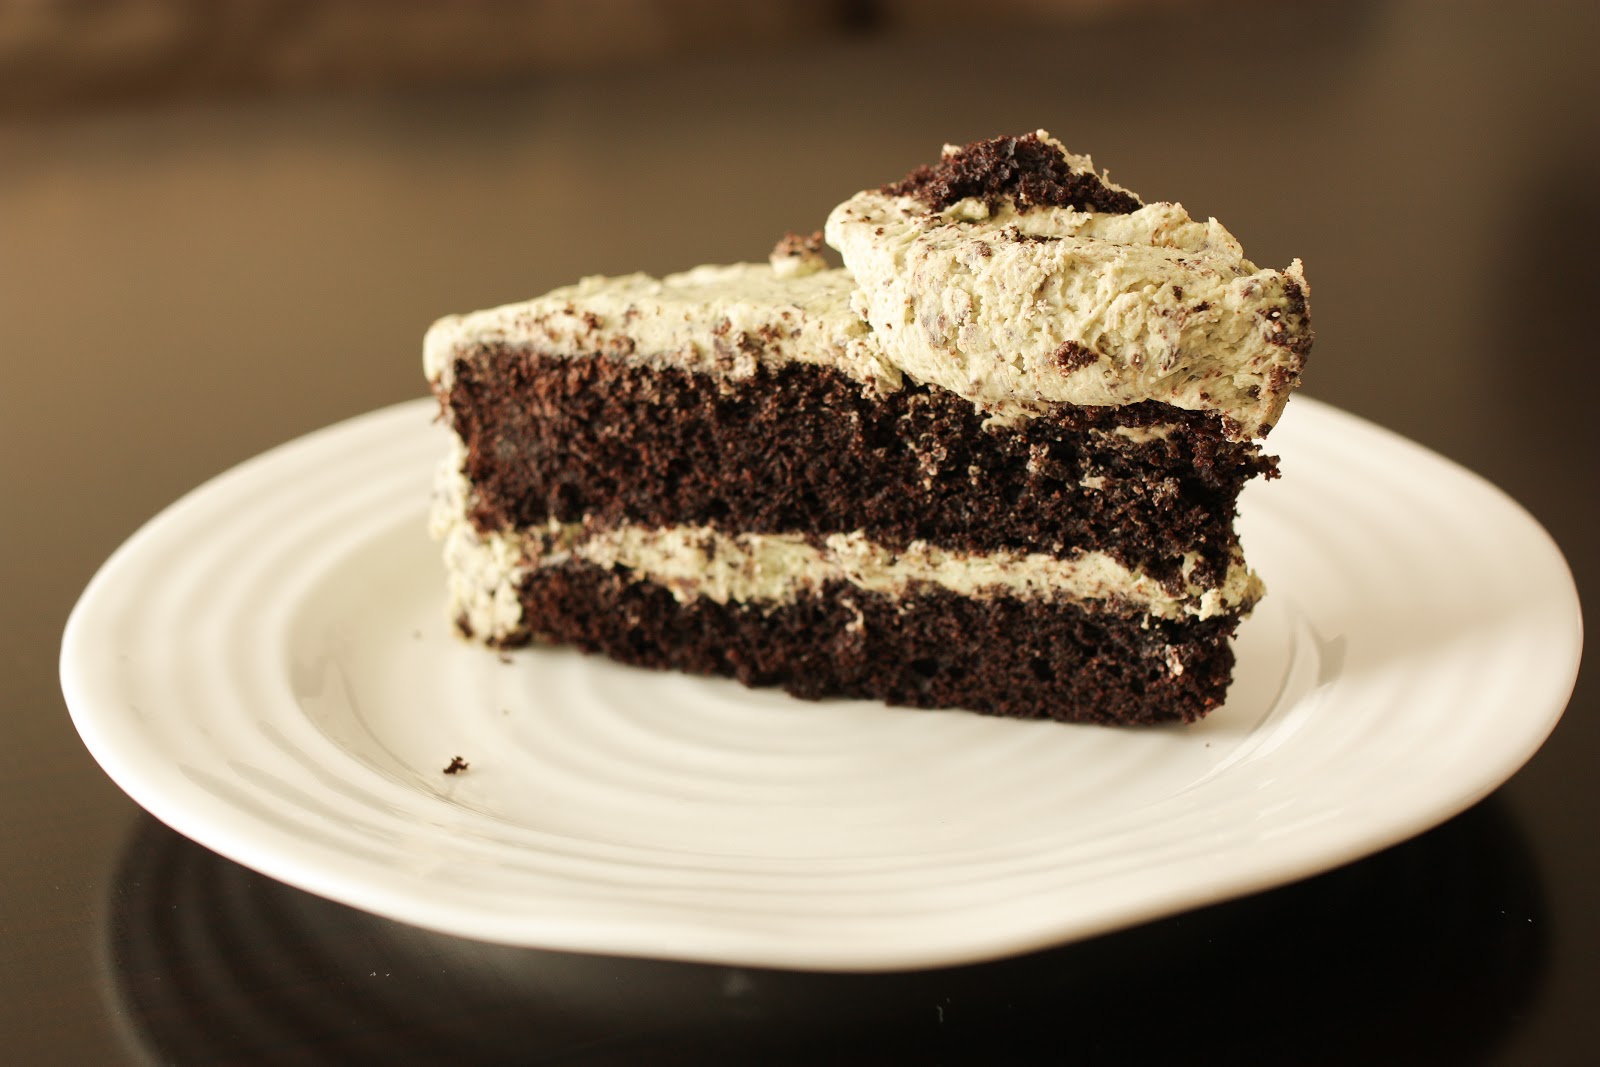
Yep, this is a pretty ugly piece of cake. It was the only piece leftover after serving it to my guests and I realized that I had better take a photo showcasing the lovely chocolate inside of the cake to show that my recipe is actually CHOCOLATE CAKE in light of what this challenge is about!!!
So, here is my entry into the Ultimate Chocolate Cake Crazy Cooking Challenge! Mint Chocolate Chip Cake. It seriously tastes just like the ice cream, so if you're a fan (and probably even if you aren't), you'll love this cake!

Mint Chocolate Chip Cake
Recipe minimally adapted from Raspberri Cupcakes

Ingredients:

For the Cake:
  • 9 tbsp unsweetened cocoa powder
  • 1 1/2 cups cake flour (not self-raising cake flour)
  • 1 1/2 tsp salt
  • 1 tsp baking soda
  • 1/4 tsp baking powder
  • 115g unsalted butter, at room temperature
  • 1 1/2 cups sugar
  • 2 large eggs
  • 1/2 cup strong coffee
  • 1/2 cup cream
For the Frosting:
  • 280g + 1/3- 1/2 cup unsalted butter at room temperature
  • 4 cups icing sugar
  • 2 tsp peppermint extract
  • 150g dark chocolate chips, run through the food processor until finely chopped
  • green food colouring
  • waffle ice cream cones to decorate (minis if you can find them!!)
Method:
  1. Butter and line the base of a 9" springform pan with parchment paper. Preheat the oven to 350F. Sift together the cocoa, cake flour, salt, baking soda and baking powder. Using a stand mixer, fitted with the paddle attachment, cream the butter and the sugar for about 5 minutes or until very fluffy and creamy. Add the eggs one at a time and beat after each addition until fully incorporated.
  2. Mix together the coffee and the cream. Stir half the dry ingredients into the butter mixture. Add the coffee-cream mixture. Then add the rest of the dry ingredients until smooth. Pour the batter into the prepared pan.
  3. Bake in preheated oven for 35-45 minutes or until a skewer inserted into the middle of the cake comes out clean (be careful not to overbake). Remove from oven and cool in baking tin for 5 minutes. Remove from baking tin to a wire rack and cool completely.
  4. Prepare the mint icing: In the bowl of a stand mixer, beat 280g of butter until fluffy and lighter in colour. Add the icing sugar one cup at a time and beat until smooth after each addition. Beat in additional butter (hence the 1/3 - 1/2 cup extra butter) until the icing is a nice spreading consistency. Beat in green food colouring until evenly distributed and coloured to desired green food colouring level. Stir through finely chopped chocolate until evenly distributed.
  5. Using a serrated knife, cut the cake in half to form two layers. Place one layer on a cake plate. Spread 1/4 of the icing on top of first layer of the cake. Then place the other half of the cake on top (trim top if necesary to get a nice flat surface). Ice the entire cake with the remaining icing. Use an ice cream scoop to make "scoops" of any extra frosting and arrange artfully on top of the cake. Top with the mini waffle cones.Can be served immediately or stored in an airtight container overnight. Serve at room temperature.
Mmmmm this was a deliciously moist cake and the frosting tasted so much like mint chocolate chip ice cream. It is a super cute cake that has a bit of a wow factor to it. I served it for a ladies get together at my house and it was a hit. Hope you enjoy it as much as we did!

This post has been linked up with Mouth Watering Mondays over at the Sweet Spot. Head on over there to check out some of the other mouth watering dishes fellow bloggers have cooked up this week. :)
This post has also been linked up with Fusion Fridays over at Jennifer Cooks. Head on over to check out her favorite submissions from last week and what other bloggers are linking up this week.