12.3.11

Blackberry Avocado Salad

This has been a really eventful week for most people around the world. Sad and scary with the earthquake and tsunami that hit Japan and the tsunami that hit other areas after rippling out from Japan. My heart goes out to the many people affected by this horrible tragedy - those living in Japan and those with family and friends in Japan. What a scary and stressful time for them. I am really touched the by the aid and fundraising efforts that started so quickly and will continue to provide support to Japan when they need it the most. The devastation and wreckage there is absolutely unreal, looking at photos and video footage makes it all the more real and all the more unnerving. My thoughts and prayers go out to those in need and those who are worried about their friends and family who may have been lost in the wreckage.


In light of the seriousness and stressfulness of the week, I thought sharing a simple and light salad with you would be fitting. As many of you are likely consumed with worry and sadness, this salad is quick to whip up, and will provide you with much needed nourishment to keep you strong and on top of things. This salad is delicious and definitely has a spring feel to it.
Blackberry Avocado Salad
Recipe from Anna Olson


Ingredients:
  • 8 cups arugula or other mixed baby greens
  • 1 ripe (but not too soft) avocado, sliced
  • 1 pint of fresh blackberries
  • 1/2 cup feta
  • juice of 1 lime
  • good quality extra virgin olive oil
  • kosher salt
  • fresh ground black pepper

Method:

  1. Wash and dry lettuce and place in a pretty bowl. Fan out the sliced avocado artfully on top of the greens and sprinkle with the blackberries and crumble the feta on top. Juice the lime over the salad, sprinkling evenly with the lime juice. Drizzle lightly with the olive oil and season to taste with salt and pepper.

I told you it was easy! And it tastes amazing - the fresh flavours really come out and the lime juice keeps the avocado from turning brown. You will love this salad and hopefully it's simplicity brings a little joy to your life in such a sad and trying time.


To all of you affected by this horrible tradgedy, my thoughts and prayers are with you. May you find your loved ones and feel a sense of peace in such a tough time.

Happy Cooking my Friends! Hugs to you all.

5.3.11

Ginger-Spice Sandwich Cookies with Lemon Cream Filling

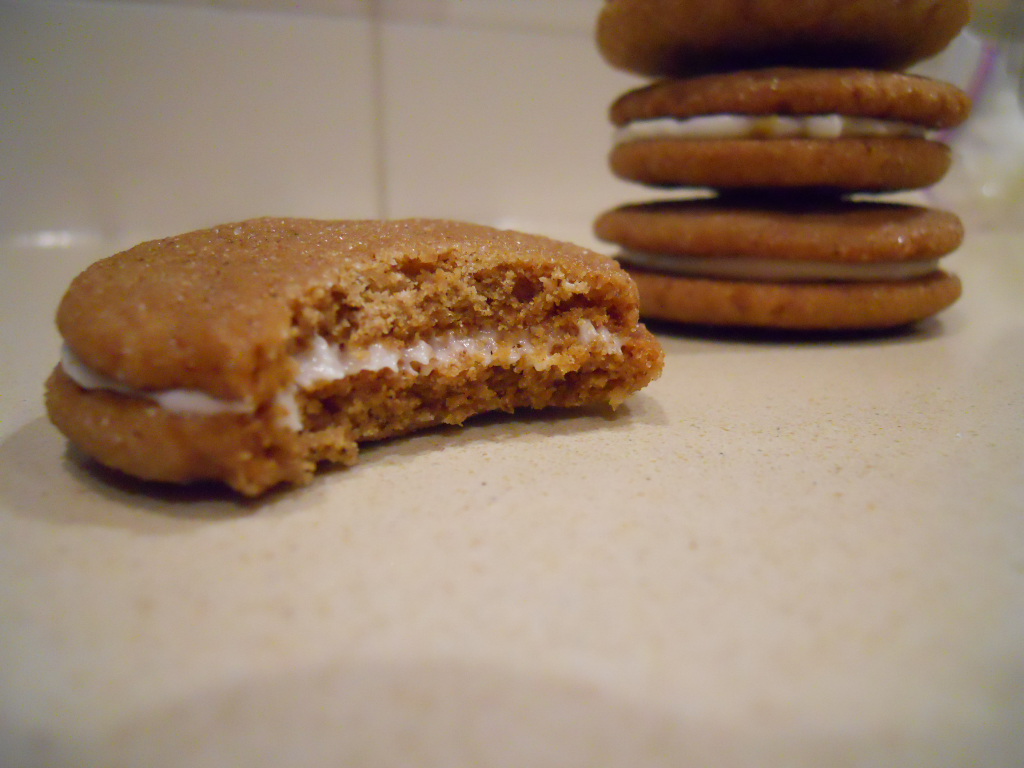
I've been having a great weekend! My Dad is here visiting, so we went out for a great dinner last night and spent the day hanging out together. Plus, the weather is nicer than its been in quite some time here, so all in all its been a good weekend! Since I'm feeling pretty joyful, I thought I would share a recipe with you that brought me a lot of joy and satisfaction - ginger-spice sandwich cookies with lemon cream. Mmmmmmm!!! I had never tried sandwich cookies before, but decided plain old cookies weren't really special enough to make for my hubby's Superbowl party last month, so I decided on this recipe from the Best of Fine Cooking Magazine - Tailgating 2010. It was definitely a good call - all of the cookies were devoured during the party and people raved about them! They were so perfect - the right amount of spice in the cookies countered with the sweet lemon cream inside the cookies. Next time I make them I'll be sure to put even more filling in them.


The cookies weren't nearly as much work as I thought they would be which is always a plus. And if you put the filling into a piping bag and pipe the filling onto the cookies, filling them is a breeze - speedy with minimal cleanup. If you make them, put about double the filling you see piped on them in the picture below, and make them the night before that way the cookies can soak up some of the filling making them extra moist and delicious.

Ginger-Spice Sandwich Cookies with Lemon Cream
Recipe from the Best of Fine Cooking magazine - Tailgating 2010


Cookie Ingredients:


  • 9 oz (2 cups) unbleached all-purpose flour
  • 2 tsp ground ginger
  • 1 1/2 tsp. ground cinnamon
  • 1/2 tsp ground cardamom
  • 1/2 tsp baking soda
  • 1/2 tsp kosher salt
  • 6 oz (3/4 cup) unsalted butter, softened
  • 1/2 cup packed dark brown sugar
  • 1/2 cup granulated sugar, plus more for rolling
  • 1/4 cup unsulfured molasses
  • 1 large egg, at room temperature
  • 1/2 tsp pure vanilla extract

Lemon Cream Ingredients:

  • 4 oz cream cheese, at room temperature
  • 1 tbsp finely grated lemon zest
  • 6 oz (1 1/2 cups) confectioners sugar

Method:

  1. Position a rack in the center of the oven and heat the oven to 350F. Line 3 baking sheets with parchment paper.
  2. In a medium bowl, whisk the flour, ginger, cinnamon, cardamom, baking soda, and salt.
  3. In the bowl of a stand mixer fitted with the paddle attachment, beat the butter and both sugars on medium-high speed until light and fluffy, about 3 minutes. Add the molasses, egg and vanilla and continue to beat until incorporated, about 1 minute. Reduce the speed to low, slowly add the flour mixture and mix until just incorporated, about 1 minute. Shape the dough into a disk, wrap in plastic, and refrigerate until firm, about 1 hour.
  4. Put about 1/3 cup granulated sugar in a small bowl. Using your hands, roll about a tsp of dough into 1-inch ball. Roll each ball in sugar and arrange about 2 inches apare on the lined baking sheets. Use the bottom of a gladd to flatten the cookies slightly. Bake one sheet at a time until the cookies feel dry to the touch and are beginning to firm up (they'll still feel soft inside), 12-14 minutes. Cool completely on racks.
  5. Make the lemon cream: with a hand mixer, mix the cream cheese and lemon zest in a medium bowl until smooth. Slowly add the confectioners sugar and continue to mix until smooth.
  6. Assemble the cookies: pipe filling liberally onto the center of a cookie, top with another cookie, then gently press them. Repeat with the remaining cookies. Store in an airtight container for up to two days.


If you want to serve them up pretty, you can put them on a plate with some candied ginger. It adds a nice touch!


I hope you're having an exciting weekend! Filled with friends, family and fun times. I am heading out of town again for work (leaving tomorrow), out to the middle of no where... so blogging may be somewhat intermittent, so please bear with me. :) Hope you enjoyed this post and are inspired to try out these little bits of heaven!
Happy Baking my Friends!

3.3.11

Gingerbread Cupcakes with Carmelized Mango Buttercream

I tend to like to stick to recipes that are pretty easy - not too many steps, not too many ingredients and not too labour intensive. I'm impatient and fairly lazy, so easy recipes are definitely where its at for me. I did make an exception when I bought Bobby Flay's new cookbook "Bobby Flay's Throwdown". This is a cookbook full of labour intensive, all-out recipes! Bobby shares the Throwdown stories and really lets you get to know both himself and the competitors... The cookbook is really well done! And of the few recipes I've tried out of the cookbook, they've all been show stoppers.

When I started making these cupcakes, I didn't really realize how labour intensive they are. They are not a quick easy batch of cupcakes to whip up, but boy are they good! Definitely a great treat to sit down to after all that hard work!!! They're moist with an extra ginger zing added by infusing a simple syrup with fresh ginger. So yummy! The mango buttercream was really interesting. As you can see from the recipe below, they call it buttercream for a reason - it is chock full of butter. Perhaps a bit too buttery for my taste, but pretty neat with the carmelized mango added in. Try out this recipe when you want to pull out all the stops and really impress someone you care about. :)

On to the recipe!
Gingerbread Cupcakes with Carmelized Mango Buttercream
Recipe from Bobby Flay's Throwdown
Cupcake Ingredients:
  • 3/4 cup granulated sugar
  • 1 3-inch piece fresh ginger, coarsely chopped
  • cooking spray
  • 1 3/4 cups all-purpose flour
  • 1 tsp baking powder
  • 3/4 tsp baking soda
  • 1/4 tsp fine salt
  • 1 tablespoon ground ginger
  • 2 tsp ground cinnamon
  • 1/4 tsp ground cloves
  • 3 tbsp unsalted butter, melted
  • 3 tbsp vegetable oil
  • 3/4 cup firmly packed dark brown sugar
  • 2 large eggs
  • 6 tbsp molasses

Carmelized Mango Buttercream Ingredients:

  • 2 cups, plus 2 tbsp unsalted butter, slightly softened, but still cool, cut into small pieces
  • 2 ripe mangos, coarsely chopped
  • 6 large egg yolks
  • cooking spray
  • 3/4 cup sugar
  • 1/2 cup light corn syrup
  • 1 tbsp pure vanilla extract
  • 1/4 cup finely diced candied ginger, for garnish

Method:

  1. To make the cupcakes, combine the granulated sugar, fresh ginger, and 3/4 cup water in a small saucepan and bring to a boil over high heat. Cook until the sugar has melted and the mixture thickens slightly, about 2 minutes. Remove from the heat and let infuse for 30 minutes. Then strain the ginger syrup before using.
  2. Meanwhile, preheat the oven to 350F. Line 12 muffin cups with paper liners and spray the liners with cooking spray.
  3. Sift together flour, baking powder, baking soda, salt, ground ginger, cinnamon and cloves into a medium bowl.
  4. Whisk the melted butter, oil, brown sugar, eggs, and molasses together in a large bowl. Add the dry ingredients and stir until the batter is smooth.
  5. Fill each paper liner with 1/3 cup of the batter, to come about 1/4 inch below the top of the liner. Bake just until the tops feel firm and a toothpick inserted into the center comes out with a few moist crumbs attached, about 12-15 minutes. Remove from the oven and brush the tops liberally with the ginger syrup. Let stand in pan for 5 minutes before removing. Let cool completely on a wire rack before frosting.
  6. To make frosting, heat the 2 tbsp butter in a large saute pan over high heat. Add the mangos and cook until carmelized and soft (watch them carefully - they will burn easily at this high temperature), about 10 minutes. Transfer to a food processor and process until smooth. Pass the mixture through a medium-mesh strainer into a bowl. Discard the solids.
  7. In the bowl of a stand mixer fitted with the whisk attachment, beat the egg yolks on high speed until creamy and pale yellow, about 5 minutes.
  8. Spray a heatproof measuring cup with cooking spray. Combine the sugar and corn syrup in saucepan and bring to a full rolling boil over medium-high heat. Cook without stirring until syrup reaches the soft-ball stage, 238F- 242F on a candy thermometer. Immediately pour into measuring cup to halt the cooking.
  9. Add a small amount of the syrup to the beaten egg yolks, turn the mixer on to high speed, and beat for about 5 seconds. Continue stopping the mixer, adding syrup and beating in the same manner until all the syrup is incorporated. Beat the mixture until it is completely cool.
  10. Add the remaining 2 cups butter, a few pieces at a time, beating until incorporated before adding the next pieces. When all the butter ha been blended in, add the vanilla and mango puree and beat until combined.
  11. Frost the top of each cupcake liberally with the buttercream, and garnish with candied ginger.
Whew!!! What a load of work, but so delicious. Please don't eat the whole batch by yourself... I doubt you will feel very well if you do... and even if you're still able to walk, you probably won't be able to get dressed because your clothes won't fit you any more!


How is that for a weeknight post folks? Hope you enjoyed and it added some sweetness to your week! Woohoo for tomorrow being Friday! Hang in there!
Happy Baking my Friends!


1.3.11

Homemade Chicken Stock

Looks like a gross picture huh? Chicken bones? Well, all this yuckiness in that huge stock pot made the most delicious chicken stock. 10 times better than anything you can buy in the store and wayyyyy healthier. Far less sodium and no preservatives = a healthier, happier you (okay, maybe not happier, but hey, I felt pretty happy after I made this goodness!). Want another reason to try this recipe (as if the above isn't enough...) - its dirt cheap to make and you can feel virtuous for not wasting the chicken carcus! It really is a win win situation. :)

This recipe makes a lot of chicken stock, but thats no problem. You can freeze chicken stock for a couple months in the freezer. Freeze it in 4 cup portions for ease of use when you thaw it! And if you think you won't use lots of chicken stock, think again! Stock goes in everything and making your own soup can be a delicious adventure. Do try out this recipe, put your own twist on it and remember, this recipe is just a guideline! Be creative and enjoy the process and the amazing smell in your house as this stock simmers away!

Chicken Stock
Recipe from Anna Olson

Ingredients:

  • 1 chicken carcus (some meat left on it is okay)
  • 2 onions, cut in half, peel intact
  • 2 celery stalks, roughly chopped
  • 2 carrots, roughly chopped
  • 2 bay leaves
  • 2 sprigs fresh thyme
  • 5 whole peppercorns
  • 1 sprig fresh parsley

Method:

  1. Put all ingredients in a large stockpot and cover with cold water. Slowly bring up to a gentle simmer over medium-low heat (no higher than medium). Once the fat and impurities start rising to the surfact, skim the sop of the stock with a spoon.
  2. Keep the stock at a bare simmer, uncovered, for 2 1/2 hours from when it first starts to simmer. A vigorous boil would disturb the ingredients and the stock will come out cloudy. Strain the stock while its still hot. Discard the veggies, herbs and chicken bones.
  3. Now that you have great stock, you can make amazing soups and sauces! Have at er!

So, thats it, pretty simple huh? Hope you get a chance to try this out at some point. You will be able to taste a difference - its that good!

Happy Cooking my Friends!

27.2.11

The Daring Bakers Challenge - February 2011 - Panna Cotta!


When this month's challenge was posted, I felt a little let down initially... after the hype of last month's uber challenging biscuit jaconde, the thought of making "simple panna cotta" seemed a little too easy. And while it was a technically simple procedure to make panna cotta, making layered panna cotta with other various elements including florentine cookies & homemade nuttella transformed this dessert into something spectacular which I think is what Mallory had in mind when she selected this fabulous challenge. It really gave me the opportunity to be creative and bring an otherwise simple dessert up a notch.

The February 2011 Daring Bakers challenge was hosted by Mallory from A Sofa in the Kitchen. She chose to challenge everyone to make Panna Cotta from Giada De Laurentiis' recipe and Nestle Florentine cookies. It was a great challenge and I'm so thankful to Mallory for showing us how to make Panna Cotta. It was amazing to see how the other Daring Bakers really stepped it up for this challenge and made some absolutley amazing creations - beautiful flavours, colours, shapes and sizes.

I chose to make a layered panna cotta which included the following layers: vanilla panna cotta, homemade nuttella, toasted hazelnuts (chopped), chocolate panna cotta. I also made the florentine cookies and filled them with more homemade nuttella. I served these for a dinner party last night and they were incredibly well received. I also thought this dessert turned out so great - they looked beautiful and it really adds a wow factor when you unmold them for your guests! :)

There are a lot of elements to this challenge, so this post is going to be a long one... hopefully you can bear with me to make it through these recipes!
Vanilla Panna Cotta
Recipe slightly adapted from Giada De Laurentiis

Ingredients:

  • 1 cup whole milk
  • 1 tbsp (1 package) unflavoured gelatin
  • 3 cups whipping cream
  • 1/3 cup honey
  • 1 tbsp granulated sugar
  • pinch of salt
  • 2-3 tsp vanilla extract

Method:

  1. Pour milk into a bowl or pot and sprinkle gelatin powder over the milk in an even layer. Let stand for 5 minutes to soften the gelatin.
  2. Pour the milk and gelatin into a medium size pan and place over medium heat on the stove. Heat until the mixture is hot, but not boiling, about 5 minutes. Whisking the mixture a few times while it heats up is a good idea!
  3. Next, add the remaining ingredients. Make sure the mixture doesn't boil, continue to heat over medium heat, stirring occasionally until honey and sugar are dissolved, about 5-7 minutes.
  4. Remove from heat, allow to stand for a few minutes to cool slightly. Then pour into glasses or ramekins, or whatever fun shaped dishes you have on hand.
  5. Refrigerate at least 6 hours or overnight.

Next element is homemade nuttella! I found this recipe for homemade nuttella on David Lebovitz's blog and just had to make it. It was absolutely perfect for this challenge and how great is it to be able to make nuttella from scratch?!

Homemade Nuttella

Recipe from David Lebovitz

Ingredients:

  • 1/3 cup whole almonds
  • 1 1/3 cup whole hazelnuts
  • 1 3/4 cup whole milk
  • 7/8 cup powdered milk
  • 3 tbsp mild flavoured honey
  • pinch of salt
  • 6 oz bittersweet or semisweet chocolate, chopped
  • 5 oz milk chocolate, chopped

Method:

  1. Spread the nuts on a baking sheet, keeping the almonds and hazelnuts separate. Toast the nuts in an oven preheated to 350F, stirring a few times for about 10-15 minutes, until the hazelnuts are browned.
  2. While they are roasting, warm the milk and powdered milk in a saucepan with the honey and salt just until the mixture starts to boil. Remove from heat.
  3. Melt the chocolate together in the microwave until smooth.
  4. Use a spatulla to put the warm hazelnuts in a kitchen towel and rub them vigorously to remove as much of the skin as possible (dont' worry if you don't get all of it, just get as much as you can).
  5. In a food processor, grind the nuts together until they are as smooth as you can get them. It will probably take a good 5 minutes or so to get them pretty smooth. Add the melted chocolate and continue to process until mixed really well. Stopping to scrape down the sides of the bowl if necessary.
  6. Once mixture is smooth, add the warm milk mixture and process until smooth. It might be a bit soupy here, but don't worry, it will firm up when it is refrigerated. For perfectly smooth nuttella, you can strain the mixture, but you don't have to. I didn't and it turned out fine.
  7. Transfer mixture into two jars and refrigerate. Keeps about one week.

Pipe a layer of nuttella onto the set layer of vanilla panna cotta and sprinkle with chopped toasted hazelnuts. Put that in the fridge to set up while you make the chocolate layer of panna cotta.

Chocolate Panna Cotta

Recipe adapted from Bon Apetit

Ingredients:

  • 1 cup whole milk
  • 1 tbsp (1 pkg) unflavoured, powdered gelatin
  • 2 cups whipping cream
  • 1/2 cup sugar
  • 3/4 cup bittersweet or semisweet chocolate
  • 1/2 tsp vanilla extract

Method:

  1. Pour milk into small bowl and sprinkle evenly with gelatin. Set aside for about 5 minutes to soften the gelatin.
  2. Place a saucepan over medium heat, stir in cream, sugar and vanilla. Bring to low boil. Add chocolate and stir until melted. Whisk in gelatin milk mixture. Whisk until gelatin has dissolved.
  3. Pour very carefully over the already set vanilla, nuttella and hazelnuts. Place in refrigerator to firm up for 8 hours or overnight.
  4. To serve, dip bottoms of ramekins in hot water, run sharp knife around edges and invert onto serving dishes. Garnish with florentine cookies and more chopped toasted hazelnuts.

And lastly, make the florentine cookies:

Nestle Florentine Cookies

Recipe from the cookbook Nestle Classic Recipes

Ingredients:

  • 2/3 cup unsalted butter, melted
  • 2 cups quick rolled oats
  • 1 cup granulated sugar
  • 2/3 cup all purpose flour
  • 1/4 cup dark corn syrup
  • 1/4 cup whole milk
  • 1 tsp vanilla extract
  • pinch of salt
  • homemade nuttella (recipe above)

Method:

  1. Preheat oven to 375F. Combine melted butter, oats, sugar, all purpose flour, corn syrup, milk, vanilla and salt. Mix well. Drop by the tablespoon full onto cookie sheet lined with parchment paper leaving 3 inches between cookies (they spread a lot). Flatten slightly with back of spatula.
  2. Bake in preheated oven for 6-8 minutes until cookies are golden brown. Cool completely on cookie sheet. Peel cookies off parchment paper and place face down on cooling rack in pairs. Pipe nuttella onto the bottom side of one cookie and place other cookie on top creating a sandwich cookie. Keep cool until serving to ensure nuttella stays firm.

And that is this month's Daring Bakers Challenge! How fabulous does that look?? And they tasted even better. :) Do try this recipe - its easy and you can simplify it by just making one kind of panna cotta or buying premade biscuits or nuttella to serve it with. Thanks Mallory for such a fantastic challenge and for sharing such great recipes with all of us Daring Bakers!

Happy Baking my Friends!

13.2.11

Cranberry Pear Linzer Tart

Can you believe today is February 27th already? Do you know what happens on the 27th of each month? Thats right, I post my daring bakers challenge. Well, this is definitely NOT my Daring Bakers challenge! This is a different post that I've been meaning to share with you for a while and while I have a few quiet minutes to myself this morning while hubby is still asleep and the dishwasher is washing the many dirty dishes from my dinner party last night I am going to write this post! Daring Bakers post to follow this evening after I have had a chance to photograph my dessert... thats right... I really saved it to the last minute this month!
I made this tart on boxing day, hence the sort of Christmassy holly looking thing on top of the tart (if you can't tell what it is, don't feel bad, I just didn't want to throw away leftover pastry!!!). It was really delicious, the pears are lovely and sweet and the cranberries add a tart burst here and there to really balance out the sweetness of the pears. But the part of this recipe that was the most interesting (and the most challenging) was the crust. As you'll see in the ingredients that follow, the majority of the ingredients go into the crust resulting in the most delicious flavour and texture in a pastry crust that I have ever tasted. Be warned though, this dough is not easy to work with... it caused me a lot of frustration, but the delicious results made it worth it!


Pear-Cranberry Linzer Tart
The Best of Fine Cooking Magazine

Ingredients:

  • 4 oz (1 cup) walnuts, lightly toasted
  • 1/2 cup granulated sugar
  • 8 oz (1 3/4 cups) all purpose flour
  • 1 tsp ground cinnamon
  • 1 tsp finely grated lemon zest
  • 1/2 tsp salt
  • 1/2 tsp ground cloves
  • 2 hard-cooked egg yolks, crumbled
  • 8 oz (1 cup) cold unsalted butter, cut into 1/2 inch pieces
  • 2 raw egg yolks
  • 1/2 tsp pure vanilla extract
  • 2 lb ripe pears, peeled, cored, and cut int 1/2 inch slices (about 4 cups)
  • 6 tbsp all purpose flour
  • 1 cup fresh or frozen cranberries, picked through and rinsed
  • 1/2 cup granulated sugar
  • 1 egg yolk
  • 1/4 cup heavy cream or whole milk

Method:

  1. To make the dough: in a food processor, grind the walnuts with the first amount of sugar to a sandy texture. Add first amount of flour, cinnamon, lemon zest, salt, cloves and crumbled hard cooked egg yolks. Pulse briefly to combine. Add butter and pulse until dough starts to come together and looks clumpy. Add the raw yolks and vanilla and pulse until well combined. The dough will be sticky and moist - more like a cookie dough than a pastry dough. Cut dough in half and set each half on a large piece of plastic and shape each into a flat disk, using the plastic to help you flatten. Wrap each disk in its plastic wrap and refrigerate at least 1 hour.
  2. To assemble the tart: on a floured work surface, roll each disk of dough onto an 11 inch round, about 1/4 inch thisk. Put one round on a plate and refrigerate, uncovered. Fit the other round into a 9 inch fluted tart pan with removable bottom. Fold the excess dough into the sides of the pan and press to get an edge flus with the side of the pan. Sprinkle 2 tbsp of the flour in the bottom of the tart and spread evenly to cover.
  3. Toss the pears and cranberries with remaining 4 tbsp of flour. Arrand the fruit in the tart shell so that pears lie as flat as possible (as you can see, I just tossed mine in there!!) and there are some berries showing on top. Scrape any remaining flour over the fruit and sprinkle with the other 1/2 cup of sugar. Take the other piece of dough from the fridge and cut into 8 1-inch wide strips. Arrange 4 strips evenly spaced over the top of the tart. Then on a shart diagonal to the first four, set the other four strips on top so that the overlapping layers make diamond-shaped windows. Trim the ends of the strips and press them into the edges of the tart.
  4. Position the rack in bottom of oven, line a heavy rimmed baking sheet with foil and set on the rack. Heat the oven to 350F. Whis the last egg yolk with the 1/4 cup cream. Brush top strips with the egg glaze.
  5. Bake on the baking sheet until the pastry is golden brown, 45 minutes to 1 1/4 hours. Let cool on a rack for 1 hour before serving.

This is such a delicious and versatile dessert and the crust really is so different tasting that it is worth giving it a try! You most definitely won't regret it and the people you share it with will be glad you went to the trouble of making it. :)

Happy Baking my Friends! Stay tuned for my Daring Bakers post later today.

Chocolate Chip Cookies

I hope you're all having a fantastic weekend! Mine has been great - a welcome rest from the craziness of last week. I felt moderately productive this weekend too! Hubby and I managed to finish a bench we have been "refinishing" for the last year. And I made some great meals this weekend - Lamb Rogan Josh on Saturday night and Pork Carnitas tonight! Deliciousness. :) In light of all the cooking / baking this weekend, I thought I would post something nice and simple with comfort-food qualities... I mean, who doesn't like chocolate chip cookies?!

This is a great recipe - simple, delicious and quick to make! I found it in the Better Homes & Gardens New Cook Book years ago. It is my go-to recipe. I do have other recipes that I like too, but I've made this one so many times I pretty well have it memorized! I hope you enjoy it as much as we always do.

Chocolate Chip Cookies
Recipe from Better Homes & Gardens New Cook Book

Ingredients:

  • 2 1/2 cups all purpose flour
  • 1 tsp baking soda
  • 1/2 tsp salt
  • 1 cup butter
  • 1 cup packed brown sugar
  • 1/2 cup granulated sugar
  • 2 eggs
  • 1 1/2 tsp vanilla
  • 2 cups chocolate chips (I only use 1 - 1 1/2 cups)

Method:

  1. Stir flour, soda and salt together. In the bowl of a stand mixer, beat butter on medium speed for 30 seconds. Add both sugars and beat until fluffy. Add eggs and vanilla; beat well.
  2. Add dry ingredients to beaten mixture, mixing until well combined. Stir in chocolate chips.
  3. Bake at 375F for 8-10 minutes. Be sure not to over cook them!


Happy Baking my Friends!