Pages

19.11.12

Peanut Butter RIce Krispies for SRC

I had a crazy weekend with some very unexpected and exciting news! I can't share details with you yet, but this news totally threw off my plans to tackle my SRC assignment on Sunday as I had originally planned to. It completely slipped my mind and I'm so sorry because I was assigned such a fantastic blog this month!!!


I was assigned Cook with Sara. I chose to make the rice Krispy squares but opted to use a slightly different flavor profile with peanut butter and chocolate rather than the caramel chocolate combo she used. Both I'm sure would be fantastic! Check out the recipe here


I chopped up mini peanut butter cups (approx 1 cup chopped) and stirred them into the Rice Krispies. Then I drizzled the bars with melted peanut butter (1/4 cup) and chocolate (1/4 cup). They were soooo good!

Thanks Sara for the delicious recipe and the many more recipes that I can't wait to try (check out the Cappuccino Crinkles - they're next on my list!!). I apologize for the lateness of my post!


Happy Baking my Friends!


12.11.12

Mini Slider Buns


You know how some things are just better and cuter in miniature form? Burgers are totally one of those things for me. I'm not one to love burgers, but give them to me in a tiny version and I'll eat a plateful! The only annoying thing about making sliders is that it can be hard to find the mini buns you need to make them. Well, look no further, just make your own - they're easy, super cute and way better than store bought. {Hang in there for later this week - I'll post my slider burger patty recipe and the toppings I used when I served these at my friend's cocktail party} Plus, your guests will go crazy for them - so be sure to make lots!!


I found this recipe via a random google search for mini slider buns on a blog called Lauren's Latest. What a great find! She has some awesome recipes on there, so be sure to pop over there and have a look. :)

Mini Slider Buns
Recipe minimally adapted from Lauren's Latest

Ingredients:
  • 1/2 cup warm water
  • 2 1/4 teaspoons instant yeast
  • 1 tsp honey
  • 1/4 cup butter
  • 1/2 cup milk
  • 2 eggs, divided
  • 1 tsp kosher salt
  • 3 cups all purpose flour
  • sesame seeds for sprinkling
Method:
  1. Stir warm water with yeast and honey. Cover with plastic wrap and set aside to proof (about 5-10 minutes or until mixture is foamy).
  2. Place butter in microwave safe bowl and melt. Remove from microwave and stir in milk and 1 egg. Stir to incorporate. Pour into bowl of a stand mixer. Pour yeast mixture into bowl of stand mixer and sprinkle with salt and two cups of the flour. Knead with dough hook until all flour has been incorporated. With mixer on low, add remaining one cup of flour gradually (you may not need all of it). Knead on low until dough is smooth and slightly sticky. Place in well oiled bowl, turning dough to coat. Set aside to rise for one hour until doubled in bulk.
  3. Punch down dough and form into small balls the size of golf balls. Place on parchment lined baking tray. Cover and let rise another 30-60 minutes.
  4. In a small bowl, beat remaining egg with two tablespoons of water. Brush tops of buns and sprinkle with sesame seeds. Bake in 350F oven 12 - 15 minutes or until golden brown on top.


Happy Baking my Friends!

10.11.12

Chocolate Espresso Peanut Butter Chip Cookies

 
A couple weeks ago I was supposed to bake dessert for a cocktail party I was attending - I had planned a couple of delicious show stoppers. The were 1) Chocolate coconut rounds and 2) Marshmallow topped peanut butter pretzel squares. I baked them both the day of the party and as I was portioning them into mini cocktail sized portions, I decided I didn't like how either of them presented, or tasted. So, now with only 1 1/2 hours to finish getting myself ready and find another dessert option, I had to think and do quickly - off to pinterest I went. I found these chocolate espresso brownie cookies, but I didn't have time to get to the store to buy the ingredients I needed, so I made due. Lo and behold, they turned out amazing and were a total hit. Who knew such a simple and easy cookie could be such a superstar. Make these and be prepared to want to eat the whole batch!! They're that good!
 
 
 Chocolate Espresso Peanut Butter Chip Cookies
Recipe minimally adapted from Just a Taste

Ingredients:
  • 3 oz unsweetened chocolate
  • 1 cup semi sweet chocolate chips
  • 1 cup peanut butter chips
  • 8 tbsp butter
  • 3 large eggs
  • 1 cup plus 2 tbsp sugar
  • 2 tsp instant coffee granules
  • 1 cup flour
  • 1/3 tsp baking powder
  • 1/4 tsp salt
Method:
  1. Preheat oven to 350F.
  2. Combine unsweetened chocolate, semi sweet chocolate chips and butter in a microwave safe bowl. Microwave on low heat, stirring at 30 second intervals until melted and smooth. Set aside.
  3. In the bowl of a stand mixer combine the eggs, sugar and coffee granules on high speed until smooth and very thick - about 3 minutes. Slowly add the chocolate mixture to the bowl, whisking until just combined.
  4. Turn off stand mixer and add flour, baking powder and salt to the bowl. Stir until just combined. Add peanut butter chips and stir until just combined.
  5. Place scoopfuls of batter onto parchment lined baking sheets leaving approximately 2 inches in between them. Bake in preheated oven for 15 - 18 minutes or until cookies are puffed. Do not overbake - if in doubt, underbake. Let sit on baking sheet for 2 minutes before transferring to wire rack to cool completely.


Hope you are having a fantastic weekend! I know I am! The sun is shining, I've had a chance to do some baking and some shopping so life is good. To those of you Canadians reading this, be sure to take the time to pause and remember those soldiers who fought and lost their lives for our freedom tomorrow on Remembrance Day. They made it possible for us to have many freedoms not enjoyed by people in all areas of the world and as such, we owe them tribute for their selfless acts. Lest we forget.

Take care and enjoy the rest of your weekend.

Happy Baking my Friends!

22.10.12

No Bake White Chocolate Peanut Butter Cookies for SRC


Time for Secret Recipe Club again! This month seems to have been another busy month, even though I have been expecting life to just slow down a bit. No such luck though!! This is one of those months I wish I would have had more spare time because the blog I was assigned, Veronica's Cornucopia is such a great blog! There were so many great recipes and so many creative ideas. I will definitely be visiting again in a month I have more time to experiment, because there were a lot of great looking recipes to try. Go have a look around for yourself - I'll still be here when you come back. :)


I didn't really go too crazy due to my lack of time, but I was super impressed with how quick, easy and delicious the recipe I selected was! I made Veronica's Cow Pie Cookies - but changed them up to be made with white chocolate and peanut butter because that's what I had on hand!

White Chocolate Peanut Butter Cookies
Recipe adapted from Veronica's Cornucopia

Ingredients:
  • 12 oz white chocolate
  • 4 tbsp peanut butter
  • 2/3 cup rolled oats
  • 1/2 cup shredded coconut
  • chopped marshmallows (I used about 1/2 - 1 cup)
Method:
  1. Melt the white chocolate and peanut butter on low heat in the microwave. Stir until smooth. Stir in the oats, coconut and marshmallows. Drop by spoonfuls onto parchment paper. Let set at room temperature until firm - approximately 1 hour. Enjoy!
Yep! Thats it - easy, and delicious. Veronica says you can mix in whatever you want! I think next time I make these I'll mix in pretzels for that sweet and salty combo that I can't get enough of.


Thanks for stopping by - Happy Baking my Friends!

19.10.12

Bavarian Style Soft Pretzels!


 So the first thing you probably noticed is that my pretzels are ugly... like super ugly. But, what they lack in beauty, the made up for in taste! These guys were delicious. They're a little bit of work, but most of the work is down time waiting for them to rise, freeze, then rise again, then the worst part - waiting for them to bake - its so hard when they smell sooooo delicious!

If you have a rainy Saturday with not much planned, these are a perfect way to spend the day! You can make them at a leisurely pace and enjoy the process and the fruits of your labour!

 We'll get on to the recipe and th process ASAP since its a bit longer than most recipes I post on my blog. :)

Bavarian Style Soft Pretzels
Minimally adapted from Fine Cooking - Oct/Nov 2012 Issue

Ingredients:
  • 1 1/2 tsp active dry yeast
  • 19 1/2 oz (4 1/2 cups) flour
  • 2 tbsp packed light brown sugar
  • 2 1/4 tsp kosher salt
  • vegetable oil or cooking spray
  • 3 tbsp baking soda
  • 1 large egg, lightly beaten
  • 1 tbsp pretzel or coarse salt
Method:
  1. In a stand mixer fitted with the dough hook, combine the yeast and 1 1/2 cups lukewarm water and let stand until dissolved, about 5 minutes. Add the flour, sugar, oil and salt. Mix on low speed until the ingredients are hydrated and form a coarse ball of dough, 2-3 minutes. Add more water as needed, 1 tsp at a time, if all of the flour isn't incorporated into the dough.
  2. Increase the speed to medium low and mix until the dough becomes smooth, supple and elastic, about 3 minutes. The dough should be soft but only slightly tacky; if it seems sticky or very tacky, sprinkle in more flour, as needed.
  3. Form te doug into a ball, transfer to a large, lightly oiled bowl, cover with plastic wrap and let rise at room temperature until it is about 1 1/2 times its original size, 1 - 1 1/2 hours.
  4. Lightly mist a work surface with oil and transfer the dough to it. Divide the dough into 6 equal pieces (about 6 oz each). Form each piece into a smooth, round ball, lightly mist wit oil, and cover with plastic wrap. Let rest on the work surface at room temperature for 20-30 minutes to allow the gluten to relax.
  5. Line a large baking sheet with lightly oiled parchment paper and set aside (I needed two of them). Lightly mist a work surface and using your palms and fingers, roll each piece ofdough on the work surface into a rope that is about 30 inches long and 1/3 - 1/2 inch thick (note, this is why mine are ugly - I didn't roll my ropes long or thin enough). If the doug resists or shrinks back, let it rest for a few minutes while you work on other pieces; short rests will let the gluten relax enough to allow for the full rollout.
  6. Working with 1 dough rope at a time, shape it into a large U that is 5-7 inches across with the curved side closest to you. Take the two ends of the rope in your fingers and cross one over the other so ends overhang the cross by about 3 inches. Twist the ends of the rope, shortening the overhang to about 2 inches. Next, pull the twisted section toward you and fold it down over the bottom curve of the U so the ends are a couple inches apart and overhand the bottom by about 1/4 inch.
  7. Carefully transfer the partzels to the prepared baking sheet, spacing them evenly and reshaping as needed. Cover with plastic wrap and freeze til hard, at least 2 hours and up to three weeks.
  8. Bring 2 cups of water to a boil in a small saucepan. Remove from the heat and add the baking soda and stir til completely dissolved. Transfer to a bowl and let cool to lukewarm, about 30 minutes.
  9. Using stainless steel tongs, dip one pretzel into the baking soda bath at a time and soak for five seconds. If the liquid doesn't completely cover the pretzel, turn it over and submerge the other side for five seconds. Remove pretzel from liquid and allow excess to drip off. Return to baking sheet.
  10. Brush tops and sides of pretzels with some of the beaten egg. Let pretzels thaw and rise at room temperature until they are soft and puffy, 1 1/2 to 2 hours.
  11. Position a rack in the center of the oven and heat to 400F. Brush pretzels once more with egg. Lightly sprinkle with salt. Bake until dark golden-brown, approximately 20-22 minutes. Transfer to rack and cool for at least 15 minutes before serving.

So, like I said, a little labour intensive, but well worth the effort. Hope you enjoy!

Happy Baking my Friends!

16.10.12

Bacon Rolls for 7th World Bread Day


Its the 7th Annual World Bread Day hosted by Zorra Kochtopf!! Food bloggers all over the world join in and bake bread and post about it on October 16. How fun right? I missed it last year, so there was no way I was going to miss it this year. :)


I decided to do a savory version of cinnamon rolls - Bacon Rolls! Easy and delicious! First, you're going to start off by making my herb bun recipe and letting it have its first rise. Here's the recipe.

Once your dough has completed its first rise, roll it out into a large rectangle - til its about 1/4 - 1/2 inch thick. You'll need the following ingredients to put on that rectangle of dough:
  • Bacon (I used 1 lb, but that was overkill!!) - chopped and cooked til crisp
  • Cheese (I used a 4 cheese italian blend) - enough to sprinkle over the dough and a bit more to sprinkle on top of the pan
  • 2 heads roasted garlic
Spread the roasted garlic on the dough rectangle, leaving a 1/2 inch border. Then sprinkle liberally with bacon and cheese. Roll tightly, starting on the long side of the rectangle (like you're rolling cinnamon buns). Then pinch the seam tightly to make sure it stays put. Next, cut into approximately 12-15 buns. Place in a greased 9x13 inch pan with the cut side up. Once the pan is full, sprinkle with a bit more cheese, bacon salt and a bit of smoked bacon salt. Cover with plastic wrap and let rise 45 minutes to one hour or until doubled in bulk.

Preheat oven to 375F. Bake in preheated oven for approximately 30 minutes or until they sound hollow when you tap on them. Let cool slightly and enjoy!


The picture above is the bacon salt I like to use, but you can use any brand you like. Most gourmet food stores will carry various types of salt and since bacon is so popular right now, they're likely to carry bacon salt.

Hope you enjoy my contribution to World Bread Day! I can't wait to see what everyone else contributes this year. :)

Happy Baking my Friends! And thanks Zorra for hosting this lovely gathering of food bloggers.

13.10.12

Coconut Crusted Salted Caramel Cookies


I follow a great blog called Taking on Magazines written by "the Mom Chef" who is actually Christiane. Its a great blog with loads of delicious recipe ideas. Please check it out right now - I'll be here when you get back. :)

Any way, a while back she posted the recipe for these amazing cookies and I pinned it to try later. Later finally came when I made them a couple weeks ago. They were such a hit!!! Devoured eagerly and quickly that I barely had time to snap a couple of pictures. You've gotta try making them they are absolutely delicious and easy to make. In fact they might be fun to make with your kids if you have them - the kids could help with rolling them into balls and rolling them in the coconut (or nuts if you choose). It would be a fun kitchen project to take on.


Coconut Crusted Salted Caramel Cookies
Recipe adapted from Taking on Magazines

Ingredients:

  • 3 sticks unsalted butter, softened
  • 1 cup sugar
  • 1 tbsp vanilla
  • 3 1/2 cups flour
  • 1/2 tsp kosher salt
  • 2 large eggs, lightly beaten
  • coconut for rolling
  • 1 2/3 cups sugar
  • 1/2 c water
  • a few drops lemon juice
  • 1c whipping cream
Method:
  1. First make the caramel sauce. Put the 1 2/3 cups of sugar into a very clean saucepan. Gently pour the water oer the sugar and add the lemon juice. Place pan over medium high heat with the lid on. Bring to a boil and let boil with lid on, removing and replacing the cover every so often. When all the water is boiled off, the sugar will be boiling with big bubbles breaking on the surface. The bubbles will gradually get smaller as the temperature rises. Remove the lid and pay attention now. The sugar will change colour - when it reaches a nice gold/ amber colour, remove it from the heat - don't let it get too dark or it will taste burnt. Add the cream carefully (it will bubble and steam like crazy). Have a wooden spoon ready and stir until well blended. Set aside to cool and thicken up a bit.
  2. Preheat oven to 350F. Line two baking sheets with parchment paper. Set aside.
  3. Beat together butter with 1 cup sugar until smooth and fluffy. Beat in vanilla.
  4. Add the flour a little at a time, then add the salt. Beat to combine.
  5. Roll dough into 1 1/4 inch balls. Dip each ball in the egg, then roll in coconut to coat. Place on prepared cookie sheet. Press to flatten a bit, then use your thumb to make an indentation in the center of the cookie. Repeat with remaining dough.
  6. Bake in preheated oven for 10 minutes. Repress indent with your thumb and then bake for another 9-10 minutes or until golden. Let cool on wire racks.
  7. When completely cooled fill indentation with a little of the caramel sauce, then sprinkle with sea salt.
 Yep, so that is all!! I am writing this to share with you while enjoying bacon rolls - like cinnamon buns, but savory!! Recipe to follow on world bread day - 3 days left! Can you wait that long?!

Happy Baking my Friends!


22.9.12

Mixed Greens with Wild Blueberry Dressing, Herbed Goat Cheese & Spiced Pecans


Hey Friends! I'm back in the kitchen now that my exam is over and I am so happy to be here! Hopefully I'll post more regularly and have time to start tackling some cool dishes that I've been wanting to do for a while. I'll share everything with you as I go. :)

Want to eat the best salad of your life? Make this salad!!! Seriously the best thing ever. Plus, it plates up beautifully so your dinner party guests will be wowed by how "fancy" it is. While it is a bit of work because you have to make all of the components prior to assembling your salads, if you prepare the components the day before, then you just have to plate it up when your guests come over. Its an awesome dinner party dish.


All of the below recipes are from the cookbook No more Secrets - recipes from the Cow Bay Cafe by Adrienne Johnston.

 First, make the spiced pecans.

Ingredients:
  • 3 tbsp corn syrup
  • 1 1/2 tbsp sugar
  • 1/2 tsp salt
  • 1 large pinch chipotle powder
  • 1 1/4 cups pecan halves
Method:
  1. Preheat oven to 325F. Line a baking sheet with parchment paper. Place a 30 cm piece of foil on a flat, heat-proof work surface (I used my cutting board).
  2. In a medium bowl, combine corn syrup, sugar, salt and chipotle powder. Add the nuts and mix well. Spread nuts on the prepared baking sheet in a single layer and bake for 12-15 minutes, stirring every five minutes until golden brown.
  3. Spoon them onto the prepared foil and cool slightly. Quickly separate the nuts and cool thoroughly. Store in an air-tight container.


Next, make the blueberry dressing.

Ingredients:
  • 1 cup frozen blueberries
  • 1/4 cup granulated sugar
  • 1/4 cup tarragon vinegar
  • 1 cinnamon stick
  • 1/2 tsp ground ginger
  • zest and juice of one lemon
Method:
  1. In a medium pot over medium-high heat, place the blueberries, sugar, vinegar, cinnamon stick, ginger and lemon zest and juice. Bring to a boil and simmer for five minutes. Then remove from heat and cool. Refridgerate until ready to use.
Then, make the herbed goat cheese.

Ingredients:
  • 1 small log goat cheese
  • 3 tbsp tarragon vinegar
  • fresh basil and tarragon
Method:
  1. Finely chop basil and tarragon. Combine goat cheese, tarragon vinegar and chopped herbs. Set aside in fridge.


Finally, assemble your salads when ready to serve (don't preassemble them).

Method:
  1. Toss mixed greens (approx 9 cups) lightly with olive oil, some kosher salt and fresh ground black pepper.
  2. Place a puddle of the blueberry dressing on a plate. Mound some of the greens onto the blueberry dressing.
  3. Place a few pieces of the herbed goat cheese and some of the pecans on top.
  4. Serve immediately.

Hope you enjoy this one!! We most definitely did. What's your favorite salad to make when you have dinner guests?

Happy Cooking my Friends!

17.9.12

Triple Berry Lemon Muffins for SRC


Well, its time for SRC's Group C reveal again (seems like that was the last time I even posted last month... shame on me). Super excited about the blog I had this month and wishing I had more time to test out recipes this month! I was assigned Mommy's Menu this month - Toni is a stay at home mom to seven children in Utah!! Can you believe that she still has time to blog? My excuses look pretty weak now! I absolutely love how creative her blog is and I loved the wide variety of recipes she had available to try. I settled on something quick and adapted it to what I had on hand, but I can't wait to come back and try out her Pumpkin Snickerdoodle Bars and her Strawberry Cheesecake Chocolate Chip Sandwich Cookies. Both of them looked amazing!!


I settled on making Toni's Lemon Raspberry Muffins (in a slightly adapted version using what I had on hand). The results were delicious! Hubby has been eagerly devouring these babies!! Check out the link for the unadapted recipe... see below for my adapted version. Both I'm sure would be equally as delicious!!

Triple Berry Lemon Muffins
Recipe adapted from Mommy's Menu

Ingredients:
  • 2 cups flour
  • 1 cup sugar
  • 3 tsp baking powder
  • 1/2 tsp salt
  • 2 eggs
  • 1/2 cup heavy cream
  • 1/2 cup water
  • 1/2 cup vegetable oil
  • zest of one lemon, finely grated
  • 1 cup fresh or frozen mixed berries (I used a mix of raspberries, blackberries and blueberries)
Method:
  1. Preheat oven to 400F. Grease 2 x 12 cup muffin tins (or line with paper liners). 
  2. In a large bowl, combine flour, sugar, baking powder, lemon zest and salt. Set aside. In a medium bowl, combine eggs, cream, water, and oil and mix until combined. Add all at once to flour mixture and stir until just combined. Add berries and fold through batter (don't over mix or you will have tough, pink muffins).
  3. Spoon mixture into prepared muffin tins, filling each tin approximately 2/3 of the way full. Bake in preheated oven for 18-22 minutes or until spring back slightly when lightly pressed.
  4. Let cool on a rack. Enjoy!


 So, thats that. Make these, they're amazing!! And check out Toni's blog - you'll find loads of recipes you need to make. I found her blog quite addicting - not unlike pinterest!! :) Thanks Toni for the great recipes to choose from - I'll definitely be back to snoop around some more (only this time I won't have to lurk!).


27.8.12

Choux Swans for the August 2012 Daring Bakers' Challenge


Hey Friends! How was your weekend? Mine was excellent - had a little fun hiking and baking and got a little accomplished by dejunking and organizing my garage yesterday. Got the satisfaction of hauling an entire truckload full of junk to the dump!! Woohoo! Any way, after a long hiatus, I am finally back and participating in the Daring Bakers' Challenge for the month!

Kat of The Bobwhites was our August 2012 Daring Baker hostess who inspired us to have fun in creating pate a choux shapes, filled with crème patisserie or Chantilly cream. We were encouraged to create swans or any shape we wanted and to go crazy with filling flavors allowing our creativity to go wild!

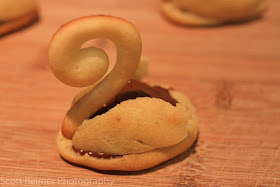
I didn't go too wild - I kept with the swan shape (or as good as I could manage any way...) and filled them with a mocha (chocolate & coffee) pastry cream. The result was an amazing tasting dessert. The pastry cream was a hit and I will make it over and over again!!


Pate a Choux
Recipe from the Daring Bakers' (can't be doubled)

Ingredients:
  • ½ cup (120 ml) (115 gm) (4 oz) butter
  • 1 cup (240 ml) water
  • ¼ teaspoon (1½ gm) salt
  • 1 cup (240 ml) (140 gm) (5 oz) all-purpose flour
  • 4 large eggs
Method:
  1. Line at least two baking sheets with parchment paper. Preheat oven to moderately hot 375°F/190°C/gas mark 5 .
  2. In a small saucepot, combine butter, water, and salt. Heat over  medium heat until butter melts, then remove from stove.
  3. Add flour all at once and beat, beat, beat the mixture until the dough pulls away from the sides of the pot.
  4. Add one egg, and beat until well combined. Add remaining eggs individually, beating vigorously after each addition. Resulting mixture should be somewhat glossy, very smooth, and somewhat thick.
  5. Using a ¼" (6 mm) tip on a pastry bag, pipe out about 36 swan heads. You’re aiming for something between a numeral 2 and a question mark, with a little beak if you’re skilled and/or lucky.
  6. Remove the tip from the bag and pipe out 36 swan bodies. These will be about 1.5" (40 mm) long, and about 1" (25 mm) wide. One end should be a bit narrower than the other.
  7. Bake the heads and bodies until golden and puffy. The heads will be done a few minutes before the bodies, so keep a close eye on the baking process
  8. Remove the pastries to a cooling rack, and let cool completely before filling.
 
 Next up, make the pastry cream:

Mocha Pastry Cream
Recipe minimally adapted from the Daring Bakers'

Ingredients:
  • 1 cup (225 ml.) whole milk
  • 2 Tbsp. cornstarch
  • 6 Tbsp. (100 g.) sugar
  • 1 large egg
  • 2 large egg yolks
  • 2 Tbsp. (30 g.) unsalted butter
  • 1 Tsp. Vanilla
  • 1/4 cup whole milk
  • 3 oz dark chocolate
  • 1 1/2 tsp instant espresso powder
Method:
  1. Dissolve cornstarch in ¼ cup of milk. Combine the remaining milk with the sugar in a saucepan; bring to boil; remove from heat.
  2. Beat the whole egg, then the yolks into the cornstarch mixture. Pour 1/3 of boiling milk into the egg mixture, whisking constantly so that the eggs do not begin to cook.
  3. Return the remaining milk to boil. Pour in the hot egg mixture in a stream, continuing whisking.
  4. Continue whisking (this is important – you do not want the eggs to solidify/cook) until the cream thickens and comes to a boil. Remove from heat.
  5. Combine 1/4 cup whole milk, chocolate and espresso powder in a small, microwave safe container. Microwave on low heat until chocolate is melted and mixture is smooth. Mix chocolate mixture, butter and vanilla into pastry cream and stir until smooth and incorporated. Chill until ready to use. 

 To assemble your swans:

  1. Take a swan body and use a very sharp knife to cut off the top 1/3rd to ½.
  2. Cut the removed top down the center to make two wings.
  3. Dollop a bit of filling into the body, insert head, and then add wings. 
  4. Your first attempt will probably not look like much, but the more you make, the more your bevy of swans will become a beautiful work of swan art.


Okay, so I'm not going to lie, these were a bit of work, but they weren't nearly as difficult or finicky as I thought they were going to be. My choux swans didn't puff up quite as much as I wanted and they didn't look as seamless as I thought they should once they were all assembled, but I was pleased with the overall result. Probably with a little practice, I could make some pretty cute little swans!!

Thanks so much Kat for hosting such a spectacular challenge! Great idea and it was fun to have something new and challenging to try out. :)

Happy Baking my Friends!

26.8.12

Summer Berry Flan


I'm not normally one to be too into making desserts with fruit. I like chocolate, cream, cake and other desserts, but normally I don't like to "pollute" them with fruit! However, this dessert is the exception - not only does it look beautiful and impressive to your guests, it tastes fantastic with the perfect balance of flavours and the berries don't "pollute" the dessert at all. They complement the rest of the dessert so perfectly. It was the aha moment where I determined that fruit has its place in dessert and that dessert can be just as decadent and delicious as non-fruit desserts. I'm hooked on this one! You should give it a try too. Its a bit involved, but the sense of satisfaction you get from making all components from scratch and the oooo's and ahhhh's you'll get from your friends and family will be well worth the effort. :)


 The beautiful thing about this dessert is that you can do so many variations to change it up - you could make a chocolate pastry cream and serve it with strawberries or cherries on top. Or you could do a tropical fruit tart with pineapple, papaya and toasted coconut... the options are endless!! What would be your go to flavour combination for this one?


Classic Fruit Flan
Minimally Adapted from Back to Baking by Anna Olson

Ingredients:

Tart Shell:
  • 1/2 cup unsalted butter, room temperature
  • 1/4 cup sugar
  • 2 egg yolks
  • 1/2 tsp vanilla
  • 1 cup flour
  • 1/4 tsp salt
  • 3 oz white chocolate
Pastry Cream:
  • 1 cup whole milk
  • 2 eggs
  • 1/4 cup sugar
  • 2 1/2 tbsp cornstarch
  • 2 tsp vanilla extract
  • 2 tbsp unsalted butter
Fruits:
  • 4 cups assorted fresh, tender fruits - I used raspberries, blueberries and strawberries
  • 1/4 cup apple jelly
Method:

Tart:
  1. Beat butter and sugar together until fluffy. Stir in egg yolks and vanilla. Stir in flour and salt until dough comes together. Shape dough into a disc, wrap in plastic and chill for at least 2 hours until firm.
  2. Preheat oven to 350F. Knead pastry dough on lightly floured surface to soften it a little bit. Dust the pastry with a little flour, and roll out just larger than your tart pan (make sure it has a removable bottom). Line pan with dough, trim edges. Chill pastry for 10 minutes in the freezer.
  3. Place the chilled tart pan on baking tray. Dock the bottom of the pastry shell with a fork, then bake in preheated oven for 16-20 minutes, until just the edges are golden brown and center of shell looks dry. Cool completely.
  4. Melt 3 oz white chocolate. Brush to coat bottom and sides of cooled tart shell. Chill the shell while preparing pastry cream.
Pastry Cream:
  1. Heat the milk in a heavy-bottomed saucepan until just below a simmer. In a small bowl, whisk the eggs, sugar and cornstarch. Whisk half of the hot milk into the egg mixture, then pour entire mixture back into the pot with the remaining milk. Whisk the custard constantly over medium heat until it thickens and just begins to bubble, about 3-4 minutes.
  2. Strain custard into a bowl, stir in vanilla and butter until melted, then cover bowl with plastic wrap so the plastic directly covers the surface of the custard. Cool custard to room temperature, then chil1 in the pan for at least 2 hours.
Assemble the Tart:
  1. Spoon the custard into the tart shell and spread it evenly. Top the custard with the fresh fruit, creaming an appealing design. Melt apple jelly in the microwave, then brush it over the fruit. Chill the tart in the pan until you are ready to serve. The tart can be stored in the fridge for up to one day.

So I told you it was a bit of work and I wasn't kidding, but its well worth the time and effort. Remember when selecing your fruits that some fruits turn brown (oxidize) upon contact with air. Those may not be best suited to this type of tart. Some examples of fruits that oxidize are - apples, bananas, peaches, and pears.

I hope you enjoy this one! Happy Baking my Friends!

25.8.12

Macaroni & Cheese Carbonara


Hi Friends! Happy Saturday - hope you have some fun stuff planned for one of the last weekends of summer. :) We are heading out hiking this morning on a 10 km adventure which I am looking forward to a lot. I hadn't planned on blogging this recipe - I made it for my sister's BF's birthday dinner last night, but a number of people are asking for the recipe - so here ya go! I've changed the recipe quite a bit from the original recipe, but we loved it. Hope you enjoy it too!
 

Macaroni & Cheese Carbonara
Adapted from Bobby Flay's Throwdown

Ingredients:
  • unsalted butter, for the baking dish
  • 1 tbsp olive oil
  • 8-10 strips of bacon, cut into bite size pieces
  • 4 cloves garlic, minced
  • 3 tbsp all purpose flour
  • 5 cups milk, hot (the recipe called for whole milk, but this is such a rich sauce recipe, skim or anything in between would also work here without impacting the taste)
  • 4 large egg yolks, lightly whisked
  • 2 tsp finely chopped fresh thyme leaves
  • 1/2 tsp cayenne pepper (or less if you don't like heat)
  • 3/4 cup grated asiago cheese + 1/3 cup for the top
  • 2/3 cup freshly grated parmesan cheese, + 1/4 cup for the top
  • 1 * 250g tub of McLaren's Sharp Cold Pack Cheddar Cheese
  • kosher salt & freshly ground black pepper
  • 1 lb elbow macaroni, cooked just under al dente
Method:
  1. Preheat oven to 375F. Butter the bottom and sides of a 9x 13 inch baking dish and set aside.
  2. Heat oil in a large saute pan (remember you need to be able to fit 5 cups of milk plus all that cheese in here later) over medium heat. Add the bacon and cook until golden brown and crisp, about 8-10 minutes. Remove with a slotted spoon to a plate lined with paper towels.
  3. Add the garlic to the remaining fat in the pan and cook until light golden brown, 1 minute. Whisk in the flour and cook for 1-2 minutes. Whisk in the hot milk, raise the heat to high, and cook, whisking constantly until thickened, about 5-6 minutes. Whisk in the eggs until incorporated (be careful here or you will end up with scrambled eggs!). Let cook 1-2 minutes. Remove from the heat and whisk in the thyme, cayenne and all three cheeses until completely melted. Season with salt and pepper to taste. If mixture is too thick, add additional warm milk, 1/4 cup at a time.
  4. Put the cooked macaroni in a large bowl, add the cheese sauce, reserved bacon and stir until combined. Transfer to prepared baking dish.
  5. Combine additional 1/3 cup asiago and 1/4 cup parmesan and sprinkle evenly over the top. Bake in preheated oven until heated through - about 15 minutes. Then broil for 3-5 minutes until top is browned and crisp. Remove from oven and let rest for 10 minutes before serving.
This recipe is a little involved for mac and cheese - Bobby Flay's recipes tend to be a little on the heavy side (think dirtying every dish in your kitchen) but well worth the effort and the cleanup later. I've tried a lot of mac and cheese recipes (check out my archives for this blog and you'll see what I'm talking about), but I think this is one of the best one's I've made to date. Hope you enjoy!

Happy Cooking my Friends! Enjoy your weekend. :)

20.8.12

Chocolate Peanut Butter Chip Cookies for SRC!


Hi Friends! Its time for Secret Recipe Club's Group C reveal again and you know what that means - I get to try out a new recipe from a new blog! This month I was assigned Erin's blog (yep, we have the same name) Making Memories with your Kids. I decided to make her Chocolate Pastel Mint cookies, but I didn't have mint chips, so I substituted peanut butter chips on top, plus I added some to the dough as well (because you can never have enough PB chips right?!). The cookies were a huge hit with my family!


Lets get right down to business, here's my version of the recipe (the only changes I made were to use PB chips instead and add some to the dough as well.

Chocolate Peanut Butter Chip Cookies
Recipe minimally adapted from Making Memories with your Kids

Ingredients:
  • 1 cup sugar
  • 1/2 cup butter, at room temperature
  • 1 egg
  • 2 tsp vanilla
  • 1 1/2 cups flour
  • 1/2 cup dutch process cocoa powder
  • 1/4 tsp baking soda
  • 1/4 tsp baking powder
  • 3/4 cup peanut butter chips + extra for topping the cookies with
Method:
  1. Preheat oven to 350F.
  2. In the bowl of the stand mixer, cream together butter and sugar until smooth and fluffy. Add egg and vanilla and mix until well combined.
  3. Add flour, cocoa powder, baking soda & baking powder. Mix until just combined. Add in peanut butter chips until just combined.
  4. Roll cookies into 1 inch balls and place on an ungreased cookie sheet. Bake in preheated oven for 12 minutes or until just set (don't over cook them or they will be dry). Remove from oven and immediately top with 5-6 more peanut butter chips, pressing into the soft cookies slightly.


Thats it! Easy to  make, basic ingredients and only dirties one bowl! Whats not to like? Thanks Erin for a fantastic recipe. :)

19.8.12

S'mores bars with Nuttella Marshmallows


I've been meaning to make marshmallows  for quite a while now. Then the other day (national s'mores day) Bon Appetit featured the top 10 s'mores recipes from various food blogs and there was one from Cherry Tea Cakes for S'mores bars where you made the marshmallow layer from scratch. I was pretty stoked to make them right away. I changed the recipe slightly by putting nuttella flavour into the marshmallow layer and putting peanut butter in the top chocolate layer, but other than that I was quite true to the original recipe. They are addictive and delicious and you've got to make them this summer. Its well worth the effort.


Graham Layer
Minimally adapted from Cherry Tea Cakes

Ingredients:
  • 2 1/2 cups + 2 tbsp all purpose flour
  • 1 cup golden brown sugar, lightly packed
  • 1 tsp baking soda
  • 3/4 tsp kosher salt
  • 7 tbsp cold, unsalted butter
  • 1/3 cup agave syrup
  • 5 tbsp low fat milk
  • 2 tbsp vanilla extract
Method:
  1. Add flour, sugar, soda, and salt to the large bowl of the food processor. Pulse a couple of times to combine. Add the butter and pulse until the mixture is crumbly and butter is evenly distributed through the dry ingredients.
  2. Whisk together the agave, milk and vanilla until combined. Add to the flour mixture and pulse until just combined.
  3. Press mixture into a 9x13 inch rectangle baking dish that has been lined with parchment paper.
  4. Preheat oven to 350F. Bake in preheated oven for 20-25 minutes or until semi-firm to the touch. Remove from oven and set aside to cool. Make the marshmallow layer while it cools.
Marshmallow Layer
Minimally adapted from Cherry Tea Cakes

Ingredients:
  • 1 1/2 packages unflavoured gelatin
  • 1/2 cup ice cold water, divided
  • 3/4 cup granulated sugar
  • 1/2 cup corn syrup
  • 1/8 tsp kosher salt
  • 1/2 tsp vanilla extract
  • 2 heaping tbsp nuttella
Method:
  1. Fit stand mixer with whisk attachment. Combine 1/4 cup cold water and the gelatin in the bowl of the mixer and leave to sit while you make the syrup.
  2. In a medium saucepan, combine 1/4 cup ice water, sugar, corn syrup and kosher salt. Cover and cook on medium heat for 3 minutes. Don't worry about stirring it.
  3. Remove the lid and attach candy thermometer to the side of the pan. Boil for approximately 7 minutes or until the mixture reaches 240 degrees and then remove from heat immediately.
  4. Put stand mixer on low speed and churn the gelatin mixture for a couple of turns. Then with mixture still on low, slowly pour in the hot syrup mixture (BE CAREFUL, THE MIXTURE IS EXTREMELY HOT AND CAN BURN YOU).  When all the syrup is incorporated, cover the front and sides of the mixer with a tea towel and turn the mixer up to high speed. Continue to whip until mixture is luke warm - 12 minutes. In the last minute of whipping, add vanilla and nuttella and mix until incorporated.
  5. Pour marshmallow cream onto the graham cracker base. Sprinkle lightly with powdered sugar.
  6. Let set for 1 hour before topping with chocolate peanut butter layer.


Chocolate Peanut Butter Layer
Minimally adapted from Cherry Tea Cakes

Ingredients:
  • 3/4 cup semi sweet chocolate chips
  • 4 tbsp peanut butter
  • 1 tbsp corn syrup
  • 1/4 tsp vanilla
Method:
  1. Combine all ingredients in microwave safe bowl. Microwave on low heat at 30 second intervals stirring well each time until mixture is completely melted. Pour over marshmallow layer and spread evenly.
  2. Allow to set for a few hours. Enjoy!

So, these are a little bit of work, but they're delicious. I highly recommend making them as a dessert for one of your end of summer get togethers with friends and family. It makes a nice big pan of squares that will feed lots of people.

Happy Baking my Friends!