Pages

29.4.12

Heavenly Iced Coffee!

I don't know about you, but when the warm spring and summer days hit, nothing tastes better to me than a delicious, creamy iced coffee! When you make it at home it just doesn't taste the same as when you get one from your favorite coffee shop. This recipe will teach you how to make one that tastes just like the one you get from the coffee shop with way less fat and sugar and for a fraction of the price! Plus, once you make the coffee base, it keeps in your fridge for a month, so you can enjoy iced coffees for weeks before having to make another batch. :)

This recipe uses the cold brew method of brewing coffee which takes a long time, but avoids the bitterness of hot brewing coffee, so its well worth it. Start making these the evening before you want to enjoy.


I found  this recipe/ method on Craving Comfort with the Homesteading Housewife. If you have a chance, head over there for some lovely photos and some great recipes.

You can make this recipe in smaller or larger batches depending on your coffee consumption rate!! The ratio is 1 oz coffee beans to 1 cup of cold water.

Creamy & Sweet Iced Coffee
Recipe minimally adapted from Craving Comfort

Ingredients:
  • 8 oz coffee beans, coarsely ground just before using
  • 8 generous cups of cold water
  • cheese cloth
  • 1 can fat free evaporated milk
  • 1/2 can low fat sweetened condensed milk (1.5g fat per serving)
Method:
  1. Combine coarsely ground coffee with the cold water in a large bowl. Stir to ensure all coffee grounds are moistened. Leave sit 8 hours or overnight.
  2. Line a fine mesh sieve with a few layers of cheesecloth (3-4) or with a coffee filter (you may need to change the coffee filter several times while filtering). Pour coffee mixture through the lined sieve until completely drained. Chill coffee base in fridge and discard the grounds.
  3. Mix together the evaporated milk and sweetened condensed milk. I combined mine in a salad dressing container that mixed everything together nicely.
  4. Fill a tall glass with ice and find a pretty straw. Fill glass 3/4 full with coffee mixture then top remaining room with the milk mixture. Stir and enjoy! You won't ever have to buy iced coffee again!! 

You can also experiment with different flavours of coffee beans. The second time I made this one I used 3 1/2 oz of hazelnut cream flavoured beans and the remaining 4 1/2 oz of beans I used just plain regular coffee beans. It was delicious! Some of the other flavours I want to try out are vanilla, bavarian chocolate, and irish cream. Using 3 1/2 ozs resulted in a very prominent flavour, so if you are after a more subtle flavour try starting with 2 - 2 1/2 ozs of flavored beans. This adds extra flavour to your coffee without adding extra calories!


Hope you enjoy this one! I know I definitely did. I've made it twice now and even my hubby enjoys it and he's not nearly the coffee fanatic I am. Cheers!

23.4.12

Birthday Cake Oreo Cookie Bark & Zucchini Carrot Cake for SRC


Guess what? Its time for Secret Recipe Club again! And I'm super excited about my assignment this month. This month I was assigned Mom's Crazy Cooking written by Tina. Tina is amazing! I follow her blog regularly and am always in awe of the delicious recipes she makes and how frequently she posts. In addition to her crazy blogging, Tina also hosts the Crazy Cooking Challenge every month which I have recently started participating in. What fun! If you're looking for another cooking challenge to join with supportive and friendly participants, check this challenge out!!

With all of Tina's delicious recipes, I couldn't just choose one... so I made Cookie Bark and Zucchini & Carrot Cake with Lemon Cream Cheese Frosting. I've posted the recipe for Cookie Bark below because I adapted it slightly, but for the Zucchini & Carrot Cake I didn't change a darn thing but the presentation, so I'm going to send you over to Tina's blog for that recipe.

Birthday Cake Oreo Cookie Bark
Recipe minimally adapted from Mom's Crazy Cooking

Ingredients:
  • 1 lb milk chocolate melting wafers
  • 1 lb white chocolate melting wafers
  • 5 birthday cake 100th anniversary oreo cookies
  • 1/3 cup mini chocolate chips
Method:
  1. Melt 1 lb milk chocolate melting wafers in the microwave, stirring at 40 second intervals until mixture is smooth. Spread into a thin layer on a piece of parchment paper. Set aside at room temperature until completely set (mine took about 15 minutes, but can take up to an hour if you live somewhere warm).
  2. Melt 1 lb white chocolate melting wafers using the same method as above. While the chocolate is melting, roughly chop the oreo cookies and set aside.
  3. Spread melted white chocolate onto milk chocolate layer and immediately sprinkle with the oreo cookies and the mini chocolate chips, pressing in lightly. Let set completely - about an hour. Then break into rough pieces to serve.
*NOTE: Don't put chocolate in the freezer to set - otherwise the top layer of chocolate won't adhere as well to the base layer and your bark will break into separate layers when you break it into pieces. Be patient and let it set at room temp!!


It makes quite a lot of bark, but it goes fast!! So if you're having a party with lots of friends, you might want to double the recipe. :)


 And here is a picture of my zucchini carrot cake with lemon cream cheese frosting - I cut out circles of cake using a round cookie cutter and then topped with an ice cream scoop of frosting. Then I finished it with a light sprinkle of icing sugar. Simple and beautiful! This would make the perfect plated dessert to wrap up a dinner party - and just between us - this is super easy to make!!


Happy Baking my Friends! Hope you'll use the  blog hop to check out what all the other Group C'ers made for this month's challenge. You might find a new blog or two to follow!! :)
22.4.12

Snickerdoodles... sort of!


Good morning friends! Thanks for stopping by. I'm just hanging out with two lovely Golden Retrievers and my delicious iced coffee (check back later this week for that amazing recipe) on this beautiful Sunday morning. Not quite as beautiful as yesterday morning, but still great!

I know I haven't been putting as much effort into my blog lately as I would like to, but sometimes life just goes that way doesn't it?

Here's what I've been up to lately:

Coming to the end of a crazy and insane busy season at the accounting office I work for. It seems so much crazier than last year... not sure why, but it just is. The last two weeks, I haven't been working quite as many hours, but I'm still feeling a tad burnt out. I have also been getting more responsibility on the enagement's I've been staffed on and that seems to come with more stress and accountability, so I have been learning to adapt to that role without going crazy from the increased stress!!

For the past five weeks I've been trying to change my lifestyle so that I can lose some weight, get more active and just generally improve my health. You can imagine how tough that is with all this delicious baking around... but it is necessary... my goal is to lose 53 lbs over the next year. So far in five weeks I've lost 15.2 lbs and lost 13.5 inches. I'm pretty proud of that accomplishment and hope it continues to come off that quickly! I've been getting more exercise and trying to make my health a priority. So, you may see more healthy recipes coming through here in the future (don't worry, I'll still post yummy and sinful recipes too, just probably not as many!!).

I'm also in the final year of getting my CA (chartered accountant) designation. Its a stressful year - I have to pass two more modules - one of which is known to be very technical and diffucult - in order to qualify to write the final UFE (uniform final examination). So, this summer is going to be filled with studying for the UFE and to pass those courses. I'm just praying I pass everything in the first go so I can say goodbye to this stressful part of my life and move on to a life that is non-student!!


But, enough about me for now! Lets get to this yummy recipe! These aren't traditional snickerdoodles, but I'll give a suggestion below on how to make them taste more traditional. If you make the recipe as is, they will taste more like a sugar cookie coated lightly with cinnamon and sugar. They are delicious as is, but not traditional tasting!

Snickerdoodles... sort of!
Recipe adapted from Anna Olson's Back to Baking

Ingredients:
  • 1 cup butter, softened
  • 1 cup sugar
  • 2 eggs
  • 2 tsp vanilla extract
  • 2 1/2 cups all purpose flour
  • 1 tsp cream of tartar
  • 1 tsp cinnamon (add this in for more traditional tasting snickerdoodles - note this was not included in the original recipe, so omit if you want a less traditional snickerdoodle)
For the coating:
  • 1/2 cup sugar
  • 1 1/2 tsp ground cinnamon
Method:
  1. Preheat oven to 350F and line two baking trays with parchment paper.
  2. Cream the butter and the sugar together until fluffy (about 2-4 minutes). Beat in eggs one at a time until well blended. Add vanilla extract and stir until incorporated.
  3. In a separate bowl, combine the flour, cream of tartar and cinnamon (if using). Add to the butter mixture and blend well (don't over mix of you will get tough cookies).
  4. For the cinnamon sugar coating, in a small bowl mix both ingredients together well. Using a large cookie scoop, scoop out portions of the dough and roll them into balls and then roll in the cinnamon sugar mixture to coat completely. Place on a baking tray and press lightly to flatten them.
  5. Bake in preheated oven for 15-17 minutes, depending on the size of your cookies. As soon as the edges start to turn light brown, they are done. You want the center of the cookie to still look soft. Don't worry - it will finish cooking once you take it out of the oven and will be completely cooked on the inside.


And thats that! Those are easy cookies to whip up in an evening. Your family will love them... I mean, who doesn't love Snickerdoodles?!

Sorry for the long post today! I just wanted you to know whats been going on with me, especially since I haven't written much on my blog lately. Hope you enjoy this recipe! I've got the Secret Recipe Club April challenge going up on Monday (its a good one that I'm really excited about!!!), and the Daring Bakers' Challenge going up on the 27th, so its going to be a delightful week of recipes. Hope you'll stop by to check them out.

Happy Baking my Friends!

20.4.12

Zucchini Parmesan Crisps {Healthy, Low Fat}

Okay, I promise, I do have better pictures coming for you this weekend!! But, I really have to share these with you. Head over here to see good pictures of these darling little zucchini parmesan crisps. They are so easy and quick and pack a real punch of flavour.

I made these little guys as a vegetable side dish for our Easter dinner and they were a total hit. We definitely didn't have any leftovers. You could make these for a great snack or picky food at a party too if you're looking for a healthier dish to put out for health conscious guests.


We're going to keep this post nice and short because its Friday night and I want to relax and unwind from my week at work! So here's the recipe for you to try out this weekend. Pin this one for this summer when you've got an overabundance of zucchini growing in your garden that you don't know what to do with!

Zucchini Parmesan Crisps
Recipe from Blackjack Bake House

Ingredients:
  • 1 lb zucchini (about 2 medium or 3 small)
  • 1/4 cup shredded parmesan
  • 1/4 cup panko bread crumbs
  • 1/2 tbsp olive oil
  • 1/4 tsp kosher salt
  • freshly ground black pepper to taste
Method:
  1. Preheat oven to 400F. Line two baking sheets with parchment paper and set aside.
  2. Slice zucchini into 1/4 inch thick rounds. Toss rounds with oil to coat them well.
  3. In a shallow bowl, combine the parmesan, panko, salt and black pepper.
  4. Place rounds into parmesan breadcrumb mixture and press each side into the mixture to coat well. The mixture won't completely cover the zucchini, but don't worry, it will taste great!
  5. Place rounds on prepared baking trays in a single layer. Sprinkle remaining breadcrumb mixture onto rounds.
  6. Bake in preheated oven for about 15-20 minutes or until golden brown.
Pretty easy right? And as long as you take it easy on the oil and the cheese, these are actually a really healthy dish to serve up. I don't really ever feed kids, but since my hubby eagerly devoured these and he really hates veggies (especially zucchini), I think kids would like them too!

Happy Cooking my Friends!

17.4.12

Maple & Ham Scones


If you ever make ham for your family, I'm sure you are well aware that you always have leftovers. And while leftovers are fun in their original form the next day or so, they quickly become monotonous and may even go to waste. Not with this recipe though!! Ohhhh are these ever good. I was inspired by the maple scalloped potatoes I made for easter and thought if they went well with ham, so would maple syrup, in scones! Oh yah, I did that!


I LOVE Anna Olson's scone recipes! They always turn out so light and delicious. So I flipped to my favorite recipe of hers for Apple Cheddar Walnut Scones and heavily adapted it to serve my purpose. Here's my rendition of the recipe made with Ham & Maple.

Ham & Maple Scones
Recipe adapted from Anna Olson's Back to Baking

Ingredients:
  • 1 2/3 cups all purpose flour
  • 2 tbsp pure maple syrup, plus extra for brushing
  • 1 tbsp baking powder
  • 5-6 tbsp butter, cut into small pieces and chilled
  • 1/3 cup finely grated asiago cheese
  • 9 oz leftover ham
  • 1/2 cup heavy cream, plus extra for brushing
Method:
  1. Preheat oven to 400F and line a baking tray with parchment paper.
  2. Pulse the flour and baking powder together in the bowl of a food processor until combined. Cut in the butter until the mixture is crumbly, but pieces of butter are still visible. Remove from the food processor into a medium bowl and stir in the cheese and 1/2 of the ham until coated. Add the heavy cream and the maple syrup and stir until dough starts to come together. Turn out on work surface. Knead lightly until dough comes together fully, being careful not to overwork. Lightly pat dough out into 1/2 inch thick square. Sprinkle with remaining ham pieces and press lightly into the dough. Fold the dough in half, pressing the ham in at the same time. Repeat process until you've worked in about 4 folds.
  3. Shape dough into a square, about 8 inches by 8 inches. Cut the dough into 16 pieces and place on prepared baking tray.
  4. Stir together about 2 tbsp heavy cream and 2 tbsp maple syrup. Brush tops of scones with mixture and bake in preheated oven for about 12-15 minutes, or until they are a rich golden brown.

I baked these for hubby to take to his guys weekend last week and they were a hit!! I have been asked to kindly make these again next time I make a ham. Hope you enjoy these - they're a little different than your usual scone combination, but they work. :)

Happy Baking my Friends!

14.4.12

Bacon & Maple Scalloped Potatoes

Alright, to get things started today - please defer to my last post for my excuses for the horrible photo quality and lack of photos in this post. I wouldn't be sharing this with you except that it tasted so good that I just can't resist.

I made these Bacon & Maple Scalloped Potatoes for our Easter dinner and they were soooo unbelievably delicious. I normally don't like Kraft recipes because of the overabundance of processed food they promote, but this recipe wasn't too bad and with a few minor swaps I found myself a dish that I will make over and over again.

Bacon & Maple Scalloped Potatoes
Recipe minimally adapted from Kraft Recipes

Ingredients:
  • 1 yellow onion, diced
  • 4 oz low fat cream cheese
  • 1 1/4 cups reduced sodium chicken broth
  • 1/2 cup milk
  • 7 slices lazy maple bacon
  • 1/4 cup pure maple syrup
  • 2 lbs baking potatoes, peeled and very thinly sliced
  • 1 cup sharp cheddar cheese, shredded
Method:
  1. Heat oven to 400F. Cook bacon until crisp in a frying pan over medium heat. Set aside on some paper towel to drain. Remove all but 2 tbsp of the bacon drippings from the pan. Return the pan to medium heat and add the onions. Sautee five minutes until very tender, stir frequently. Remove the onions from the skillet and set aside.
  2. Add the cream cheese, broth and milk to the skillet and heat until the cream cheese has melted nicely into the sauce. Stir with a whisk until sauce is smooth and creamy. Remove from heat and crumble the bacon into the sauce and add the maple syrup. Stir well.
  3. Place half the potatoes in a 9x13" baking dish in an even layer. Cover with a layer of onions and sprinkle with cheddar. Top with a layer of potatoes and repeat layers of onions and cheddar. Finally end with a last layer of potatoes. Pour bacon-maple sauce over potatoe layers. Cover tightly with foil and bake for 1 hour and 15 minutes, removing the foil after 50 minutes in the oven. Potatoes are done when top is golden brown and potatoes are tender.
We really, really enjoyed this one! My hubby doesn't normally eat leftovers, but he eagerly gobbled these potatoes up in the few days following Easter. :) I love the new twist on what is usually such a tried and true classic dish.

This post has been linked up with the Recipe Party over at the Sweet Spot. Stop by and check out what other bloggers have whipped up this week.
Happy Cooking my Friends!

11.4.12

Baked Brie & Pear Feuilletés

I have to apologize... my photos in my next couple of posts are going to leave something to be desired. They are from my Easter dinner and I did not get time to snap many photos... just what I could sneak in with my iPhone while serving my family. So, take it from me - even if my photos aren't beautiful, the recipes are delightful. So read on my friends!

If you're ever in need of a quick, but impressive appetizer, make this yummy Baked Brie & Pear Feuilletes (feuilletes is a french term for any appetizer served on puff pastry in case you're wondering). It tastes amazing and comes together really quickly. Assemble and bake when your guests arrive and they will definitely be impressed. 


Are you ready? Here's how easy this is:

Baked Brie & Pear Feuilletes
Recipe adapted from ziplist.com

Ingredients:
  • two sheets puff pastry, thawed
  • 1 ripe pear, thinly sliced
  • 1/2 cup pecan halves
  • 4 oz brie (with rind on)
  • freshly ground black pepper
Method:
  1. Preheat oven to 375F. Line a large baking tray with parchment paper. Set aside.
  2. Roll out the first sheet of puff pastry then place on the baking tray. Repeat with the second piece (should be about 1/4 inch thick). Sprinkle with half the brie, then arrange the pear slices artfully on top. Sprinkle with the pecans and then the remainder of the brie. Top with a bit of fresh ground pepper.
  3. Bake in the preheated oven until the puff pastry is golden brown and the cheese is melted, about 15-20 minutes.
Yep, thats it. While your guests are enjoying their first glass of wine, your house will be smelling heavenly while this divine appy bakes up.

Give it a try. Your guests will thank you. :)

This post has been linked up with the Recipe Party over at the Sweet Spot. Head on over to see what other bloggers baked up this week. :)
Happy Baking my Friends!

9.4.12

Coconut Topped Buttermilk Brownies with Chocolate Buttermilk Frosting


Stop right there!! Don't scroll down to the recipe yet... pause and have a look and these beautifully lit photos my darling hubby captured for me. He got up early to get great lighting for me while I was heading off to work. What a sweetie?! He totally deserves mad props in my opinion!!

These little beauties are coconut topped buttermilk brownies finished with a chocolate buttermilk frosting. Yah, I may have had some buttermilk leftover from another recipe I was trying to use up, but it turned out to be a great success. These were eagerly devoured by my co-workers and my hubby's co-workers (did I mention the recipe made wayyyy more than I thought?!). These even started a little rivalry between husbands at my hubby's workplace.. turns out another wife had sent in baking that day too... cookies. It ended with one of his co-workers (who shall remain nameless), telling my hubby that my cupcakes were way better than so-and-so's wife's cookies... whoops!! Maybe we should plan which days we are allowed to send in baking so we don't step on any toes?!


Don't even think about how much work these may be... just go out, get the ingredients and get to it!! They are soooo worth the effort. :)

Coconut Topped Buttermilk Brownies with Chocolate Buttermilk Frosting
Brownie recipe adapted from Bake Space
Coconut topping from In Katrina's Kitchen
Frosting Recipe by me

Ingredients:
Brownies:
  • 2 cups all purpose flour
  • 1 cup granulated sugar
  • 1 cup packed brown sugar
  • 1 tsp baking soda
  • 1 cup butter
  • 1/3 cup unsweetened cocoa powder
  • 1 cup water
  • 2 eggs
  • 1/2 cup buttermilk
  • 1 tbsp vanilla
Coconut Topping:
  • 4 1/2 cups shredded coconut
  • 1 small can sweetened condensed milk
  • 1 1/4 cups icing sugar
Frosting:
  • Find the frosting recipe here. Substitute 1/3 cup of the icing sugar for 1/3 cup of cocoa powder for a chocolate version of the same frosting.


Method:
  1. To make the brownies: Preheat the oven to 350F. Line 3 - 12 cup muffin tins with paper liners. Set aside. In a large bowl, combine the flour, granulated sugar and baking soda.
  2. In a medium saucepan, combine brown sugar, butter, cocoa powder and water. Bring mixture just to boiling, stirring constantly. Remove from heat. Add the chocolate mixture to the flour mixture and mix until all of the flour is incorporated. Add the eggs, buttermilk and vanilla. Whisk until mixture is smooth and silky (it will be quite thin). Fill prepared muffin tins 1/3 - 1/2 way full. Bake in preheated oven for 10-14 minutes (or until tops spring back lightly when touched). Do not overbake or they will be dry. Err on the side of slightly underbaked as they will continue to cook after they are removed from the oven.
  3. Cool on a wire rack.
  4. While brownies are cooling, prepare coconut topping by combining all three ingredients and stirring until evenly distributed. Mixture should be quite stiff. Once cupcakes are cooled, form 1-2 tbsp portions of the coconut mixture into disks and fit them on top of the cupcakes, pressing down gently to adhere them to the cakes. Repeat until all cupcakes have been fitted with a coconut disk.
  5. Prepare the frosting and frost cupcakes however you like. 


This post has been linked up with the Recipe Party over at the Sweet Spot. Head on over to check out what other goodies fellow bloggers have whipped up this week.

Yep, these are pretty incredible!! :) :) Hope you'll take the time to try them out. Happy Baking my Friends!

7.4.12

Blueberry Earl Grey Muffins for the Crazy Cooking Challenge


 After sitting the last Crazy Cooking Challenge out, I've had a chance to get back into the swing of things. I'm super excited to be participating in this month's challenge - to make the Ultimate Blueberry Muffin. And I think I've done it - Blueberry Earl Grey muffins with a Lemon Earl Grey Glaze! Yep, a little over the top, but none-the-less, delicious. My sister thinks these taste like a london fog from a fancy coffee shop and my good friend K thinks these taste like "Afternoon Tea".

Photobucket

If you're wondering what the Crazy Cooking Challenge is - every month a group of bloggers gets together and tries to find the Ultimate version of an every-day favorite dish. Some of the past challenges have been chocolate cake, spaghetti with red sauce, macaroni & cheese, and others. If you're interested, head on over to Mom's Crazy Cooking and check out Tina's informative page.


It is really funny - this month I was browsing around and I was inspired by the same blog I was in the month we did the Ultimate Chocolate Cake! I didn't realize it at first until I went to look up the recipe again to write this post. So funny to see how I am constantly drawn to the same style of blogs and recipes. :) Any way, the blog I'm featuring is Raspberri Cupcakes. Its great! Head on over to check out some of the yummy treats she has been baking up.

Blueberry Earl Grey Muffins
Recipe adapted from Raspberri Cupcakes

Ingredients:
  • 4 earl grey tea bags
  • 1 cup milk
  • 2 1/2 cups flour
  • 2 tsp baking soda
  • 3/4 cup brown sugar
  • 2 tsp vanilla
  • 1/2 cup butter, melted
  • 2 eggs lightly whisked
  • 1 heaping cup blueberries
  • 1/2 cup icing sugar
  • 1 earl grey tea bag
  • juice of one lemon
Method:
  1. Warm the milk until nearly boiling. Remove from heat and add first four tea bags. Steep and let cool for one hour. Remove tea bags and discard.
  2. Preheat oven to 350F. Line a 12 cup muffin pan with paper liners. Place the flour and baking soda in a large bowl. Add the milk, vanilla, brown sugar, butter and eggs. Stir gently to combine. Fold in blueberries. Spoon evenly into prepared muffin pan. Bake in preheated oven for 25-27 minutes until a skewer comes out clean. Don't overbake these muffins or they will dry out.
  3. Cool on a rack. While muffins are cooling, prepare the glaze. Mix the icing sugar, earl grey tea and juice of one lemon together in a bowl until it reaches the desired consistency to drizzle on the muffins (you may have to add more icing sugar or more lemon juice, but adjust it til you like the consistency).


This post has been linked up with the Recipe Party at the Sweet Spot. Head over and check out the other goodies bloggers have linked up this week.
Thanks for stopping by! Hope you enjoy my version of the Ultimate Blueberry Muffin! I know we did. :)
Happy Baking my Friends!

4.4.12

Mini Egg Cupcakes just in time for Easter


Hoppy Easter friends!! :) Sorry, I know that was corny, but I love Easter. Yes, I know the true meaning of Easter (not the coming of the Easter bunny), but the reason I absolutely love Easter revolves more around family activities that I grew up with. We would always go to church as a family to reflect on the true reason for Easter and then we would go over to my grandparents house with our other 10 cousins and have an Easter egg hunt! We would all work together to find our Easter treats that had been carefully hidden in my grandparents' backyard (did I mention it was a HUGE backyard?!!). Needless to say, it was a task that kept us occupied until Easter dinner was ready. My grandma put on quite the show - making everything down to homemade mustard to go on the delicious ham. Yep, it was a lot of fun and cultivated such great memories of our family.

 Since I love Easter and the cute little treats that go along with it, you can imagine my excitement when all these cute Easter treats started showing up on Pinterest. I created these cupcakes based on some inspiration from here. Mine are a little different, but I'm really happy with how they turned out. Here is the recipe I used:

Mini Egg Cupcakes
Recipe adapted from Joy of Baking

Ingredients:
  • 2 large eggs
  • 1 3/4 cups cake flour
  • 2 tsp baking powder
  • 1/4 tsp salt
  • 1/2 cup butter, at room temperature
  • 1 cup white sugar, divided
  • 2 tsp vanilla extract
  • 1/2 cup buttermilk
  • 1/8 tsp cream of tarter
  • 1/2 cup Cadbury's Mini Eggs, roughly chopped
Method:
  1. Preheat oven to 350F. Line a 12 cup muffin tray with paper liners.
  2. Separate the eggs placing the egg whites in the bowl of a stand mixer. Using the whisk attachment, whip the egg whites on medium-high speed until frothy. Add the cream of tartar and continue to whip until soft peaks form. Gradually add 1/4 cup granulated sugar while mixer is moving and continue whipping until stiff peaks form. Scrape into a medium bowl and set aside for later.
  3. In another medium bowl, whisk together the flour, baking powder and salt. Set aside for later.
  4. In the bowl of an electric mixer beat the butter until fluffy (about two minutes). Add 3/4 cup of sugar and beat until fluffy. Scrape down the sides of the bowl and add egg yolks one at a time, beating well after each addition. Scrape down sides of the bowl and add vanilla. With the mixer on low speed, add the flour mixture in three additions, alternating with the buttermilk, beginning and ending with the flour mixture. Once just combined, fold in the mini eggs. Then fold in the egg whites, being careful not to overmix or the batter will deflate.
  5. Divide batter equally among the prepared muffin tin. Bake 18 minutes or until tops spring back when lighly pressed. Do not overbake!!
  6. Frost with buttermilk frosting (recipe below) and garnish with three mini eggs for each cupcake.
Buttermilk Frosting
Recipe by me

Ingredients:
  • 3 cups icing sugar
  • 2 tsp vanilla extract
  • 1/2 cup butter, softened
  • 1/8 - 1/4 cup buttermilk
Method:
  1. Beat butter in the bowl of stand mixer on medium-high speed. Add icing sugar and vanilla and mix until well incorporated. Add buttermilk 1 tbsp at a time until frosting is the right consistency for piping.

Thats that! The buttermilk frosting tastes a lot like a cream cheese icing, but with a far better piping consistency. Give these a try this weekend for your Easter get together whether its for friends or family or both. They're sure to be a hit.

This post has been linked up with the Recipe Party at the Sweet Spot. Head on over there and check out what other treats bloggers have linked up this week.

Happy Baking my Friends!

2.4.12

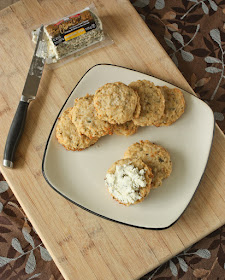
Savory Oatmeal Cookies


I have a confession to make... I'm pretty obsessed with Pinterest. I may have disclosed this at some point in the past couple of months, but seriously, this obsession has gotten worse (yes, I'm aware gotten isn't proper english and this is my caring face heehee). Any way, seriously, I check out Pinterest first thing when I wake up in the morning, at lunch time in the office, and of course lying in bed at night before I go to sleep. Now that I have the Pinterest app on my phone... well, my obsession has intensified. On one of my many Pinterest binges, I came across these amazing looking savory oatmeal cookies. And this weekend I finally got around to making them. I made some minor changes to the recipe, and the result was glorious!!

Savory Oatmeal Cookies
Recipe very slightly adapted from the Kitchn.com

Ingredients:
  • 1 cup steel cut oats
  • 1/4 cup warm water
  • 1/3 cup extra virgin olive oil
  • 1/3 cup honey
  • 1 large egg, beaten
  • 1 cup all purpose flour
  • 1/4 tsp baking soda
  • 1 tbsp finely chopped fresh rosemary
  • 1/2 tsp freshly ground black pepper
  • 1 cup finely grated parmesan cheese
  • kosher salt for sprinkling
  • Roasted garlic goat cheese
Method:
  1. Preheat oven to 350F. Line large baking tray with parchment paper.
  2. Place oats in a large bowl and sprinkle with warm water. In a smaller bowl, combine the olive oil, honey, and egg until well mixed. Pour mixture over the oats and stir to combine. Set mixture aside.
  3. In another mixing bowl, combine the flour, baking soda, rosemary and black pepper. Whisk until well incorporated. Then gently stir in the parmesan cheese. Add the flour mixture to the oat mixture and stir until blended (try not to overmix).
  4. Scoop onto prepared baking tray (I did about 1/8 cup portions or the size of an ice cream scoop). Flatten slightly then sprinkle with kosher salt.
  5. Bake 18 minutes or until edges are lightly browned. Remove from oven and cool on wire rack.
  6. Once cookies are cooled, serve spread with roasted garlic goat cheese.


Yep, they're pretty easy and use very basic ingredients that you probably already have in your pantry and fridge. These are a great snack or starter to a yummy dinner and pair really well with white wine. If you have a chance, head over to the Kitchn to check out other delicious recipes and some great tips.
This post has been linked up with the recipe party over at the Sweet Spot! Head over and check out all the amazing Easter Goodies that have been linked up with the party. :)

Happy Baking my Friends!!